
Build a Web dApp Algorand Wallet Interface Using Reach and Vue
A web dApp wallet interface using Reach & Vue (with or without Vuex), that connects to and funds an Algorand account. It can be used as a starter project for a full-fledged web dApp built with Reach-ALGO smart contracts.

 JavaScript
Requirements
- node package manager
- Vue’s Command Line Interface, which scaffolds the project, compiles vue files, runs a development server, and produces minified builds for distribution
- The Reach JS stdlib, whose installation information is included below in Project Set-Up. The Reach stdlib provides a front-end interface to connect to wallets and deploy/attach to Reach smart contracts.
- The Reach executable, used to develop Reach programs, verify them, and compile to TEAL 3 and ETH. The Reach executable depends on make, Docker, and Docker Compose. The executable can be installed in the project directory or a separate directory, and isn’t used in this tutorial.
Background
Reach is a blockchain-agnostic programming language that allows you to write smart contracts in a subset of Javascript, automatically verify them, and compile them to multiple blockchains. Reach currently compiles to Algorand and Ethereum, and plans to expand to more soon. Reach also has created a front-end library to connect to devnet wallets or directly to Algosigner, and to deploy and attach to Reach generated contracts. This project uses the front-end library with Vue to create a simple Algorand wallet interface.
For more information on Reach, check out the Reach site, docs, and Discord server. If you want to see a live Reach project with Vue, check out ‘Serious’ Rock Paper Scissors
Steps 2-5 use the top-level Vue instance to manage state. If you want to use Vuex to manage state, skip from step 1 to step 6.
Steps
- 1. Project Set-Up
- 2. Connecting to Wallet State with Reach
- 3. Build the UI to Connect, Display, and Fund a Wallet
- 4. Testing the Project
- 5. Styling the Wallet
- 6. Managing Wallet State with Reach and a Vuex Store
- 7. Building the UI to Connect, Display, and Fund a Wallet (Vuex)
- 8. Testing the Project (Vuex)
- 9. Styling the Wallet (Vuex)
- 10. Extending the Project
1. Project Set-Up
Create your project using vue create proj_name in the command line
vue create vuecli-reach-tut
You can use the default build, but if you want to flesh your project out later on, manually select options and add Vuex and Vue Router. Vuex manages state within a modular store, keeping the code maintainable. In the second half of this tutorial, we’ll move state from the top-level Vue instance to a Vuex store. Vue Router allows easy and configurable routing between page views, and isn’t used in this tutorial.
If you manually select your features, the default options are fine after you’ve selected Vue Router and Vuex.
cd into the project, and install the Reach executable and Reach front-end stdlib (check the Reach docs for more info)
cd vuecli-reach-tut

curl https://raw.githubusercontent.com/reach-sh/reach-lang/master/reach -o reach ; chmod +x reach

npm install @reach-sh/stdlib
In src/App.vue
- If the HelloWorld component is there, delete it from the template, import, and components
2. Connecting to Wallet State with Reach
See the Accounts page of the Reach front-end docs for API info
- import the Reach library for Algorand
import * as reach from '@reach-sh/stdlib/ALGO.mjs'
- Create the data and methods that use the Reach standard library to connect to the wallet
data: () => {
    return {
      acc: undefined,
      addr: undefined,
      balAtomic: undefined,
      bal: undefined,
    }
}
- acc - the Reach account interface for the wallet, on which Reach functions are called
- addr - the address of the connected wallet
- balAtomic - the balance of the wallet in atomic units
- bal - the readable formatted balance of the wallet
note: () => arrow function notation works for defining Vue data, but do not use arrow functions for Vue methods - arrow functions do not include ‘this’ in their scope
- Get the balance of the current account interface, and convert the atomic balance to readable ALGO units
methods: {
    async updateBalance() {
      try {
        this.balAtomic = await reach.balanceOf(this.acc)
        this.bal = reach.formatCurrency(this.balAtomic)
      } catch (err) {
        console.log(err)
      }
    },
-
Many Reach functions that interface with cryptowallets are asynchronous, and try/catch blocks are helpful for handling the errors that may come up, for example if a network/devnet is inaccessible
-
Connect to the default account, and get the account’s address and balance
    async connectWallet() {
      try {
        this.acc = await reach.getDefaultAccount()
        this.addr = await this.acc.getAddress()
        this.updateBalance()
      }
      catch (err) {
        console.log(err)
      }
    },
- Fund the wallet with 10 Algos from the devnet faucet and update the balance
    async fundWallet() {
      try {
        const fundAmt = 10
        await reach.fundFromFaucet(this.acc, reach.parseCurrency(fundAmt))
        this.updateBalance()
      } catch (err) {
        console.log(err)
      }
    }
  }
To run using AlgoSigner/MainNet, see the note at the end of the tutorial
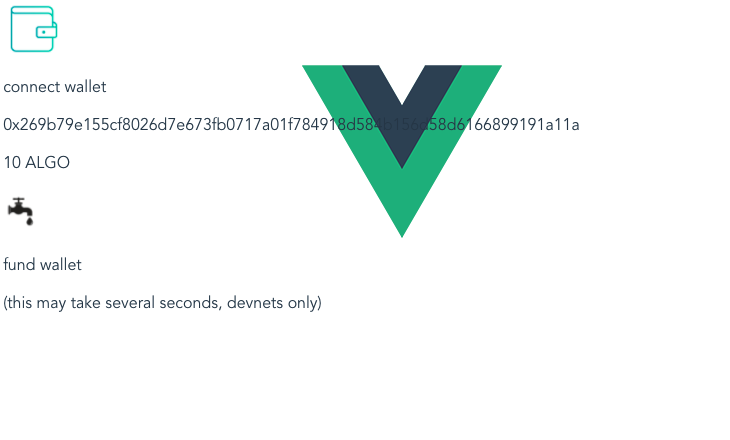
3. Build the UI to Connect, Display, and Fund a Wallet
Create the src/components/Wallet.vue component to display the interface for our Wallet.
The UI needs:
- a button to connect to a wallet
- if there’s an address, display address and balance
- a button to fund our wallet on devnets
- labels for each button
<template>
    <div id="wallet">
        <div><img src="../assets/wallet.png" id="wallet-icon" v-on:click="connectWallet"><p>connect wallet</p></div>
        <div v-if="addr">
            <p id="addr">{{addr}}</p>
            <p id="bal">{{bal}} ALGO</p>
            <div id="faucet">
                <div><img src="../assets/faucet.png" id="faucet-icon" v-on:click="fundWallet">
                <p>fund wallet</p></div>
                <p>(this may take several seconds, devnets only)</p>
            </div>
        </div>
    </div>
</template>
The script for the component:
- props (inherited state): addr & bal
- methods: connectWallet -> emit, fundAccount -> emit
- calling emit runs any code that the parent component has attached to this component’s ‘connectWallet’ or ‘fundWallet’ events
<script>
    export default {
        props: ["addr", "bal"],
        methods: {
            connectWallet: function() {
                this.$emit('connectWallet')
            },
            fundWallet: function() {
                this.$emit('fundWallet')
            }
        }
    }
</script>
Basic starter styling:
<style scoped>
#wallet {
    position: absolute;
    top: 1vh;
    left: 1vw;
    text-align: left;
}
#wallet-icon {
    max-height: 10vh;
    width: auto;
}
#faucet-icon {
    max-height: 7vh;
    width: auto;
}
</style>
- scoped style keeps CSS rules within current .vue file
- position the wallet component in the top left of page
- style images with a set max-height and width: auto to resize while keeping aspect ratio
Now we integrate Wallet.vue into App.vue
- import Wallet.vue to App.vue, and add it to App.vue’s components object
import Wallet from './components/Wallet.vue'

import * as reach from '@reach-sh/stdlib/ALGO.mjs'

export default {
  name: 'App',
  components: {
    Wallet
  },
- Add the Wallet component to the template, provide the wallet props to the Wallet component, and attach to its events
<template>
  <div id="app">
    <img alt="Vue logo" src="./assets/logo.png">
    <Wallet v-on:connectWallet="connectWallet" v-on:fundWallet="fundWallet" :addr="this.addr" :bal="this.bal"/>
  </div>
</template>
4. Testing the Project
To try it, run
- In one shell:
REACH_CONNECTOR_MODE=ALGO ./reach/reach devnet
- And in another:
npm run serve
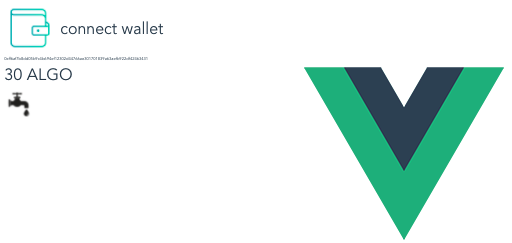
5. Styling the Wallet
- Define the margins between elements
#wallet {
    position: absolute;
    top: 1vh;
    left: 1vw;
    text-align: left;
    margin-top: .5vh;
    margin-bottom: 0vh;
}
- Assign classes / ID’s to elements
- Add row divs to align images and labels
<template>
    <div id="wallet">
        <div class="row with-hover-label"><img src="../assets/wallet.png" id="wallet-icon" v-on:click="connectWallet"><p class="label">connect wallet</p></div>
        <div v-if="addr">
            <p id="addr">{{addr}}</p>
            <p id="bal">{{bal}} ALGO</p>
            <div id="faucet" class="with-hover-label">
                <div class="row with-hover-label"><img src="../assets/faucet.png" id="faucet-icon" v-on:click="fundWallet">
                <p class="label">fund wallet</p></div>
                <p class="subtext label">(this may take several seconds, devnets only)</p>
            </div>
        </div>
    </div>
</template>
CSS classes:
- row : place items side by side using flex
- with-hover-label : reveal button icon labels on hover
- label : label to reveal on hover
- others: sizing and little tweaks
.row {
    display: flex;
    flex-direction: row;
}
.label {
    margin-left: .5vw;
}
.with-hover-label .label {
    opacity: 0;
    transition: 1s;
}
.with-hover-label:hover > .label {
    opacity: 100;
    transition: 1s;
}
p {
    margin-top: .5vh;
    margin-bottom: 0vh;
    align-self: center;
}
.subtext {
    font-size: 1vw;
}
#wallet-icon {
    max-height: 10vh;
    width: auto;
    display: block;
}
#faucet-icon {
    max-height: 7vh;
    left: 2vw;
    width: auto;
}
#addr {
    font-size: .5vw;
}
#bal {
    font-size: 2vw;
}
-
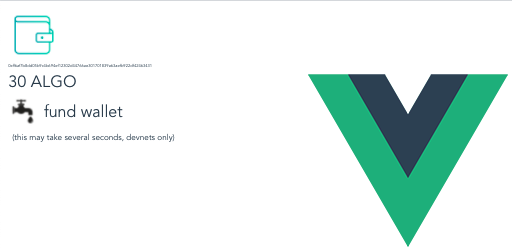
Bonus
 : Display a loading message while awaiting funds from the faucet
 -
in src/App.vue
data: () => {
    return {
      acc: undefined,
      addr: undefined,
      balAtomic: undefined,
      bal: undefined,
      faucetLoading: false
    }
  },
...
async fundWallet() {
  this.faucetLoading = true
  try {
    const fundAmt = 10
    await reach.fundFromFaucet(this.acc, reach.parseCurrency(fundAmt))
    this.updateBalance()
  } catch (err) {
    console.log(err)
  }
  this.faucetLoading = false
}
In src/components/Wallet.vue:
<template>
    <div id="wallet">
        <div class="row with-hover-label"><img src="../assets/wallet.png" id="wallet-icon" v-on:click="connectWallet"><p class="label">connect wallet</p></div>
        <div v-if="addr">
            <p id="addr">{{addr}}</p>
            <div class="row"><p id="bal">{{bal}} ALGO</p><p id="faucet-loading" class="label subtext" v-bind:class="{loading: faucetLoading}">waiting for devnet...</p></div>
            <div id="faucet" class="with-hover-label">
                <div class="row with-hover-label"><img src="../assets/faucet.png" id="faucet-icon" v-on:click="fundWallet">
                <p class="label">fund wallet</p></div>
                <p class="subtext label">(this may take several seconds, devnets only)</p>
            </div>
        </div>
    </div>
</template>
...
<style scoped>
...
#faucet-loading {
    opacity: 0;
    transition: 1s;
}
#faucet-loading.loading {
    opacity: 100;
    transition: 1s;
}
...
</style>
The completed interface:
6. Managing Wallet State with Reach and a Vuex Store
See the Accounts page of the Reach front-end docs for API info, and check out the Vuex core concepts as needed if this is new to you
- in src/store/index.js, import the Reach Algorand library
import * as reach from '@reach-sh/stdlib/ALGO.mjs'
- Make the wallet state variables
export default new Vuex.Store({
  state: {
    acc: undefined,
    addr: undefined,
    balRaw: undefined,
    bal: undefined
  },
- acc: the Reach account interface for the wallet, on which Reach functions are called
- addr: the address of the connected wallet
- balRaw: the balance of the wallet in atomic units
-
bal: the readable formatted balance of the wallet
-
Create mutations: the only functions Vuex allows to modify the state
mutations: {
  setBalance(state, balAtomic) {
      state.balAtomic = balAtomic
      state.bal = reach.formatCurrency(balAtomic)
  },
  setAcc(state, {acc, addr}) {
      state.acc = acc
      state.addr = addr
  }
},
- setBalance: use the atomic balance to set state.balAtomic and state.bal
-
setAcc: store the reach account interface & the wallet address
-
Create actions: asynchronous functions that can access state, call mutations, and dispatch other actions
- updateBalance: get the balance of the account and commit it
async updateBalance({state, commit}) {
        try {
          console.log(state.acc)
          const balAtomic = await reach.balanceOf(state.acc)
          console.log(state.acc)
          console.log(balAtomic)
          commit('setBalance', balAtomic)
      } catch (err) {
          console.log(err)
      }
    },
- connectWallet: try to get the default account and its address, then commit these
async connectWallet({commit, dispatch}) {
        try {
            const acc = await reach.getDefaultAccount()
            console.log(acc)
            const addr = await acc.getAddress()
            commit('setAcc', {acc,addr})
            dispatch('updateBalance')
        }
        catch (err) {
            console.log(err)
        }
    },
- fundWallet: try to call reach.fundFromFaucet to fund the wallet from the devnet
async fundWallet({state, commit, dispatch}) {
        try {
            const fundAmt = 10
            await reach.fundFromFaucet(state.acc, reach.parseCurrency(fundAmt))
            dispatch('updateBalance')
        } catch (err) {
            console.log(err)
        }
    }
To run using AlgoSigner/MainNet, see the note at the end of the tutorial
7. Building the UI to Connect, Display, and Fund a Wallet (Vuex)
- Create a Wallet.vue component to call wallet functions & display the wallet address and balance (this HTML is the same as without Vuex)
<template>
    <div id="wallet">
        <img src="../assets/wallet.png" id="wallet-icon" v-on:click="connectWallet">
        <p>connect wallet</p>
        <div v-if="addr">
            <p id="addr">{{addr}}</p>
            <p id="bal">{{bal}} ALGO</p>
            <div id="faucet">
                <img src="../assets/faucet.png" id="faucet-icon" v-on:click="fundWallet">
                <p>fund wallet</p>
                <p>(this may take several seconds, devnets only)</p>
            </div>
        </div>
    </div>
</template>
- To access the store state within the Wallet component, import & call mapState onto the computed variables of the component
<script>
    import {mapState} from 'vuex'

    export default {
        computed: {
            ...mapState({
                addr: state => state.addr,
                bal: state => state.bal
            })
        },
        methods: {
            connectWallet: function() {
                this.$store.dispatch('connectWallet')
            },
            fundWallet: function() {
                this.$store.dispatch('fundWallet')
            }
        }
    }
</script>
Basic starter styling:
<style scoped>
#wallet {
    position: absolute;
    top: 1vh;
    left: 1vw;
    text-align: left;
}
#wallet-icon {
    max-height: 10vh;
    width: auto;
}
#faucet-icon {
    max-height: 7vh;
    width: auto;
}
</style>
- scoped style keeps CSS rules within current .vue file
- position the wallet component in the top left of page
-
style images with a set max-height and width: auto to resize while keeping aspect ratio
-
To call the wallet functions, we access the store directly and dispatch the corresponding actions
In src/App.vue:
- Add the wallet to the template & in the App components object
<template>
  <div id="app">
    <img alt="Vue logo" src="./assets/logo.png">
    <Wallet/>
  </div>
</template>

<script>
import Wallet from './components/Wallet.vue'

export default {
  name: 'App',
  components: {
    Wallet
  },
  data: () => {
    return {
    }
  },
  methods: {
  }
}
</script>
8. Testing the Project (Vuex)
To try it, run
- In one shell:
REACH_CONNECTOR_MODE=ALGO ./reach/reach devnet
- And in another:
npm run serve
9. Styling the Wallet (Vuex)
(The HTML/CSS is the same as step 5)
- Define the margins between elements
#wallet {
    position: absolute;
    top: 1vh;
    left: 1vw;
    text-align: left;
    margin-top: .5vh;
    margin-bottom: 0vh;
}
- Assign classes / ID’s to elements
- Add row divs to align images and labels
<template>
    <div id="wallet">
        <div class="row with-hover-label"><img src="../assets/wallet.png" id="wallet-icon" v-on:click="connectWallet"><p class="label">connect wallet</p></div>
        <div v-if="addr">
            <p id="addr">{{addr}}</p>
            <p id="bal">{{bal}} ALGO</p>
            <div id="faucet" class="with-hover-label">
                <div class="row with-hover-label"><img src="../assets/faucet.png" id="faucet-icon" v-on:click="fundWallet">
                <p class="label">fund wallet</p></div>
                <p class="subtext label">(this may take several seconds, devnets only)</p>
            </div>
        </div>
    </div>
</template>
CSS classes:
- row : place items side by side using flex
- with-hover-label : reveal button icon labels on hover
- label : label to reveal on hover
- others: sizing and little tweaks
.row {
    display: flex;
    flex-direction: row;
}
.label {
    margin-left: .5vw;
}
.with-hover-label .label {
    opacity: 0;
    transition: 1s;
}
.with-hover-label:hover > .label {
    opacity: 100;
    transition: 1s;
}
p {
    margin-top: .5vh;
    margin-bottom: 0vh;
    align-self: center;
}
.subtext {
    font-size: 1vw;
}
#wallet-icon {
    max-height: 10vh;
    width: auto;
    display: block;
}
#faucet-icon {
    max-height: 7vh;
    left: 2vw;
    width: auto;
}
#addr {
    font-size: .5vw;
}
#bal {
    font-size: 2vw;
}
Bonus![]() : display loading text while awaiting funds from the devnet faucet
: display loading text while awaiting funds from the devnet faucet
In src/store/index.js:
state:
export default new Vuex.Store({
  state: {
    ...
    balLoading: false
  },
mutations:
  mutations: {
    ...
    setBalLoading(state, isBalLoading) {
        state.balLoading = isBalLoading
    }
  },
actions: modify fundWallet to set balLoading to true at function start, and to false at its end
async fundWallet({state, commit, dispatch}) {
        commit('setBalLoading', true)
        try {
            const fundAmt = 10
            await reach.fundFromFaucet(state.acc, reach.parseCurrency(fundAmt))
            dispatch('updateBalance')
        } catch (err) {
            console.log(err)
        }
        commit('setBalLoading', false)
    }
In src/components/Wallet.vue:
        <div v-if="addr">
            <p id="addr">{{addr}}</p>
            <div class="row">
                <p id="bal">{{bal}} ALGO</p>
                <p id="bal-loading" class="caption subtext" v-bind:class="{loading: balLoading}">waiting for devnet...</p>
            </div>
            <div id="faucet" class="with-hover-label">
                <div class="row with-hover-label"><img src="../assets/faucet.png" id="faucet-icon" v-on:click="fundWallet">
                <p class="caption">fund wallet</p></div>
                <p class="subtext caption">(this may take several seconds, devnets only)</p>
            </div>
        </div>
#bal-loading {
    opacity: 0;
    transition: 1s;
}
#bal-loading.loading {
    opacity: 100;
    transition: 1s;
}
The completed interface:
10. Extending the Project
Some ideas for extending this project:
- Show wallet errors to the user
- A button to copy your wallet address to the clipboard
- Make the faucet rain coins instead of displaying “loading…”
- Generalize to allow either ETH or ALGO
- Run the Reach RPS tutorial program
Keep in mind:
- ./reach update & update your @reach-sh/stdlib often (I use a bash script to update both)
By default Reach connects to the local devnet and uses the mnemonic method, which allows you to generate an account on the devnet. To use AlgoSigner and MainNet, include the following code in either App.vue (no Vuex) or store/index.js (Vuex). The mnemonic method allows Reach to sign transactions automatically, to enter a wallet address and sign transactions manually using Algosigner, call setSignStrategy:
reach.setSignStrategy('AlgoSigner');
To run applications on the MainNet instead of the local devnet, call setProviderByName
reach.setProviderByName('MainNet');// or 'TestNet' or 'LocalHost'