
Build Algorand iOS, Android and UWP apps using C# .NET SDK and Xamarin

Overview
This solution shows how to build an Algorand application for iOS, Android and Universal Windows Platform (UWP), with one code base, using Xamarin Forms and C#. Algorand sponsored a hackathon and every team wanted to build an app. So, I figured I better write a sample solution that does just that. Hat’s off to RileyGe who wrote this SDK and received a Development Reward from Algorand Foundation for his work. Creating .NET solutions for the Algorand blockchain is made possible through his community Algorand SDK for .NET. This library is compliant to .NET Standard 2.0, so you can use this library on any platform which can use the .NET Standard 2.0, such as Xamarin and C#. This solution walks through a C# example. In doing so, we will actually cover all of the functionality you will need to build any Algorand solution! The source code for this solution can be found in the Devrel repository at this location. Clone this repository and run it using Visual Studio, so you can follow along with the solution easier. After clone, restore NuGet packages, and rebuild.
Table of Contents
- Setup
- Xamarin Background
- Application Structure
- How to Debug a Xamarin app
- Node and Network Settings
- Accounts and Transactions
- Create and Fund Accounts
- Transactions
- Multisig Transaction
- ASA
- Atomic Transfer
- Algorand Smart Contract - Stateless
- Compile Teal
- Dryrun Debugging
- Indexer
- ReyKey
- Stateful Contracts
- Conclusion
Setup
- Download either Visual Studio Community for Windows or Visual Studio for Mac (VS). When installing, select any Mobile development options as well as emulators. This solution will be showing VS for Mac, but similar features can be found in the Windows version.
Note: Mono is not supported in VS Code. So, for Xamarin cross-platform Android and iOS C# development – use either Visual Studio for Mac or Visual Studio Community Edition for Windows.
The Algorand NuGet Package will be needed for all projects in your VS solution for Xamarin Forms. Either open the VS NuGet command line and type: Install-Package Algorand. Or right-click on the solution in the VS solution explorer and select Manage Nuget Packages and browse to Algorand.
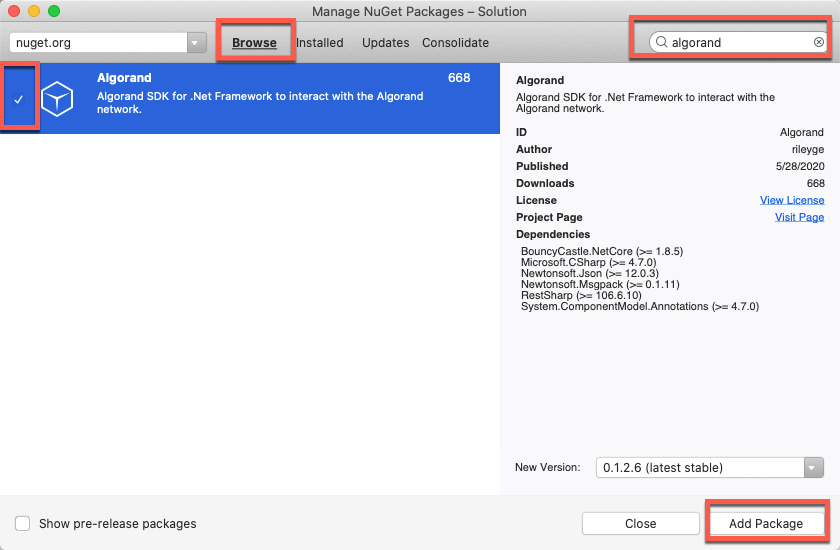
Figure 1-1 Browse for NuGet package
Figure 1-1 Browse for the Algorand NuGet package.
Optional -
Algorand Sandbox Installation or set up a node as described here. The sandbox runs for Ubuntu, MacOS and Windows.
The app runs with no code modifications. The app connects to an Algorand node (algod) to talk to the Algorand blockchain. By default, it uses the Purestake TestNet API node Purestake TestNet by default. This allows you to run the app without any modification and without having to run a node yourself. You may also consider running your own node, potentially through sandbox. Read more on the developer website
To use Purestake in your application, just sign up at Pruestake and replace the token and URL with your own (helper.cs and NodeAndNetwork.xaml.cs). This is free for TestNet/BetaNet. If you specify you own URL and token, the app defaults to the sandbox. The actual ip address of your localhost is needed in the URL, as localhost is not resolved in an app. Both TestNet and BetaNet are supported in the app sample.
Xamarin Background
Xamarin is a platform for building Cross Platform apps. For those familiar with React Native, Kotlin or Unity, Xamarin is similar in that you can create solutions for multiple platforms with one code base. Business logic can be shared across platforms using C#. Xamarin Forms sits on top of the Xamarin platform, and also includes a shared User Interface layer that can be created with code, or using XAML. The VS Mac Xamarin Forms supports iOS and Android Development. The VS Windows version supports Android, Windows and iOS development. However, a networked Mac is required for iOS development using the latest version of Xcode. For more information, see Windows requirements. Other platforms are possible as well including Mac, Apple Watch and more, all built with C#. If you are new to Xamarin Forms this is a great resource link for Installation and Building your first Xamarin Forms app. We will be using Xamarin Forms in this solution. If you start on the Mac, you can always add UWP as well to the Xamarin Forms Solution, manually.
Application Structure
A Xamarin Visual Studio solution has multiple projects. One for each platform and one that compiles a shared .NET Standard 2.0 DLL, which is referenced in the platform projects. The algorandapp shared project will have 95 percent of your code including the navigation pages and utilities. Here we see one project for algorandapp.iOS, algorandapp.Android and algorandapp.UWP and a project that contains shared code, called algorandapp. The app is deployed as a native app with native controls for each platform.
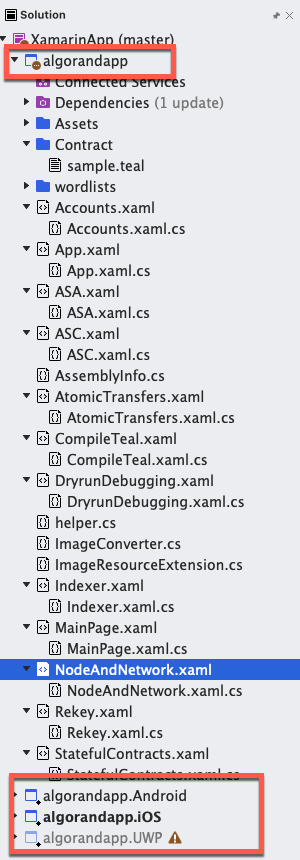
Figure 1-2 Solution Structure
Each XAML page in the image above has a corresponding “code-behind.cs” file. This solution is meant to just demonstrate how to use the C# SDK. The code is simplified for clarity and Model View ViewModel (MVVM) was not used. The logic is in the code-behind file for each page. In other words, this is not a best practice code example. The application has a main navigation page and pages for Node and Network Setup, Accounts and Transactions, Algorand Standard Assets (ASA), Atomic Transfers and Algorand Smart Contracts on Layer 1 (ASC-1). Here is the MainPage view. This view is for a tablet, but the solution will also work on a phone form factor.
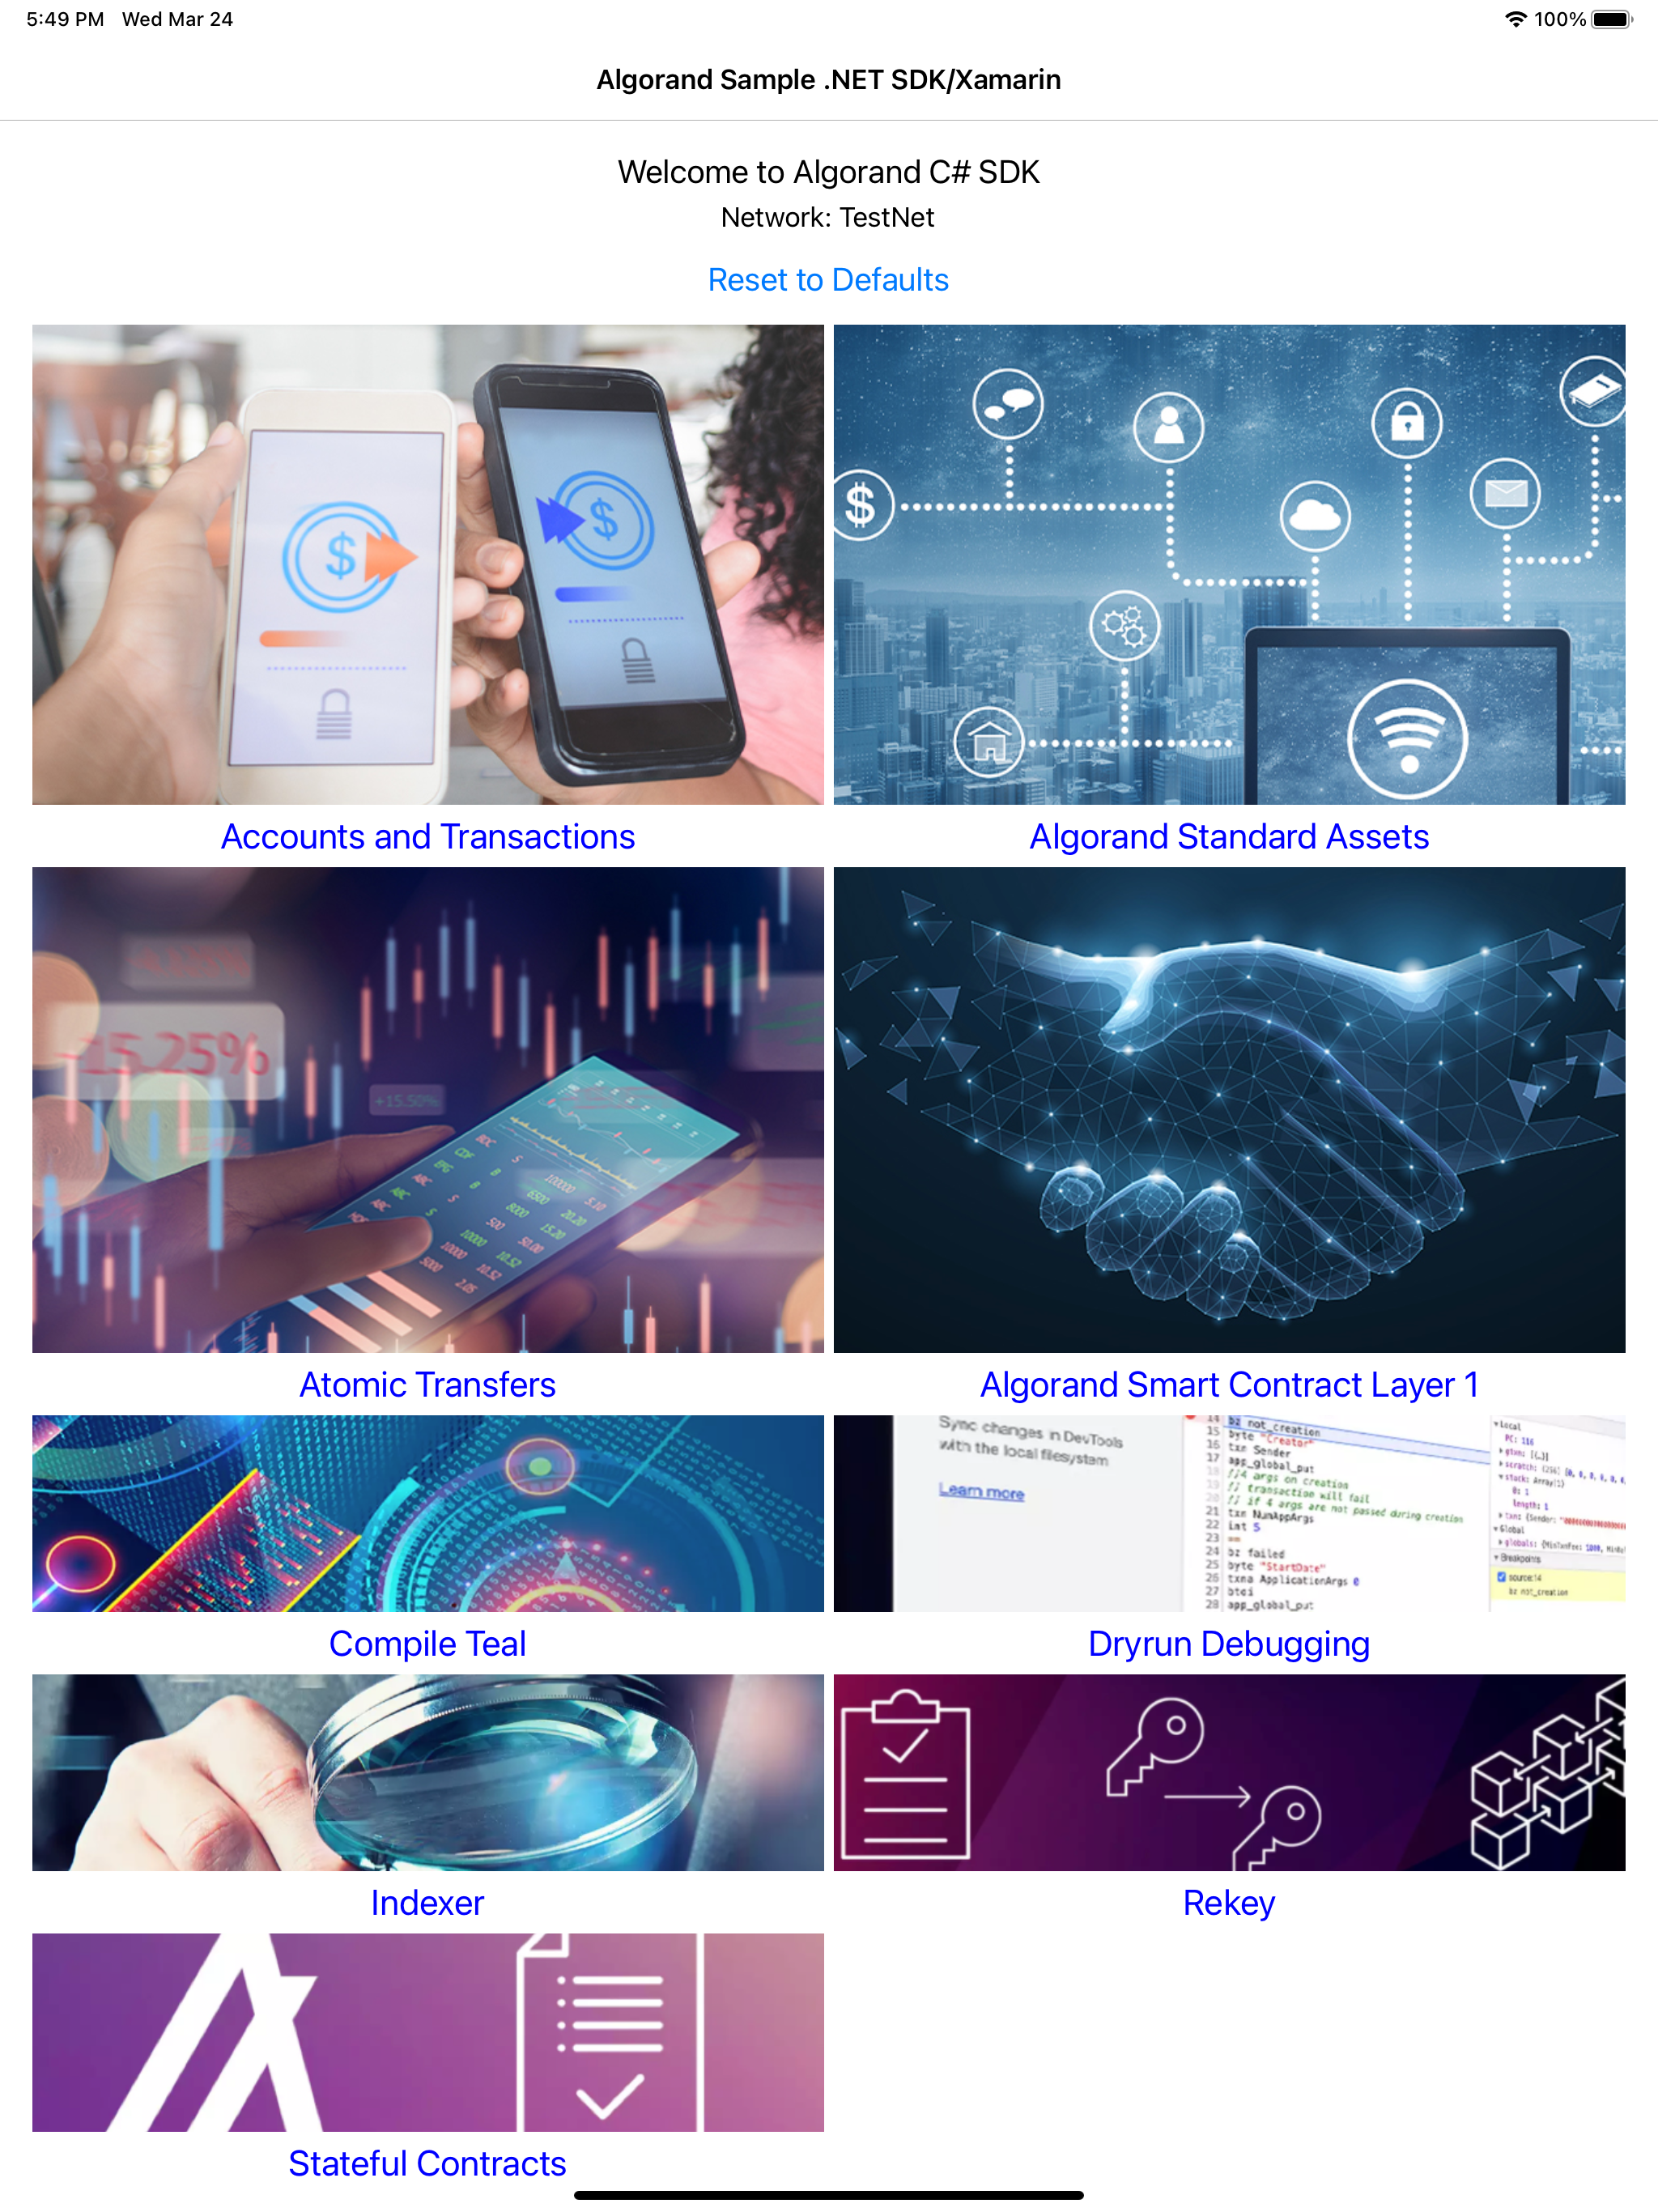
Figure 1-3 MainPage iOS
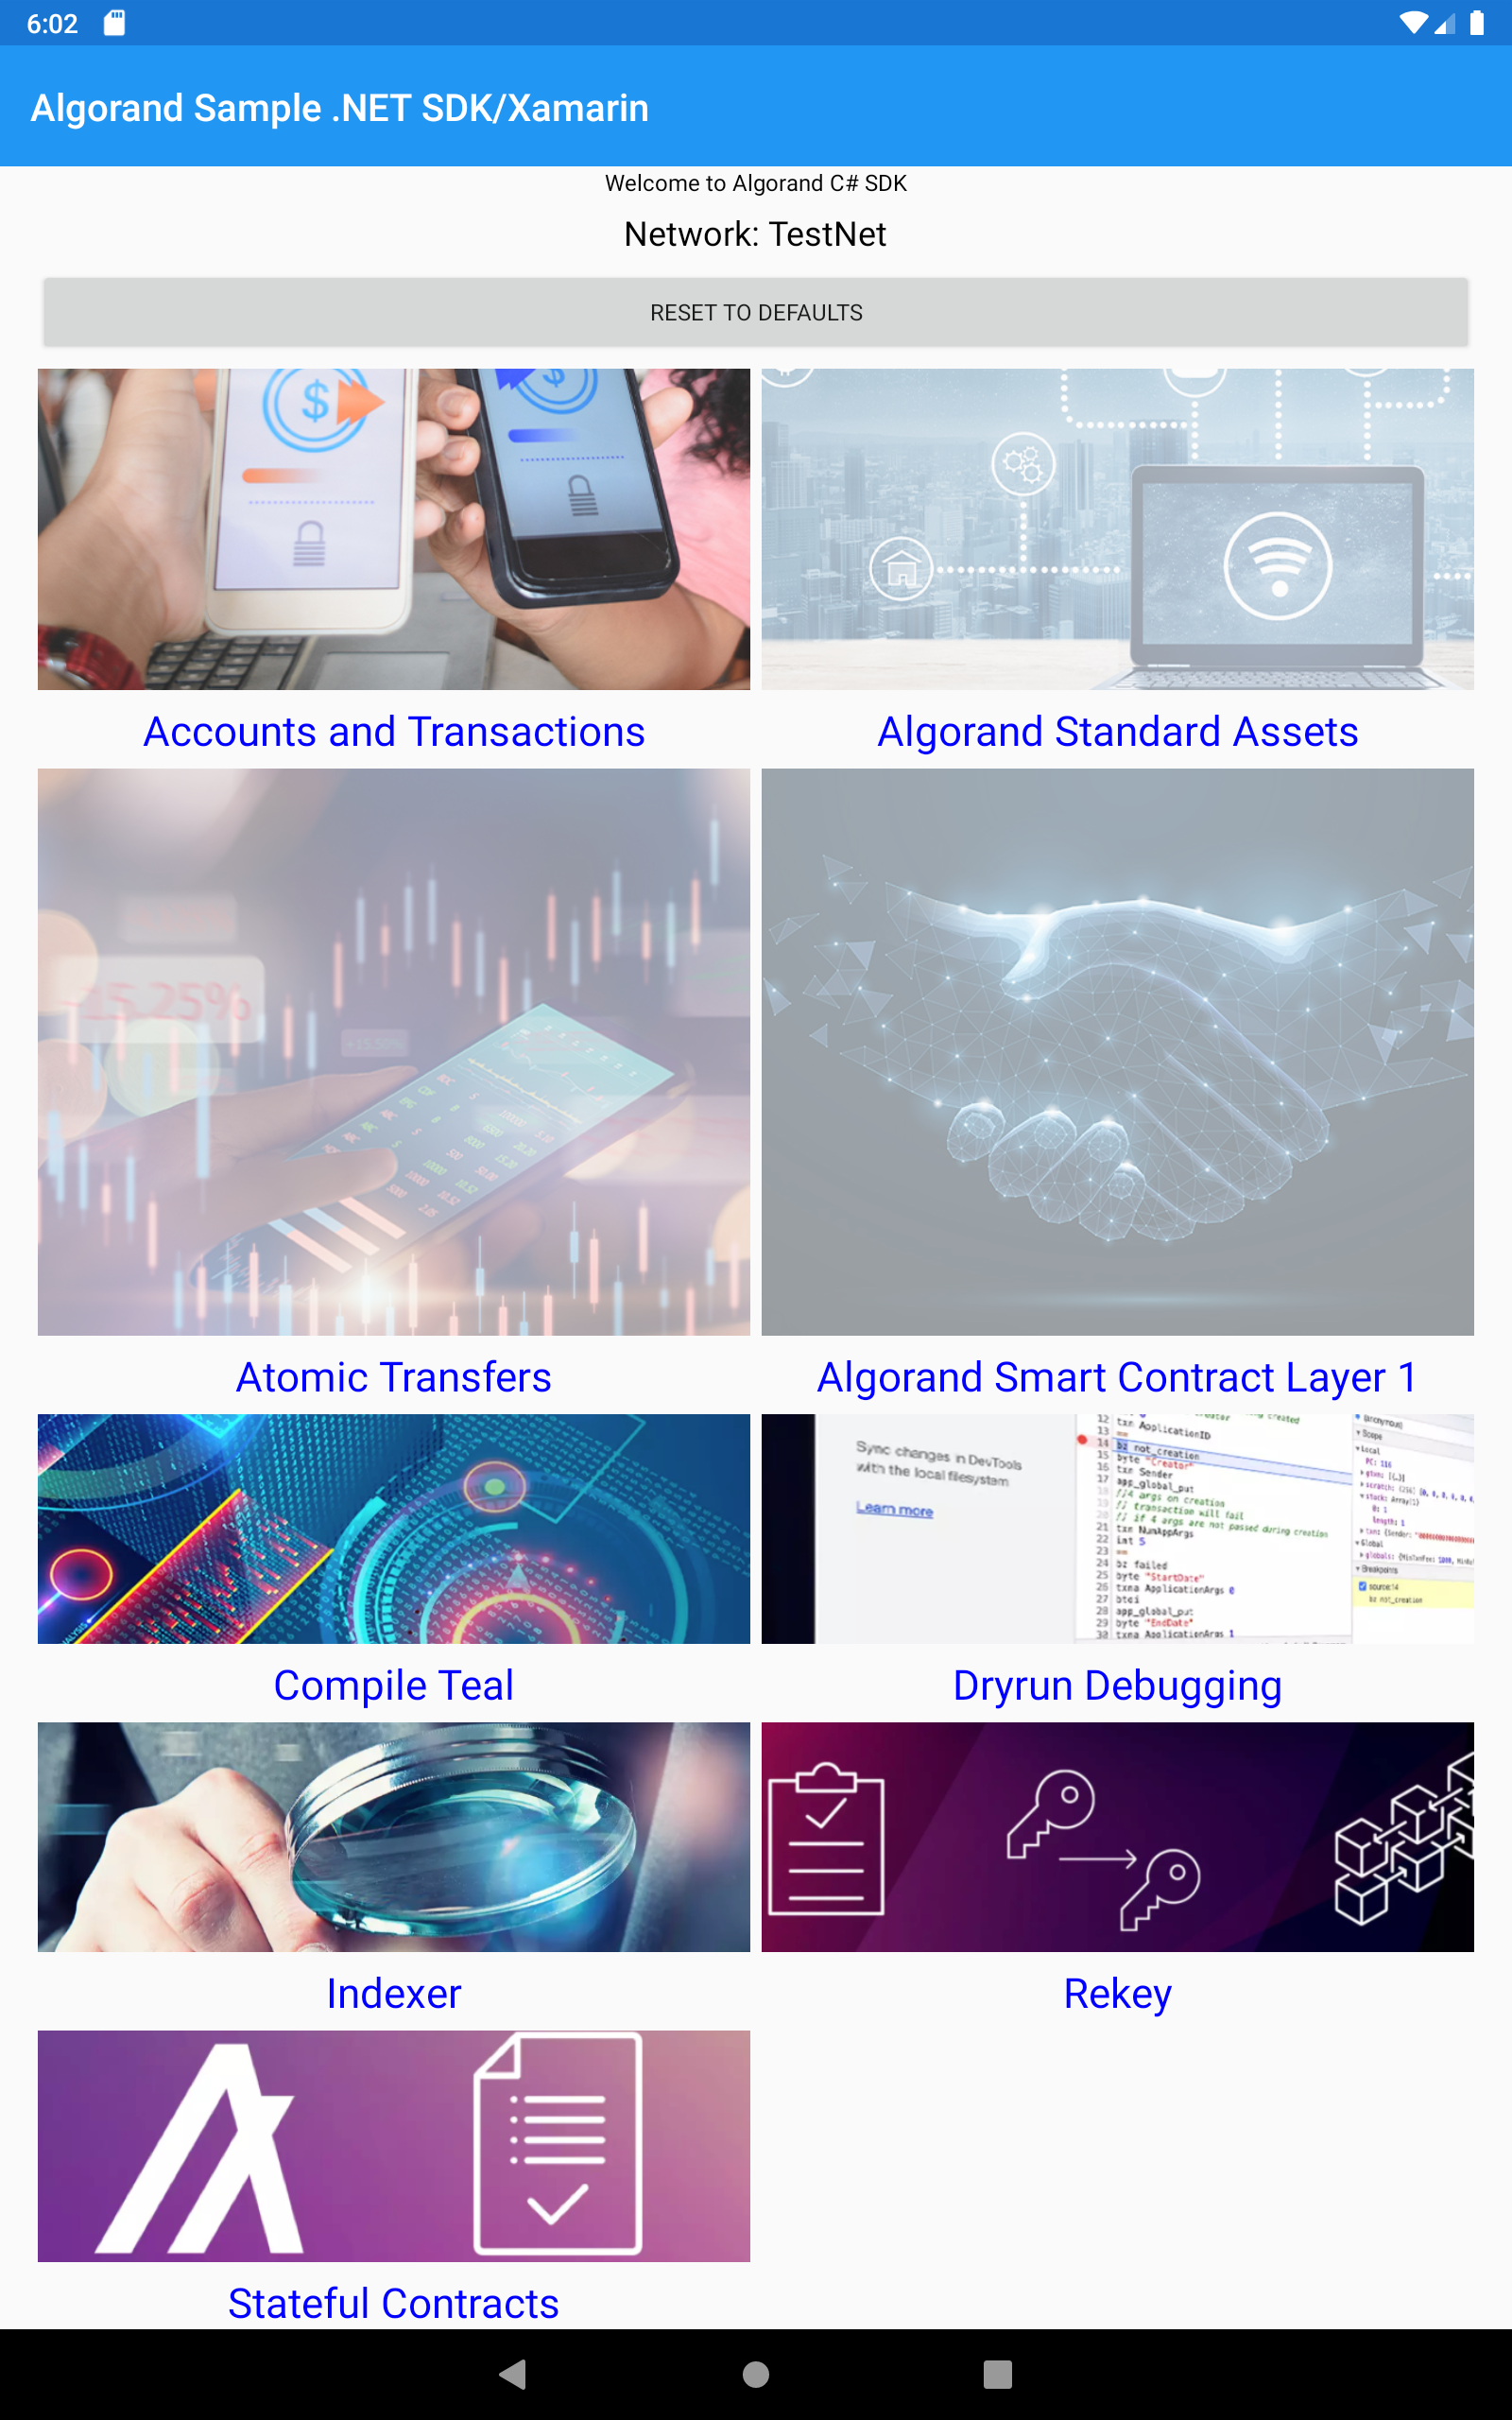
Figure 1-4 MainPage Android
How to Debug a Xamarin app
First, you need to establish a start-up project. Right-click on desired platform project, and select Set As Startup Project. The project will become bold.
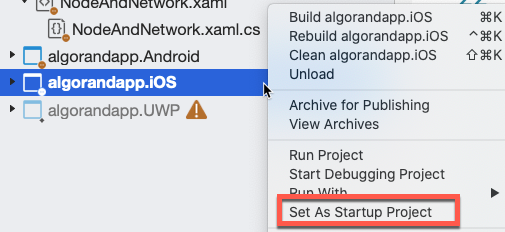
Figure 1-5 Set startup project
Then open the MainPage.xaml.cs code-behind file in the algorandapp project and set a breakpoint on the NodeNetwork_click event handler, by either clicking on the far left margin, known as the gutter area, or place the cursor on the desired break line and press F9.
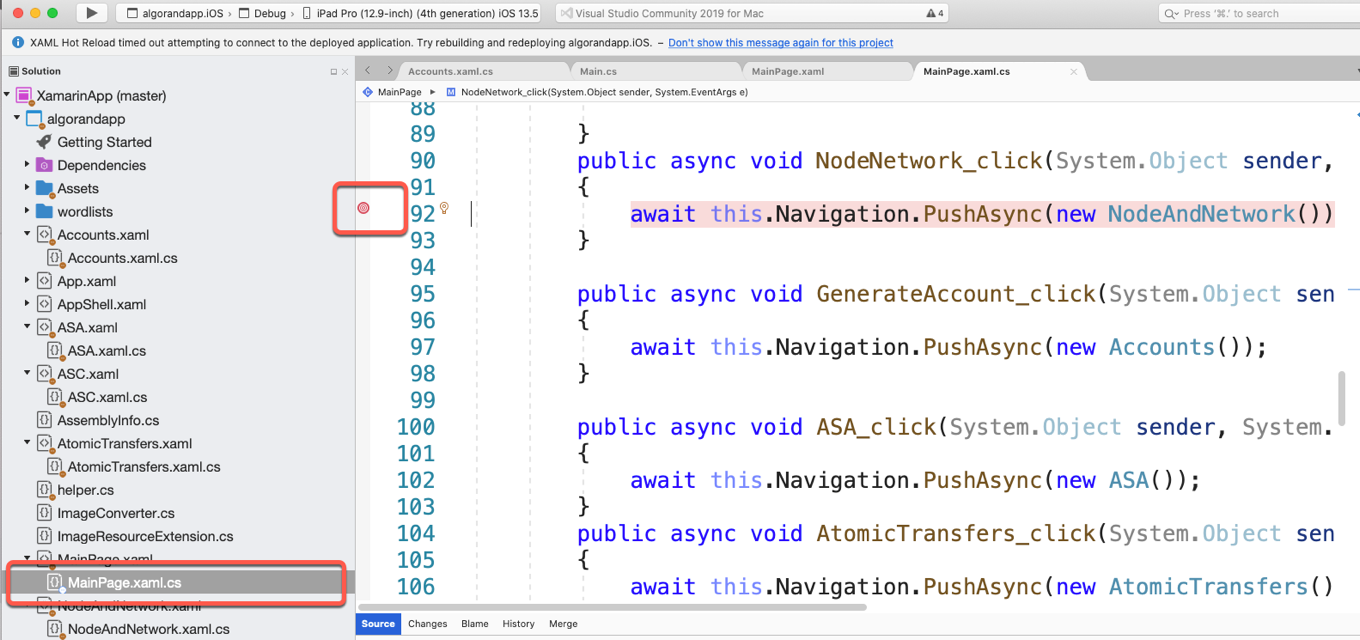
Figure 1-6 Setting a breakpoint
Select the desired simulator or actual attached device from the dropdown list and press the run button. For best viewing, select one of the tablets. Your break point will be hit when you select press the Node and Network image on the main page. You step into, over, or out. Hovering over any object in the code will display a data tip showing the contents of that object.
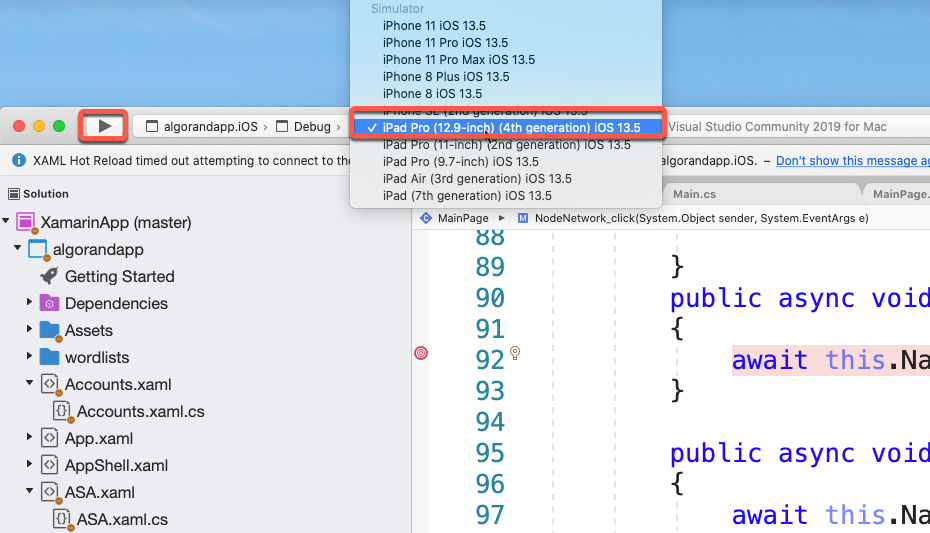
Figure 1-7 Select simulator and run
Node and Network Settings
The Node and Settings Page simply allows you to select the network, TestNet or BetaNet as well as one of the options for Purestake, hackathon or your own node. If you select to enter your own node, the default Server and token is prepopulated for the sandbox. You just need to replace your ip address. Also, since the sandbox uses the same URL and token for TestNet or BetaNet, make sure the toggle switch is set to the desired Network.
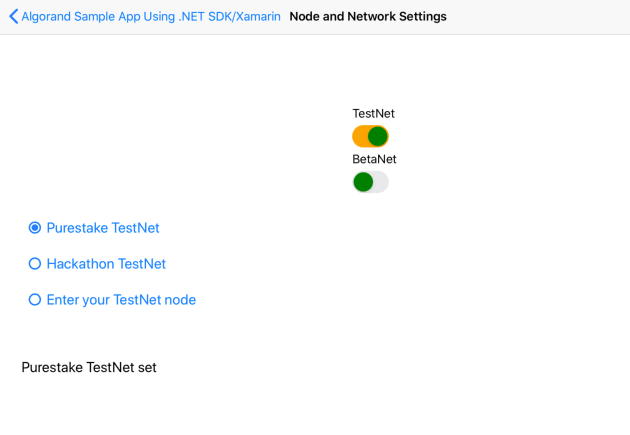
Figure 1-8 Select TestNet and Purestake
I am using Secure Storage to store the state of the application as well as use it for storing the private keys later when creating accounts. Secure storage is available through the Xamarin Essentials NuGet Package. I have a helper.cs class which has all the SecureStorage names and several utility functions. To instantiate this object use this statement below. We will be retrieving these settings for node and network when we need to create an algodApiInstance as needed.
        public static helper helper = new helper();
        private async Task PurestakeTestNetClicked()
        {
            // Purestake TestNet
            ALGOD_API_ADDR_TESTNET = "https://testnet-algorand.api.purestake.io/ps1";
            ALGOD_API_TOKEN_TESTNET = "B3SU4KcVKi94Jap2VXkK83xx38bsv95K5UZm2lab";
            await SecureStorage.SetAsync(helper.StorageALGOD_API_TOKEN_TESTNET, ALGOD_API_TOKEN_TESTNET);
            await SecureStorage.SetAsync(helper.StorageALGOD_API_ADDR_TESTNET, ALGOD_API_ADDR_TESTNET);
            await SecureStorage.SetAsync(helper.StorageNetwork, helper.StorageTestNet);
            myLabel.Text = "Purestake TestNet set";
            await SecureStorage.SetAsync(helper.StorageNodeType, helper.StoragePurestake);
            TestNetEntry.IsVisible = false;
        }
Accounts and Transactions
Open this page Accounts.xaml.cs. We will create three accounts which will be used throughout the sample app. Add funds button will appear after a new account is generated in order to execute transactions. When the fund account button is clicked it will bring you to the appropriate dispenser for TestNet or BetaNet based on your settings. Also, we will have buttons appear after the account is created, to display account amounts and info as well as transactions.
Look at the Accounts_Appearing event handler. You will see we instantiate the ApiInstance by calling the helper.CreateApiInstance() method.
private async void Accounts_Appearing(object sender, EventArgs e)
{
    algodApiInstance = await helper.CreateApiInstance();
    network = await helper.GetNetwork();
}
The code to instantiate in the helper.cs CreateApiInstance() , the method looks like this:
public async Task<AlgodApi> CreateApiInstance()
{
    // create api instance
    ...
    algodApiInstance = new AlgodApi(ALGOD_API_ADDR_TESTNET, ALGOD_API_TOKEN_TESTNET);
    ...
    return algodApiInstance;
}
Next, run the app and click on Get Block button and you will see the block information displayed in a scrollable area at the bottom of the page.
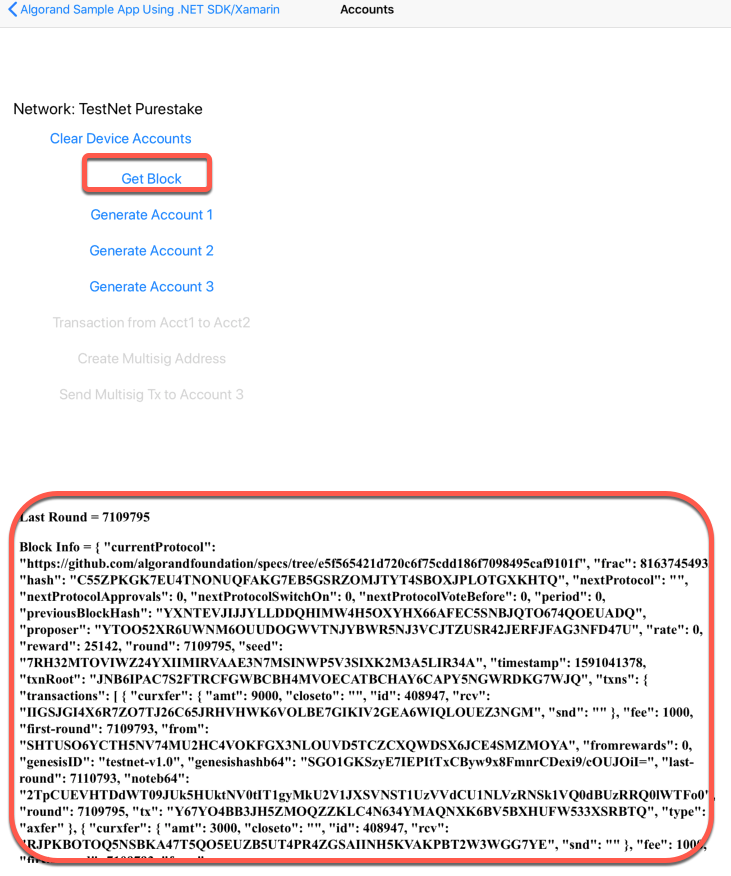
Figure 1-9 Get Block Information
The method GetStatusAsync(); is used to get the status Lastround. The block is retrieved with the GetBlockAsync method. Also, I am using a webview to display the info. A Label view (or control) is readonly, but you cannot copy and paste from that. An Entry view is read / write and you could accidently change a value. A webview is readonly and copyable. Perfect! There are times you may wish to copy off an account address and paste into one of the Algorand explorers, for example. Here is the code to Get a Block.
block = await algodApiInstance.GetBlockAsync(lastround)
public async void GetBlock_Clicked(System.Object sender, System.EventArgs e)
{
    var status = await algodApiInstance.GetStatusAsync();
    long lastround = (long)status.LastRound;
    BlockResponse block;
    try
    {
        block = await algodApiInstance.GetBlockAsync(lastround);
        var htmlSource = new HtmlWebViewSource();
        htmlSource.Html = @"<html><body><h3>" + "Last Round = " + lastround.ToString() + "</h3>" +
            "<h3>" + "Block Info = " + JsonPrettify(block.ToJson()) + "</h3>" +
            "</body></html>";
        myWebView.Source = htmlSource;
        myWebViewp.Source = htmlSource;
    }
    catch (Exception err)
    {
        var htmlSource = new HtmlWebViewSource();
        htmlSource.Html = @"<html><body><h3>" + "Error = " + err.Message.ToString() + "</h3>" +
            "</body></html>";

        myWebView.Source = htmlSource;
        myWebViewp.Source = htmlSource;
    }
}
Create and Fund Accounts
Run the app and on the Accounts and Transactions page, click the Create Account 1 button. You should see a grayed-out button that now says, Account 1 created, along with a Funds Needed button and Get Account 1 Balance. Click on the Funds Needed button, answer Yes to the prompt, and it will bring you to the TestNet Dispenser. The app copies the address to the clipboard, so you should just be able to paste the address in the input box on the dispenser page (or it may be automatically populated for you via passed in parameter).
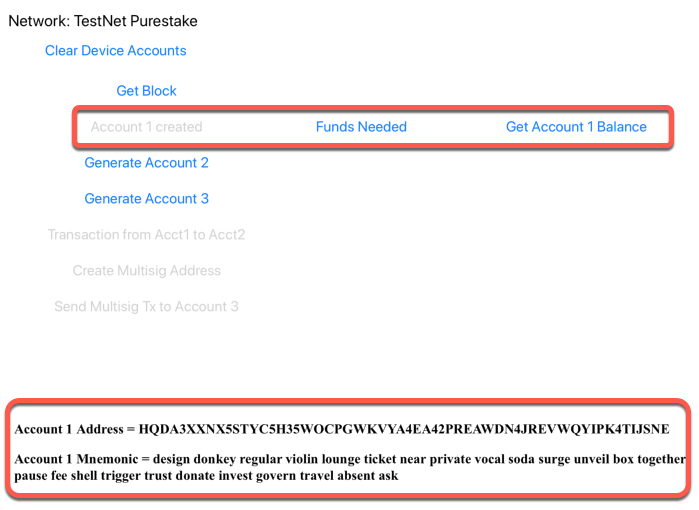
Figure 1-10 Account Created

Figure 1-11 Dispenser
On Android, click the back button to get back to the app. On iOS click the algorandapp arrow at the top left corner to get back to the app.
Feel free to copy off the Account Address and Mnemonics. You will be able to use both the account mnemonic and address for many of the tutorials on the https://developer.algorand.org/ site. These will be conveniently stored in Secure Storage as well.
The code in helper.cs CreateAccount to generate an account is as follows…
public async Task<string[]> CreateAccount(string accountname)
{
    string[] accountinfo = new string[2];
    Account myAccount = new Account();
    var myMnemonic = myAccount.ToMnemonic();
    Console.WriteLine(accountname.ToString() + " Address = " + myAccount.Address.ToString());
    Console.WriteLine(accountname.ToString() + " Mnemonic = " + myMnemonic.ToString());

    accountinfo[0] = myAccount.Address.ToString();
    accountinfo[1] = myMnemonic.ToString();
    return accountinfo;
}
If you click on the Get Account 1 Balance button you should see output displayed similar to this showing a balance of 100000000 micro algos…
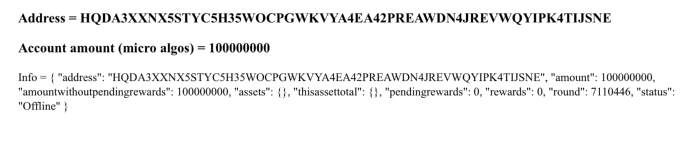
Figure 1-12 Account Info
Repeat the above until we have three accounts created.
Transactions
Let’s transfer funds from Account 1 to Account 2. Still on the Accounts page, click the Xfer Account 1 to Account 2 button. This will take a few seconds to send the amount.
You should now see a balance of 101000000 in Account 2.
Transaction ID = BF5DAD2Z4GVFLRQJXERG7LFNMKSBY6Q7ZFQQYTFYQF2TYUIW6WMA

Account 2 info = { "address": "4D5DTBXPBBGEC6DE2TIJO2AXCHSWOEC6UPXHH63IK7OZTCI4AEZPPFLJAA",
"amount": 101000000, ...
The transaction is returned from GetPaymentTransaction and then signed using SignTransaction
The SDK has a function to wait for the transaction to be written to the blockchain, which is typically under 5 seconds. Utils.WaitTransactionToComplete(algodApiInstance, id.TxId); This will wait until the transaction has been broadcast to the network using Utils.SubmitTransaction(algodApiInstance, signedTx).
Here is the code in Accounts.xml.cs to execute a transaction.
public async void Transaction_Clicked(System.Object sender, System.EventArgs e)
{
    // restore accounts

    var accounts = await helper.RestoreAccounts();
    Account account1 = accounts[0];
    Account account2 = accounts[1];
    Account account3 = accounts[2];
    HtmlWebViewSource htmlSource;
    // transfer from Account 1 to 2
    TransactionParametersResponse transParams = null;
    try
    {
        transParams = algodApiInstance.TransactionParams();
    }
    catch (ApiException err)
    {
        throw new Exception("Could not get params", err);
    }
    var amount = Utils.AlgosToMicroalgos(1);
    var tx = Utils.GetPaymentTransaction(account1.Address, account2.Address, amount, "pay message", transParams);
    var signedTx = account1.SignTransaction(tx);
    Console.WriteLine("Signed transaction with txid: " + signedTx.transactionID);
    PostTransactionsResponse id = null;
    //  string wait = "";
    // send the transaction to the network
    try
    {
        id = Utils.SubmitTransaction(algodApiInstance, signedTx);
        Console.WriteLine("Successfully sent tx with id: " + id.TxId);
        var wait = Utils.WaitTransactionToComplete(algodApiInstance, id.TxId);

        Console.WriteLine("Successful! " + wait.Txn );
        await DisplayAccount(helper.StorageAccountName2);
    }
    catch (ApiException err)
    {
        ...
Here is the code to get the balance for an account in helper.cs GetAccountBalance. To restore and an account, use the mnemonic.
account = new Account(mnemonic);
myaddress = account.Address.ToString();
Use the SDK function AccountInformationAsync to obtain account information and the amount field.
Algorand.Algod.Client.Model.Account accountinfo =
await algodApiInstance.AccountInformationAsync(myaddress);
if (accountinfo != null)
{
    return accountinfo.Amount;
}
Multisig Transaction
Run the app and on the Accounts page, click on the button Create Multisig Address
The code creates a multisig account with a version of 1, threshold of 2 and 3 accounts. The threshold is the number of accounts that must sign the transaction for it to succeed. After the multisig account is created, you will need to add funds to this account as well, by clicking the Funds Needed button which should appear when created. The following code is in CreateMultiSig_Click event.
Note: If the same public keys are used in the same order with the same number of accounts, version and threshold… the multisig address generated will be the same every time this executes.
public async void CreateMultiSig_Clicked(System.Object sender, System.EventArgs e)
{
    // restore accounts
    var accounts = await helper.RestoreAccounts();
    Account account1 = accounts[0];
    Account account2 = accounts[1];
    Account account3 = accounts[2];


    List<Ed25519PublicKeyParameters> publickeys = new List<Ed25519PublicKeyParameters>();

    publickeys.Add(account1.GetEd25519PublicKey());
    publickeys.Add(account2.GetEd25519PublicKey());
    publickeys.Add(account3.GetEd25519PublicKey());

    MultisigAddress msig = new MultisigAddress(1, 2, publickeys);
    ...
The following code is in Accounts.xaml.cs in the MultisigTransaction_Clicked event handler.
public async void MultisigTransaction_Clicked(System.Object sender, System.EventArgs e)
{
    ...
Console.WriteLine("Multisignature Address: " + msig.ToString());
//   dispense funds to msig account
string DEST_ADDR = account3.Address.ToString();
// add some notes to the transaction

// todo notes
byte[] notes = Encoding.UTF8.GetBytes("These are some notes encoded in some way!");//.getBytes();

var amount = Utils.AlgosToMicroalgos(1);
Transaction tx = null;
//noteb64 = notes
try
{
    tx = Utils.GetPaymentTransaction(new Address(msig.ToString()), new Address(DEST_ADDR), amount, "this is a multisig trans",
        algodApiInstance.TransactionParams());
}
catch (Exception err)
{
    Console.WriteLine("Could not get params", err.Message);
}
// Sign the Transaction for two accounts
SignedTransaction signedTx = account1.SignMultisigTransaction(msig, tx);
SignedTransaction completeTx = account2.AppendMultisigTransaction(msig, signedTx);

// send the transaction to the network
PostTransactionsResponse id = null;
try
{
    id = Utils.SubmitTransaction(algodApiInstance, completeTx);
    Console.WriteLine("Successfully sent tx with id: " + id.TxId);
    var x = Utils.WaitTransactionToComplete(algodApiInstance, id.TxId);
    Console.WriteLine(x);

}
catch (ApiException err)
{

    Console.WriteLine("Exception when calling algod#rawTransaction: " + err.Message);
}
    ...
In the app, once the Multisig account is funded, click on the Send Multisig Tx to Account 3 button. This transaction will be signed by Account 1 and Account 2, meeting the threshold requirement of 2. The funds are sent to Account 3. Note, the receiving account could be any account on the blockchain, not necessarily in the multisig group.
Address = TMMNEYN4JU453NZNILQDUQIT6HHF72EEVMLK2NXDPBE4QGPKE2XRJPDJKQ
Account amount (micro algos) = 101000000
ASA
From the main page in the sample app, click on the Algorand Standard Assets button. This will bring up the following page.
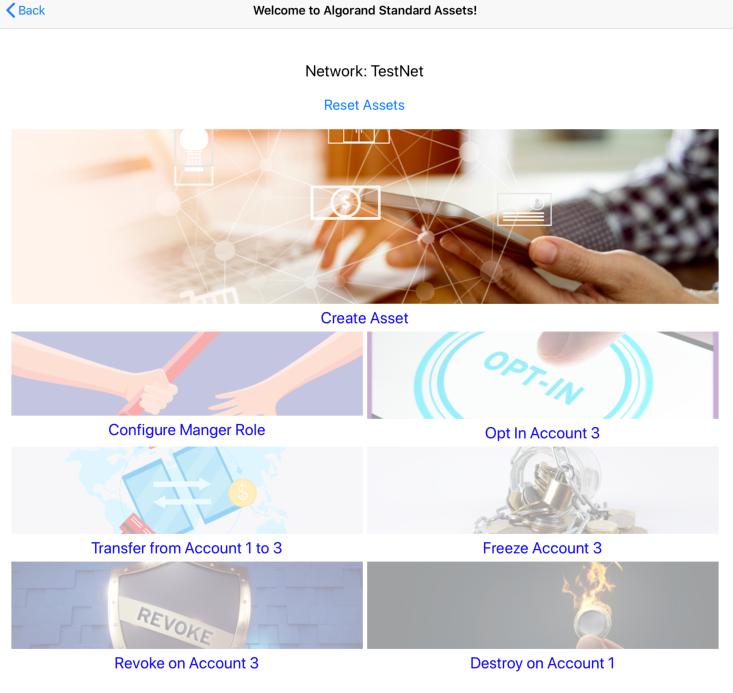
Figure 1-13 Algorand Standard Assets (ASA)
All the buttons on this page should initially be disabled except for Create Asset. The sequence we will go through on this page after Creating an Asset, will be to Manage, Opt-in, Transfer Freeze, Revoke and finally Destroy the asset. The results of each button will display on the bottom area of the scrollable page. Each button will take a few seconds to execute while waiting for the transaction to be broadcast to the blockchain. You will see the button image dim as the code is executing. The next button to press will be enabled.
Create Asset - Press Create Asset Button to get started. Once the transaction completes, you should see the Asset ID displayed at the top of the page and in the section at the bottom along with all the information about that Asset.
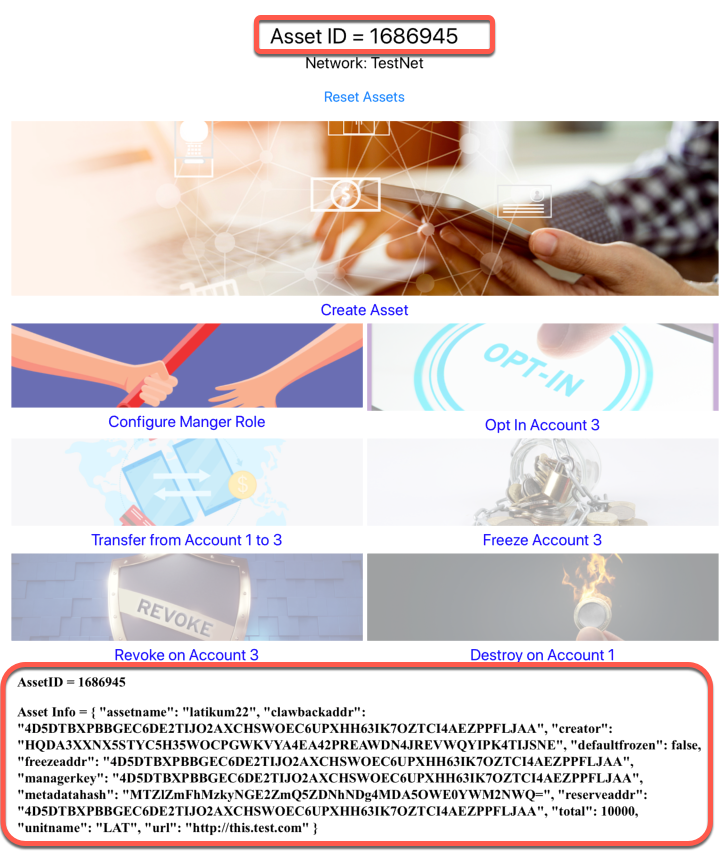
Figure 1-14 Create Asset
Here is the code in ASA.xaml.cs event handler CreateAsset_click in ASC.xaml.cs. This code sets Account 2 for Manager, Freeze, Clawback and Revoke. The creator is Account 1. The process is the same as we saw above for a Transaction on the Accounts page in the app. The transaction must be signed by the creator using SignTransaction, from Account 1. Then it needs to be submitted using Utils.SubmitTransaction and we wait for the broadcast to the blockchain to complete using Utils.WaitTransactionToComplete before we can proceed to display the asset information. To display asset information, use AssetInformation to retrieve information that is displayed.
private async void CreateAsset_click(System.Object sender, System.EventArgs e)
{
    CreateAsset.Opacity = .2;
    HtmlWebViewSource htmlSource = new HtmlWebViewSource();

    var transParams = algodApiInstance.TransactionParams();

    // The following parameters are asset specific
    // and will be re-used throughout the example.

    // Create the Asset
    // Total number of this asset available for circulation = 10000

    var ap = new AssetParams(creator: account1.Address.ToString(),
        name: "latikum22",
        unitName: "LAT", defaultFrozen: false, total: 10000,
        decimals: 0, url: "http://this.test.com",
        metadataHash: Encoding.ASCII.GetBytes("16efaa3924a6fd9d3a4880099a4ac65d"))
    {
        Manager = account2.Address.ToString()
    };

    // Specified address can change reserve, freeze, clawback, and manager
    // you can leave as default, by default the sender will be manager/reserve/freeze/clawback

    var tx = Utils.GetCreateAssetTransaction(ap, transParams, "asset tx message");

    // Sign the Transaction by sender
    SignedTransaction signedTx = account1.SignTransaction(tx);
    // send the transaction to the network and
    // wait for the transaction to be confirmed

    try
    {
        PostTransactionsResponse id = Utils.SubmitTransaction(algodApiInstance, signedTx);
        Console.WriteLine("Transaction ID: " + id.TxId);
        Console.WriteLine(Utils.WaitTransactionToComplete(algodApiInstance, id.TxId));
        // Now that the transaction is confirmed we can get the assetID
        var ptx = algodApiInstance.PendingTransactionInformation(id.TxId);
        assetID = ptx.AssetIndex;


        var assetIDstr = assetID.ToString();
        await SecureStorage.SetAsync(helper.StorageAssetIDName, assetIDstr);

        await SecureStorage.SetAsync(helper.StorageLastASAButton, "create");
        buttonstate("create");
        CreateAsset.Opacity = 1;
        var act = algodApiInstance.GetAssetByID(assetID).ToJson();
        //   var act = algodApiInstance.AssetInformation((long?)assetID).ToJson();

        htmlSource.Html = @"<html><body><h3>" + "AssetID = " + assetID.ToString() + "</h3>" +
            "<h3>" + "Asset Info = " + act.ToString() + "</h3>" +
            "</body></html>";

        myWebView.Source = htmlSource;
    }
    catch (Exception err)
    {
        ...
Configure Asset - The next step in the process is to configure the roles of the asset. The manager role, which has been set to Account 2 in step 1 above, must be the signer of this transaction. The code will now set the Manager role to Account 1. Run the app and click on Configure Manager Role button. You should now see the Manager role change to a different account than the rest of the roles for clawback, revoke, and freeze. Account 1 is now the manager role.
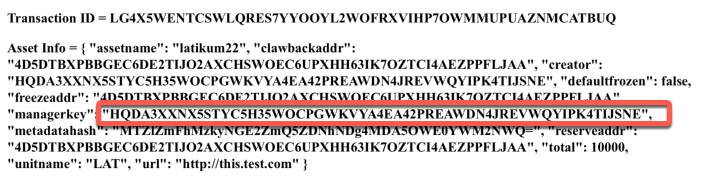
Figure 1-15 Manager Role is changed to Account 1
The code is in the event handler CongfigureManagerRole_click in ASA.xaml.cs. Use this method to change an asset configuration Utils.GetConfigAssetTransaction
async void CongfigureManagerRole_click(System.Object sender, System.EventArgs e)
{
    CongfigureManagerRole.Opacity = .2;
    // Change Asset Configuration:
    // Next we will change the asset configuration
    // First we update standard Transaction parameters
    // To account for changes in the state of the blockchain
    var transParams = algodApiInstance.TransactionParams();
    Asset ast = algodApiInstance.GetAssetByID(assetID);

    // Note that configuration changes must be done by
    // The manager account, which is currently account2
    // Note in this transaction we are re-using the asset
    // creation parameters and only changing the manager
    // and transaction parameters like first and last round
    // now update the manager to account1
    ast.Params.Manager = account1.Address.ToString();
    var tx = Utils.GetConfigAssetTransaction(account2.Address, ast, transParams, "config trans");

    // The transaction must be signed by the current manager account
    // We are reusing the signedTx variable from the first transaction in the example
    var signedTx = account2.SignTransaction(tx);
    // send the transaction to the network and
    // wait for the transaction to be confirmed
    string mytx;
    try
    {
        PostTransactionsResponse id = Utils.SubmitTransaction(algodApiInstance, signedTx);
        Console.WriteLine("Transaction ID: " + id.TxId);
        mytx= id.TxId;
        var wait = Utils.WaitTransactionToComplete(algodApiInstance, id.TxId);
        CongfigureManagerRole.Opacity = 1;
        Console.WriteLine(wait);
        await SecureStorage.SetAsync(helper.StorageLastASAButton, "manage");
        buttonstate("manage");
        // var act = algodApiInstance.AssetInformation((long?)assetID).ToJson();
        // Get the asset information for the newly changed asset
        ast = algodApiInstance.GetAssetByID(assetID);
        //The manager should now be the same as the creator

        var htmlSource = new HtmlWebViewSource();
        htmlSource.Html = @"<html><body><h3>" + "Transaction ID = " + mytx + "</h3>" +
            "<h3>" + "Asset ID = " + assetID.ToString() + "</h3>" +
            "<h3>" + "Asset Info = " + ast.ToString() + "</h3>" +
            "</body></html>";

        myWebView.Source = htmlSource;


    }
    catch (Exception err)
    {
    ...
Opt-In - To receive an Algorand asset, you must explicitly “opt-in” to receive the asset using the method Utils.GetActivateAssetTransaction. This sends a 0 amount of the asset to yourself (to the account wanting to receive the asset). Click the Opt-In Account 3 button.
The result should be: Account 3 Asset Amount = 0.
To see the balance, use AccountInformation
account = algodApiInstance.AccountInformation(account3.Address.ToString());
The assetholding contains 3 fields for the account that opts-in… Creator, Amount, and Frozen. The amount is initially 0.
account.GetHolding(assetID).Amount.ToString()
Here is the code in the OptIn_Clicked event handler in ASA.xaml.cs :
async void OptIn_Clicked(System.Object sender, System.EventArgs e)
{
    OptIn.Opacity = .2;

    // Opt in to Receiving the Asset

    // Opting in to transact with the new asset
    // All accounts that want receive the new asset
    // Have to opt in. To do this they send an asset transfer
    // of the new asset to themselves with an amount of 0
    // In this example we are setting up the 3rd recovered account to
    // receive the new asset
    // First, we update standard Transaction parameters
    // To account for changes in the state of the blockchain

    var transParams = algodApiInstance.TransactionParams();
    //  var tx = Utils.GetActivateAssetTransaction(account3.Address, assetID, transParams, "opt in transaction");
    var tx = Utils.GetAssetOptingInTransaction(account3.Address, assetID, transParams, "opt in transaction");

    // The transaction must be signed by the current manager account
    // We are reusing the signedTx variable from the first transaction in the example
    var signedTx = account3.SignTransaction(tx);
    // send the transaction to the network and
    // wait for the transaction to be confirmed
    Algorand.V2.Model.Account account = null;
    string mytx;
    try
    {
        PostTransactionsResponse id = Utils.SubmitTransaction(algodApiInstance, signedTx);
        Console.WriteLine("Transaction ID: " + id.TxId);
        var wait = Utils.WaitTransactionToComplete(algodApiInstance, id.TxId);
        mytx = id.TxId;
        OptIn.Opacity = 1;
        Console.WriteLine(wait);
        // We can now list the account information for acct3
        // and see that it can accept the new asset

        account = await algodApiInstance.AccountInformationAsync(account3.Address.ToString());
        var assetholding = account.Assets;
        Console.WriteLine(assetholding);
        await SecureStorage.SetAsync(helper.StorageLastASAButton, "optin");
        buttonstate("optin");

        account = await algodApiInstance.AccountInformationAsync(account3.Address.ToString());

        var htmlSource = new HtmlWebViewSource();
        htmlSource.Html = @"<html><body><h3>" + "Transaction ID = " + mytx + "</h3>" +
            "<h3>" + "Account 3 Asset Amount = " + account.Assets.Find(h => h.AssetId == assetID).Amount + "</h3>" +
            "<h3>" + "Asset ID = " + assetID.ToString() + "</h3>" +
            "</body></html>";

        myWebView.Source = htmlSource;
    }
    catch (Exception err)
    {
    ...
Transfer Asset - Now let’s transfer an asset from one account to another. Transfers are authorized (signed) by the account that holds the asset to be transferred. Asset transfers are analogous to standard payment transactions but for Algorand Standard Assets.
Click on the button to Transfer from Account 1 to Account 3. It will transfer 10 Assets.
You should see in the output at the bottom of the page.
Account 3 Asset Amount = 10 displayed.
Utils.GetTransferAssetTransaction is the SDK method used to transfer assets. Here is the code in the TransferAsset_Clicked event handler in ASA.xaml.cs.
async void TransferAsset_Clicked(System.Object sender, System.EventArgs e)
{
    TransferAsset.Opacity = .2;
    // Transfer the Asset:
    // Now that account3 can receive the new asset
    // we can transfer assets in from the creator
    // to account3
    // First we update standard Transaction parameters
    // To account for changes in the state of the blockchain

    var transParams = algodApiInstance.TransactionParams();
    // Next we set asset xfer specific parameters
    // We set the assetCloseTo to null so we do not close the asset out
    Address assetCloseTo = new Address();
    ulong assetAmount = 10;
    var tx = Utils.GetTransferAssetTransaction(account1.Address, account3.Address, assetID, assetAmount, transParams, null, "transfer message");
    // The transaction must be signed by the sender account
    // We are reusing the signedTx variable from the first transaction in the example
    var signedTx = account1.SignTransaction(tx);
    // send the transaction to the network and
    // wait for the transaction to be confirmed
    string mytx;
    try
    {
        PostTransactionsResponse id = Utils.SubmitTransaction(algodApiInstance, signedTx);
        Console.WriteLine("Transaction ID: " + id.TxId);
        mytx = id.TxId;
        Console.WriteLine(Utils.WaitTransactionToComplete(algodApiInstance, id.TxId));
        // We can now list the account information for acct3
        // and see that it now has 5 of the new asset
        var act = await algodApiInstance.AccountInformationAsync(account3.Address.ToString());
        Console.WriteLine(act.Assets.Find(h => h.AssetId == assetID).Amount);

        TransferAsset.Opacity = 1;
        await SecureStorage.SetAsync(helper.StorageLastASAButton, "transfer");
        buttonstate("transfer");
        var asset = algodApiInstance.GetAssetByID((long?)assetID).ToJson();
        Algorand.V2.Model.Account account = await algodApiInstance.AccountInformationAsync(account3.Address.ToString());

        var htmlSource = new HtmlWebViewSource();
        htmlSource.Html = @"<html><body><h3>" + "Transaction ID = " + mytx + "</h3>" +
                "<h3>" + "Asset ID = " + assetID.ToString() + "</h3>" +
            "<h3>" + "Account 3 Asset Amount = " + account.Assets.Find(h => h.AssetId == assetID).Amount + "</h3>" +
            "</body></html>";

        myWebView.Source = htmlSource;
    }
    catch (Exception err)
    {
        ...
Freeze Asset - Freezing an asset means that the asset can no longer be sent to or from that account.
An example use case for this functionality is if you suspect fraudulent activity related to your asset, you can issue a freeze transaction against the offending account’s asset holding while you take the time to investigate. If the account checks out okay, you can issue a follow-up transaction to unfreeze the account so they can resume trade.
Note: The sender of a freeze or unfreeze transaction must be the Freeze Manager, which is specified in the asset’s on-chain configuration.
Click the Freeze Account 3 button on the ASA page in the app. You should see at the bottom of the page…
Account 3 Asset Freeze = True
Account 2 is the freeze manager we set earlier, so Account 2 needs to sign this transaction.
To access the Frozen value use:
account.GetHolding(assetID).Frozen
Here is the code in FreezeAsset_Clicked in ASA.xaml.cs:
async void FreezeAsset_Clicked(System.Object sender, System.EventArgs e)
{
    FreezeAsset.Opacity = .2;
    // Freeze the asset
    // The asset was created and configured to allow freezing an account
    // If the freeze address is blank, it will no longer be possible to do this.
    // In this example we will now freeze account3 from transacting with the
    // The newly created asset.
    // The freeze transaction is sent from the freeze account
    // Which in this example is account2
    // First we update standard Transaction parameters
    // To account for changes in the state of the blockchain

    var transParams = algodApiInstance.TransactionParams();
    // Next we set asset xfer specific parameters
    // The sender should be freeze account acct2
    // Theaccount to freeze should be set to acct3
    var tx = Utils.GetFreezeAssetTransaction(account2.Address, account3.Address, assetID, true, transParams, "freeze transaction");
    // The transaction must be signed by the freeze account acct2
    // We are reusing the signedTx variable from the first transaction in the example
    var signedTx = account2.SignTransaction(tx);
    // send the transaction to the network and
    // wait for the transaction to be confirmed
    string mytx;
    try
    {
        PostTransactionsResponse id = Utils.SubmitTransaction(algodApiInstance, signedTx);
        Console.WriteLine("Transaction ID: " + id.TxId);
        Console.WriteLine(Utils.WaitTransactionToComplete(algodApiInstance, id.TxId));
        mytx = id.TxId;
        FreezeAsset.Opacity = 1;
        // We can now list the account information for acct3
        // and see that it now frozen

        var act = await algodApiInstance.AccountInformationAsync(account3.Address.ToString());
        Console.WriteLine(act.Assets.Find(h => h.AssetId == assetID));
        await SecureStorage.SetAsync(helper.StorageLastASAButton, "freeze");
        buttonstate("freeze");
        var asset = algodApiInstance.GetAssetByID((long?)assetID).ToJson();
        Algorand.V2.Model.Account account = await algodApiInstance.AccountInformationAsync(account3.Address.ToString());

        var htmlSource = new HtmlWebViewSource();
        htmlSource.Html = @"<html><body><h3>" + "Transaction ID = " + mytx + "</h3>" +
                "<h3>" + "Asset ID = " + assetID.ToString() + "</h3>" +
            "<h3>" + "Account 3 Asset Freeze = " + account.Assets.Find(h => h.AssetId == assetID) + "</h3>" +
            "</body></html>";

        myWebView.Source = htmlSource;

    }
    catch (Exception err)
    {
     ...
Revoke Asset - Asset revocation is also referred to as clawback functionality. Revoking an asset allows an asset’s revocation manager to transfer assets on behalf of another user. It will only work when issued by the asset’s revocation manager.
When an asset is created, the parameter in the AssetTransferTxn function that allows an asset to be “revocable” is called clawback address. If that parameter is set to “”, the asset is “un-revocable” and cannot be retroactively changed to being “revocable”.
Press the Revoke on Account 3 button. You should now see that the Asset Amount is now at 0 again for Account 3.
Account 3 Asset Amount = 0
Here is the code for the RevokeAsset_Clicked event handler in ASA.xaml.cs .
async void RevokeAsset_Clicked(System.Object sender, System.EventArgs e)
{
    RevokeAsset.Opacity = .2;
    // Revoke the asset:
    // The asset was also created with the ability for it to be revoked by
    // clawbackaddress. If the asset was created or configured by the manager
    // not allow this by setting the clawbackaddress to a blank address
    // then this would not be possible.
    // We will now clawback the 10 assets in account3. Account2
    // is the clawbackaccount and must sign the transaction
    // The sender will be the clawback adress.
    // the recipient will also be the creator acct1 in this case
    // First we update standard Transaction parameters
    // To account for changes in the state of the blockchain
    var transParams = algodApiInstance.TransactionParams();
    // Next we set asset xfer specific parameters
    ulong assetAmount = 10;
    var tx = Utils.GetRevokeAssetTransaction(account2.Address, account3.Address, account1.Address, assetID, assetAmount, transParams, "revoke transaction");
    // The transaction must be signed by the clawback account
    // We are reusing the signedTx variable from the first transaction in the example
    var signedTx = account2.SignTransaction(tx);
    // send the transaction to the network and
    // wait for the transaction to be confirmed
    string mytx;
    try
    {
        PostTransactionsResponse id = Utils.SubmitTransaction(algodApiInstance, signedTx);
        Console.WriteLine("Transaction ID: " + id);
        Console.WriteLine(Utils.WaitTransactionToComplete(algodApiInstance, id.TxId));
        mytx = id.TxId;
        RevokeAsset.Opacity = .4;
        RevokeAsset.IsEnabled = false;
        // We can now list the account information for acct3
        // and see that it now has 0 of the new asset
        var act = await algodApiInstance.AccountInformationAsync(account3.Address.ToString());

        Console.WriteLine(act.Assets.Find(h => h.AssetId == assetID).Amount);
        await SecureStorage.SetAsync(helper.StorageLastASAButton, "revoke");
        buttonstate("revoke");
        Algorand.V2.Model.Account account = await algodApiInstance.AccountInformationAsync(account3.Address.ToString());

        var htmlSource = new HtmlWebViewSource();
        htmlSource.Html = @"<html><body><h3>" + "Transaction ID = " + mytx + "</h3>" +
                "<h3>" + "Asset ID = " + assetID.ToString() + "</h3>" +
            "<h3>" + "Account 3 Asset Amount = " + account.Assets.Find(h => h.AssetId == assetID).Amount + "</h3>" +
            "</body></html>";

        myWebView.Source = htmlSource;
    }
    catch (Exception err)
    {
    ...
Destroy Asset - In order to trigger a destroy asset transaction, the original creator of the asset must be in possession (must have in its balance record) all units of the asset.
Click on Destroy on Account 1.
You should see at the bottom of the page…
Does AssetID: 1686945 exist? False
A Boolean expression to determine if an account holds an asset is…
account.Thisassettotal.ContainsKey(assetID)
Here is the code in the DestroyAsset_Clicked event handler in ASA.xaml.cs.
async void DestroyAsset_Clicked(System.Object sender, System.EventArgs e)
{
    DestroyAsset.Opacity = .2;
    // Destroy the Asset:
    // All of the created assets should now be back in the creators
    // Account so we can delete the asset.
    // If this is not the case the asset deletion will fail
    // The address for the from field must be the creator
    // First we update standard Transaction parameters
    // To account for changes in the state of the blockchain
    var transParams = algodApiInstance.TransactionParams();
    // Next we set asset xfer specific parameters
    // The manager must sign and submit the transaction
    // This is currently set to acct1
    var tx = Utils.GetDestroyAssetTransaction(account1.Address, assetID, transParams, "destroy transaction");
    // The transaction must be signed by the manager account
    // We are reusing the signedTx variable from the first transaction in the example
    var signedTx = account1.SignTransaction(tx);
    // send the transaction to the network and
    // wait for the transaction to be confirmed
    string mytx;
    try
    {
        PostTransactionsResponse id = Utils.SubmitTransaction(algodApiInstance, signedTx);
        Console.WriteLine("Transaction ID: " + id.TxId);
        //waitForTransactionToComplete(algodApiInstance, signedTx.transactionID);
        //Console.ReadKey();
        Console.WriteLine(Utils.WaitTransactionToComplete(algodApiInstance, id.TxId));
        mytx = id.TxId;
        // We can now list the account information for acct1
        // and see that the asset is no longer there
        var act = await algodApiInstance.AccountInformationAsync(account1.Address.ToString());

        Console.WriteLine("Does AssetID: " + assetID + " exist? " +
            act.Assets.Find(h => h.AssetId == assetID));


        await SecureStorage.SetAsync(helper.StorageAssetIDName, "");

        myAsset.Text = "";
        DestroyAsset.Opacity = 1;
        await SecureStorage.SetAsync(helper.StorageLastASAButton, "destroy");
        buttonstate("destroy");
        Algorand.V2.Model.Account account = await algodApiInstance.AccountInformationAsync(account3.Address.ToString());

        var htmlSource = new HtmlWebViewSource();
        htmlSource.Html = @"<html><body><h3>" + "Transaction ID = " + mytx + "</h3>" +
            "<h3>" + "AssetID: " + assetID + " destroyed "  + "</h3>" +
            "</body></html>";

        myWebView.Source = htmlSource;
    }
    catch (Exception err)
    {
    ...
Atomic Transfer
Atomic Transfers are irreducible batch transactions that allow groups of transactions to be submitted at one time. If any of the transactions fail, then all the transactions will fail. That is, an Atomic Transfer guarantees the simultaneous execution of multiple transfers of all kinds of assets.
Press the Atomic Transfers on the MainPage of the app.
Press the button image Account 1 to both A1 and A3 It will send an Atomic Transaction to Account 2 and Account 3, from Account 1.
The code will send 1000 micro algos from Account 1 to Account 2 as well as send 1000 micro algos from Account 1 to Account 3. You should see the before and after balances similar to this.
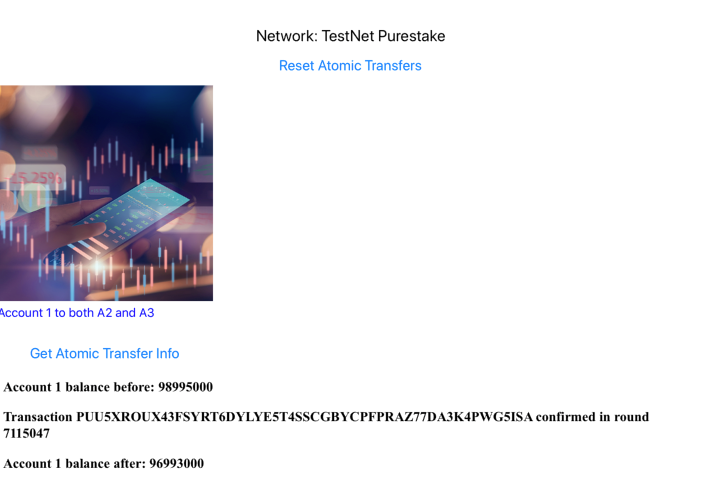
Figure 1-16 Atomic Transfer
`Account 1 balance before: 98995000
Transaction PUU5XROUX43FSYRT6DYLYE5T4SSCGBYCPFPRAZ77DA3K4PWG5ISA confirmed in round 7115047
Account 1 balance after: 96993000`
The flow of an Atomic Transfer is:
- Create the Transactions — This is like creating any kind of transaction in Algorand.
- Group the Transactions — This involves computing a groupID and assigning that id to each transaction.
- Sign the grouped transactions — Sign the grouped transactions with their respective private keys.
- Send the transactions to the network — Combine the transactions and send it to the network.
Here is the code in the AtomicTransfer_Clicked event handler in AtomicTransfers.xaml.cs
async void AtomicTransfer_Clicked(System.Object sender, System.EventArgs e)
{
    //var transParams = algodApiInstance.TransactionParams();
    AtomicTransfer.Opacity = .2;
    StackAtomicTransfers.IsEnabled = false;
    Algorand.V2.Model.TransactionParametersResponse transParams = null;
    AtomicTransfer.IsEnabled = false;

    try
    {
        transParams = algodApiInstance.TransactionParams();
    }
    catch (ApiException err)
    {
        throw new Exception("Could not get params", err);
    }
    // let's create a transaction group
    var amount = Utils.AlgosToMicroalgos(1);
    var tx = Utils.GetPaymentTransaction(account1.Address, account2.Address, amount, "pay message", transParams);
    var tx2 = Utils.GetPaymentTransaction(account1.Address, account3.Address, amount, "pay message", transParams);
    //SignedTransaction signedTx2 = src.SignTransactionWithFeePerByte(tx2, feePerByte);
    Digest gid = TxGroup.ComputeGroupID(new Algorand.Transaction[] { tx, tx2 });
    tx.AssignGroupID(gid);
    tx2.AssignGroupID(gid);
    // already updated the groupid, sign
    var signedTx = account1.SignTransaction(tx);
    var signedTx2 = account1.SignTransaction(tx2);
    try
    {
        //contact the signed msgpack
        List<byte> byteList = new List<byte>(Algorand.Encoder.EncodeToMsgPack(signedTx));
        byteList.AddRange(Algorand.Encoder.EncodeToMsgPack(signedTx2));
        var act = await algodApiInstance.AccountInformationAsync(account1.Address.ToString());
        var before = "Account 1 balance before: " + act.Amount.ToString();
        var id = algodApiInstance.RawTransaction(byteList.ToArray());
        var wait = Utils.WaitTransactionToComplete(algodApiInstance, id.TxId);
        Console.WriteLine(wait);

        // Console.WriteLine("Successfully sent tx group with first tx id: " + id);

        act = await algodApiInstance.AccountInformationAsync(account1.Address.ToString());

        await SecureStorage.SetAsync(helper.StorageAtomicTransaction, wait.ToString());

        var htmlSource = new HtmlWebViewSource();
        htmlSource.Html = @"<html><body><h3>" + before + " </h3>" +
            "<h3>" + wait + "</h3>" + "<h3> Account 1 balance after: " + act.Amount.ToString() + "</h3></body></html>";

        myWebView.Source = htmlSource;
        AtomicTransfer.IsEnabled = true;
    }
    catch (ApiException err)
    {
    ...
Algorand Smart Contract
Algorand Smart Contracts (ASC1) are small programs written in an assembly-like language that can be used as a replacement for signatures within a transaction. The language of Algorand Smart Contracts is named Transaction Execution Approval Language or TEAL.
TEAL programs have one primary function and that is to determine whether or not a transaction is approved by analyzing it against its own logic and returning either true or false - approved or not approved, respectively. Algorand transactions can be authorized by a signature from a single account or a multisignature account. Smart Contracts allow for a third type of signature using a TEAL program, called a logic signature (LogicSig). Algorand Smart Contracts provide two modes for TEAL logic to operate as a LogicSig… Contract Account and Delegated Approval.
Select Algoand Smart Contract Layer 1 on the MainPage of the application.
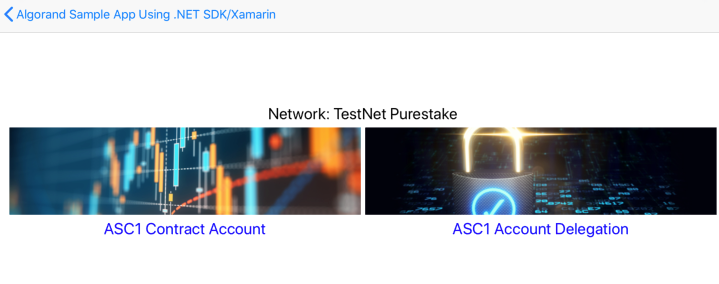
Figure 1-17 Smart Contracts
Contract Account
When used as a contract account the TEAL code is compiled, which returns an Algorand address. The contract account address can be sent Algos or Algorand Assets from any account using a standard transaction. When sending from a contract account the logic in the TEAL program determines if the transaction is approved. Contract accounts are great for setting up escrow style accounts where say you want to limit withdrawals or you want to do periodic payments, etc.
Select the image for ASC1 Contract Account and you should see an expected error…
Expected error: Exception when calling algod#rawTransaction: Error calling RawTransaction: transaction 3VDYL7EWPQ5SO5LN5Y5XPMSMCMWUTT6T4NOSNWDVB5RTFLNOCOMA: rejected by logic
A TEAL program returns either True or False. Our code has a TEAL program which is int 0 and always returns false.
// format and send logic sig
byte[] program = { 0x01, 0x20, 0x01, 0x00, 0x22 };
// int 0, returns false, so rawTransaction will fail below
Open the code in ASC.xaml.cs in the ASCContractAccount_Clicked event handler.
void ASCContractAccount_Clicked(System.Object sender, System.EventArgs e)
{
    StackASCContractAccount.IsEnabled = false;
    ASCContractAccount.Opacity = .2;
    ASCContractAccount.IsEnabled = false;
    Algorand.V2.Model.TransactionParametersResponse transParams = null;
    try
    {
        transParams = algodApiInstance.TransactionParams();
    }
    catch (ApiException err)
    {
        throw new Exception("Could not get params", err);
    }
    // format and send logic sig
    // int 1, returns true
    // byte[] program = { 0x01, 0x20, 0x01, 0x01, 0x22 };
    // int 0, returns false, so rawTransaction will fail below
    // byte[] program = Convert.FromBase64String("ASABASI=");
    //  byte[] program = { 0x01, 0x20, 0x01, 0x00, 0x22 };
    byte[] program = { 0x01, 0x20, 0x01, 0x00, 0x22 };
    LogicsigSignature lsig = new LogicsigSignature(program, null);
    Console.WriteLine("Escrow address: " + lsig.ToAddress().ToString());
    var tx = Utils.GetPaymentTransaction(lsig.Address, account1.Address, 100000, "draw algo from contract", transParams);

    //  Algorand.Transaction tx = Utils.GetLogicSignatureTransaction(lsig, account1.Address, transParams, "logic sig message");
    if (!lsig.Verify(tx.sender))
    {
        string msg = "Verification failed";
        Console.WriteLine(msg);
    }
    else
    {
        try
        {
            SignedTransaction stx = Account.SignLogicsigTransaction(lsig, tx);
            byte[] encodedTxBytes = Encoder.EncodeToMsgPack(stx);
            // int 0 is the teal program, which returns false,
            // so rawTransaction will fail below
            var id = algodApiInstance.RawTransaction(encodedTxBytes);
            Console.WriteLine("Successfully sent tx logic sig tx id: " + id);
            var wait = Utils.WaitTransactionToComplete(algodApiInstance, id.TxId);
            Console.WriteLine(wait);
            var htmlSource = new HtmlWebViewSource();
            htmlSource.Html = @"<html><body>" +
"<h3>" + "Successfully sent tx logic sig tx: " + wait + "</h3>" +
"</body></html>";
            myWebView.Source = htmlSource;
            ASCContractAccount.IsEnabled = true;
        }
        catch (ApiException err)
        {
            // This is generally expected, but should give us an informative error message.
            Console.WriteLine("Fail expected");
            Console.WriteLine("Exception when calling algod#rawTransaction: " + err.Message);
            var htmlSource = new HtmlWebViewSource();
            htmlSource.Html = @"<html><body>" +
                "<h3>" + "Expected error: Exception when calling algod#rawTransaction: " + err.Message + "</h3>" +
                "</body></html>";
            myWebView.Source = htmlSource;
            ASCContractAccount.IsEnabled = true;
        }
    }
    StackASCContractAccount.IsEnabled = true;
    ASCContractAccount.Opacity = 1;
}
Account Delegation
You can also use TEAL to do delegated signatures, which essentially means you sign a TEAL program with your private key or multisig keys and you can give this logic signature to someone else. This will allow this person to submit transactions from your account, as long as they are approved by the TEAL program. The TEAL program can limit the amount of authority you delegate. For example, you can create a delegated signature that allows a utility company to remove up to x Algos every 50000 blocks from your account.
Select ASC1 Account Delegation on the ASC1 page in the app.
Once again this will be rejected by logic as int 0 returns false.
Expected error: Exception when calling algod#rawTransaction: Error calling RawTransaction: transaction AOTWRCM72R7JFWNTVUFLU2RABFIL3XNPHO22YVEZUFJQ34EZRBYQ: rejected by logic
The main difference to Contract Account above, is that the following code delegates an account signature.
// sign the logic signature with an account sk
    account1.SignLogicsig(lsig);
And the transaction uses the account address as the first parameter instead of the lsig in Utils.GetLogicSignatureTransaction
Algorand.Transaction tx = Utils.GetLogicSignatureTransaction(account1.Address, account2.Address, transParams, "logic sig message");
Again, this will fail again as the TEAL program returns false with Int 0.
void ASCAccountDelegation_Clicked(System.Object sender, System.EventArgs e)
{
    ASCAccountDelegation.Opacity = .2;
    StackASCAccountDelegation.IsEnabled = false;
    ASCAccountDelegation.IsEnabled = false;
    Algorand.V2.Model.TransactionParametersResponse transParams = null;
    try
    {
        transParams = algodApiInstance.TransactionParams();
    }
    catch (ApiException err)
    {
        throw new Exception("Could not get params", err);
    }
    // format and send logic sig
    // int 1, returns true
    // byte[] program = { 0x01, 0x20, 0x01, 0x01, 0x22 };
    // int 0, returns false, so rawTransaction will fail below
    // byte[] program = { 0x01, 0x20, 0x01, 0x00, 0x22 };
    byte[] program = { 0x01, 0x20, 0x01, 0x00, 0x22 };

    LogicsigSignature lsig = new LogicsigSignature(program, null);

    // sign the logic signature with an account sk
    account1.SignLogicsig(lsig);

    Console.WriteLine("Escrow address: " + lsig.ToAddress().ToString());
    Transaction tx = Utils.GetPaymentTransaction(new Address(account1.Address.ToString()), new Address(account2.Address.ToString()), 1000000,
"draw algo with logic signature", transParams);
    //  Algorand.Transaction tx = Utils.GetLogicSignatureTransaction(account1.Address, account2.Address, transParams, "logic sig message");
    try
    {
        SignedTransaction stx = Account.SignLogicsigTransaction(lsig, tx);
        byte[] encodedTxBytes = Encoder.EncodeToMsgPack(stx);
        // int 0 is the teal program, which returns false,
        // so rawTransaction will fail below

        var id = Utils.SubmitTransaction(algodApiInstance, stx);

        var wait = Utils.WaitTransactionToComplete(algodApiInstance, id.TxId);
        Console.WriteLine(wait);
        Console.WriteLine("Successfully sent tx logic sig tx id: " + id);
        var htmlSource = new HtmlWebViewSource();
        htmlSource.Html = @"<html><body>" +
"<h3>" + "Successfully sent tx logic sig tx: " + wait + "</h3>" +
"</body></html>";
        myWebView.Source = htmlSource;
        ASCAccountDelegation.IsEnabled = true;
    }
    catch (ApiException err)
    {
        // This is generally expected, but should give us an informative error message.

        Console.WriteLine("Exception when calling algod#rawTransaction: " + err.Message);
        var htmlSource = new HtmlWebViewSource();
        htmlSource.Html = @"<html><body><h3> Expected error: Exception when calling algod#rawTransaction: " + err.Message + "</h3>" + "</body></html>";
        myWebView.Source = htmlSource;
        ASCAccountDelegation.IsEnabled = true;
    }
    ASCAccountDelegation.Opacity = 1;
    StackASCAccountDelegation.IsEnabled = true;
}
Compile Teal
The following code will compile TEAL source code. It can be found in CompileTeal.xaml.cs in the CompileTeal_Clicked event.
void CompileTeal_Clicked(System.Object sender, System.EventArgs e)
{
    byte[] data = ExtractResource("algorandapp.Contract.sample.teal");
    var response = client.TealCompile(data);
    Debug.WriteLine("response: " + response);
    Debug.WriteLine("Hash: " + response.Hash);
    Debug.WriteLine("Result: " + response.Result);
    DisplayInfo( "Hash: " + response.Hash + "\nResult: " + response.Result);

}

public static byte[] ExtractResource(String filename)
{
    System.Reflection.Assembly a = System.Reflection.Assembly.GetExecutingAssembly();
    using (Stream resFilestream = a.GetManifestResourceStream(filename))
    {
        if (resFilestream == null) return null;
        byte[] ba = new byte[resFilestream.Length];
        resFilestream.Read(ba, 0, ba.Length);
        return ba;
    }
}
void DisplayInfo(string text)
{
    var htmlSource = new HtmlWebViewSource();
    htmlSource.Html = @"<html><body><h2>" + text + "</h2></body></html>";
    myWebView.Source = htmlSource;
}
Output should look similar to:
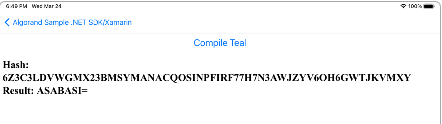
Figure 13-1 Compile Teal
Dryrun Debugging
To create a dryrun debugging file use the following code. Smart contracts can be debugged. An interactive debugger uses the tealdbg command-line tool to launch a debug session where the smart contract can be examined as the contract is being evaluated. The code can be found in DryrunDebugging.xaml.cs in the DryrunDebugging_Clicked event. For more information see tealdbg utility doc.
void DryrunDebugging_Clicked(System.Object sender, System.EventArgs e)
{
    byte[] source = ExtractResource("algorandapp.Contract.sample.teal");
    byte[] program = Convert.FromBase64String("ASABASI=");
    LogicsigSignature lsig = new LogicsigSignature(program, null);
    // sign the logic signaure with an account sk
    account1.SignLogicsig(lsig);
    Algorand.V2.Model.TransactionParametersResponse transParams;
    try
    {
        transParams = client.TransactionParams();
    }
    catch (ApiException err)
    {
        throw new Exception("Could not get params", err);
    }
    Transaction tx = Utils.GetPaymentTransaction(account1.Address, account2.Address, 1000000,
        "tx using in dryrun", transParams);
    try
    {
        //bypass verify for non-lsig
        SignedTransaction signedTx = Account.SignLogicsigTransaction(lsig, tx);
        // dryrun source
        var dryrunResponse = Utils.GetDryrunResponse(client, signedTx, source);
        Debug.WriteLine("Dryrun compiled repsonse : " + dryrunResponse.ToJson()); // pretty print
        DisplayInfo("Dryrun compiled repsonse : " + dryrunResponse.ToJson());
        // dryrun logic sig transaction - omit source
        //var dryrunResponse2 = Utils.GetDryrunResponse(algodApiInstance, signedTx);
        //Debug.WriteLine("Dryrun source repsonse : " + dryrunResponse2.ToJson()); // pretty print

        //var id = Utils.SubmitTransaction(algodApiInstance, signedTx);
        //Console.WriteLine("Successfully sent tx logic sig tx id: " + id);
    }
    catch (ApiException err)
    {
        // This error should give us an informative error message.
        Debug.WriteLine("Exception: " + err.Message);
    }
The output should look similar to this:
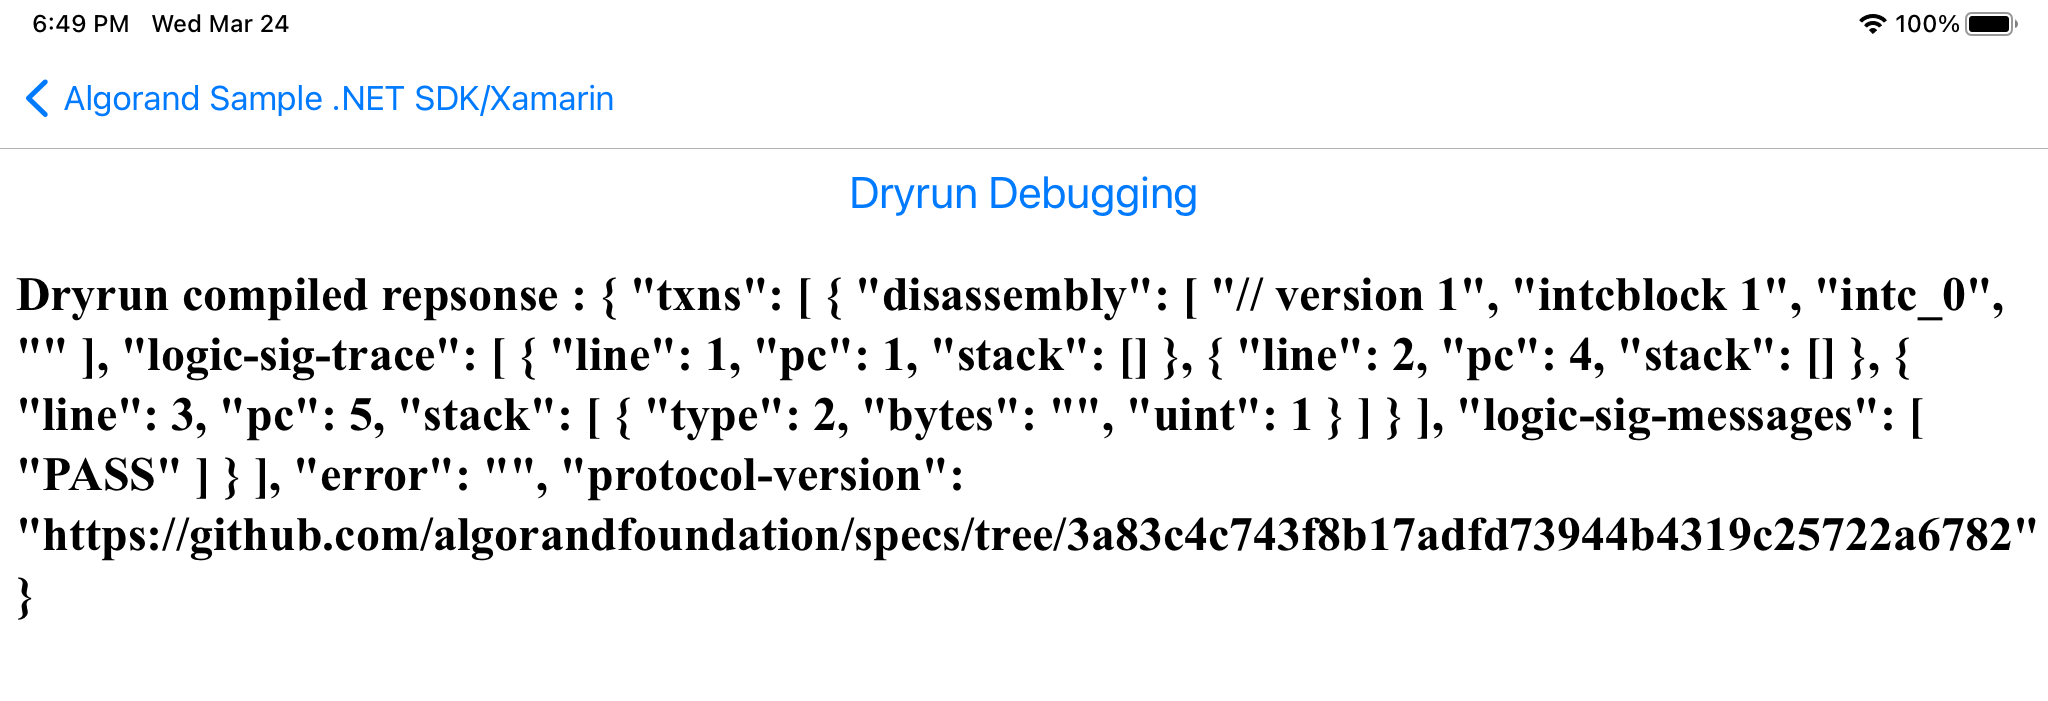
Figure 14-1 Dryrun Debugging Request
Indexer
The Algorand Indexer is a feature that enables searching the blockchain for transactions, assets, accounts, and blocks with various criteria. The following code for various queries can be found in Indexer.xaml.cs in the following event handlers. There are many examples and filters on index searches, these are just a few below. Details can be found here..
The code to instanciate the Indexer Deamon looks similar to this below. Here we are using Purestake API Indexer service. Rand Labs also provides this service.
static string INDEXER_API_ADDR = "https://testnet-algorand.api.purestake.io/idx2";
static string INDEXER_API_TOKEN = "B3SU4KcVKi94Jap2VXkK83xx38bsv95K5UZm2lab”;
IndexerApi indexer = new IndexerApi(INDEXER_API_ADDR, INDEXER_API_TOKEN);
string address = "KV2XGKMXGYJ6PWYQA5374BYIQBL3ONRMSIARPCFCJEAMAHQEVYPB7PL3KU";
Health
    void Health_Clicked(System.Object sender, System.EventArgs e)
    {
        var health = indexer.MakeHealthCheck();
        Debug.WriteLine("Make Health Check: " + health.ToJson());
        DisplayInfo("Make Health Check:" + health.ToJson());
    }
Output should look Similar to:
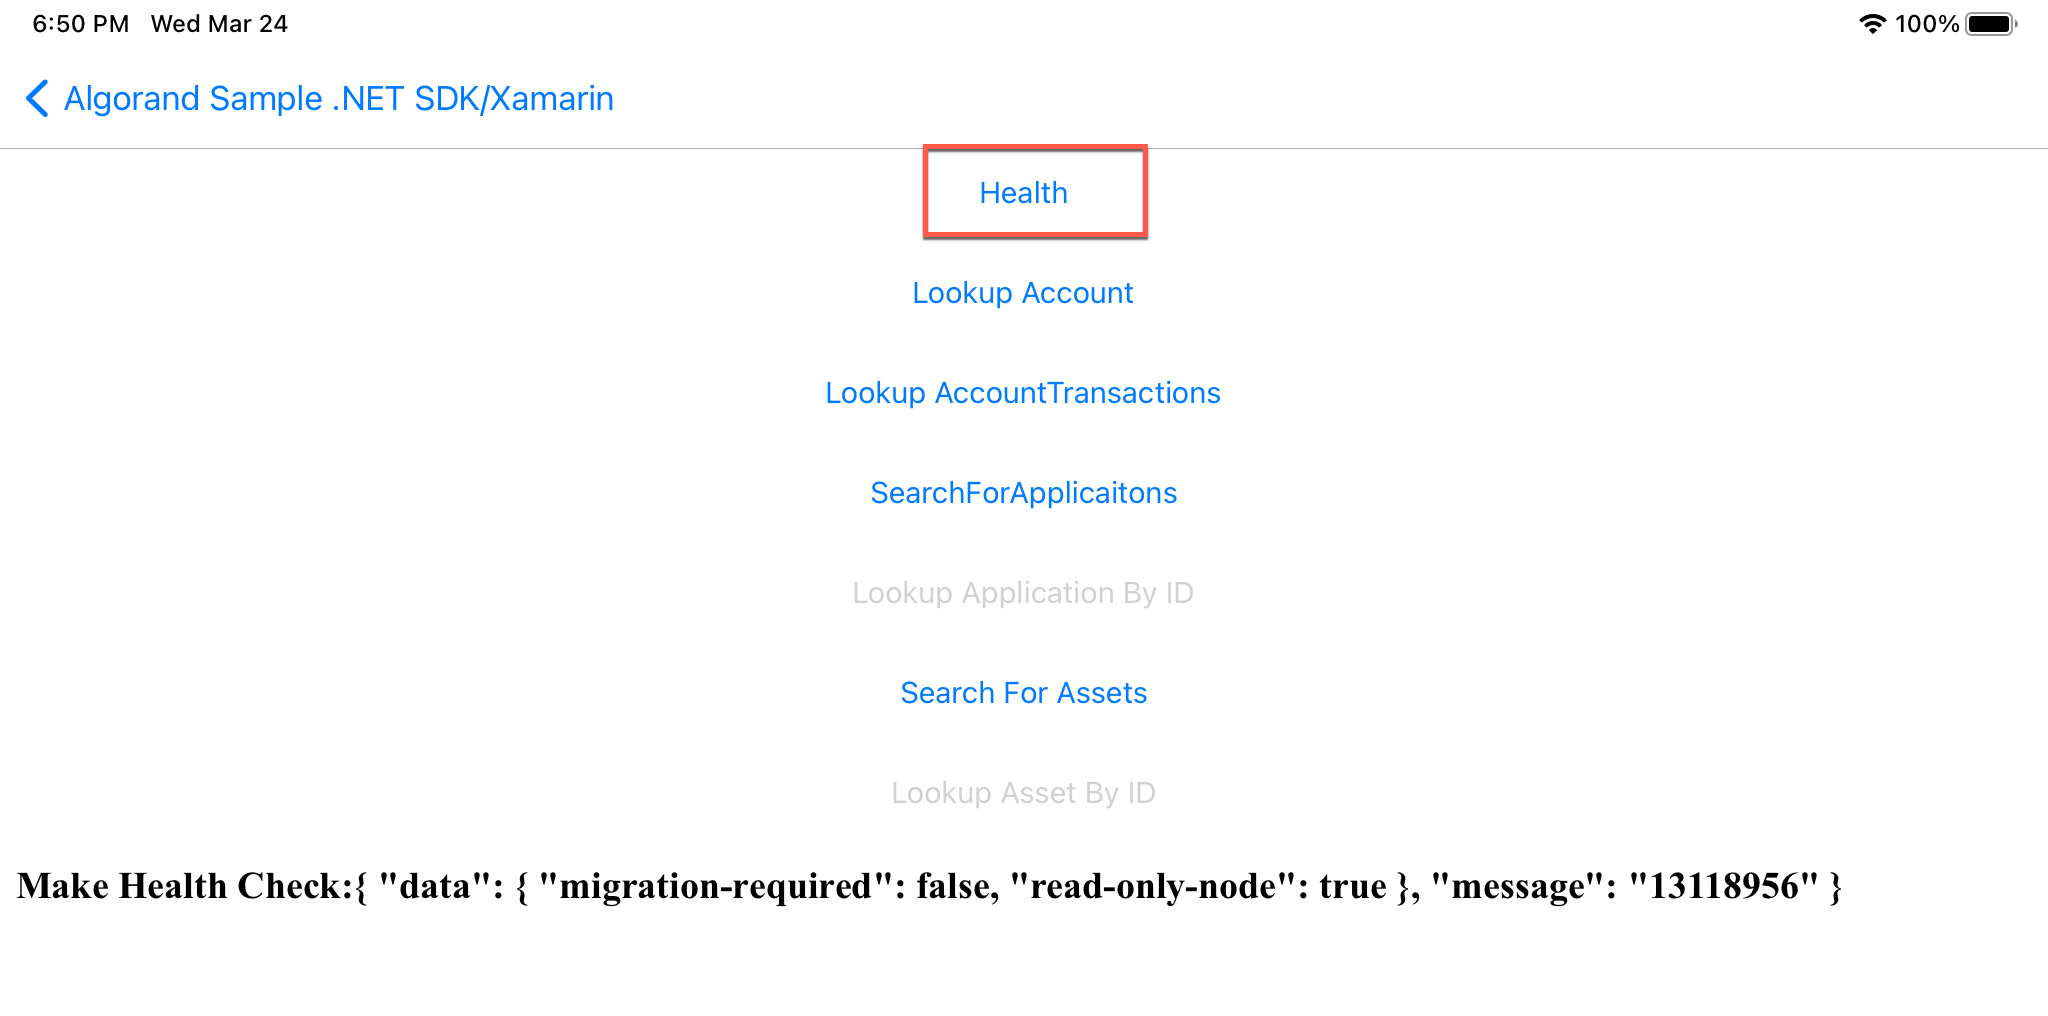
Figure 15-1 MakeHealthCheck
Lookup Account by ID
void LookupAccount_Clicked(System.Object sender, System.EventArgs e)
{
    System.Threading.Thread.Sleep(1200); //test in purestake, imit 1 req/sec
    var acctInfo = indexer.LookupAccountByID(address);
    Debug.WriteLine("Look up account by id: " + acctInfo.ToJson());
    DisplayInfo("Look up account by id: " + acctInfo.ToJson());
}
Output should look similar to:
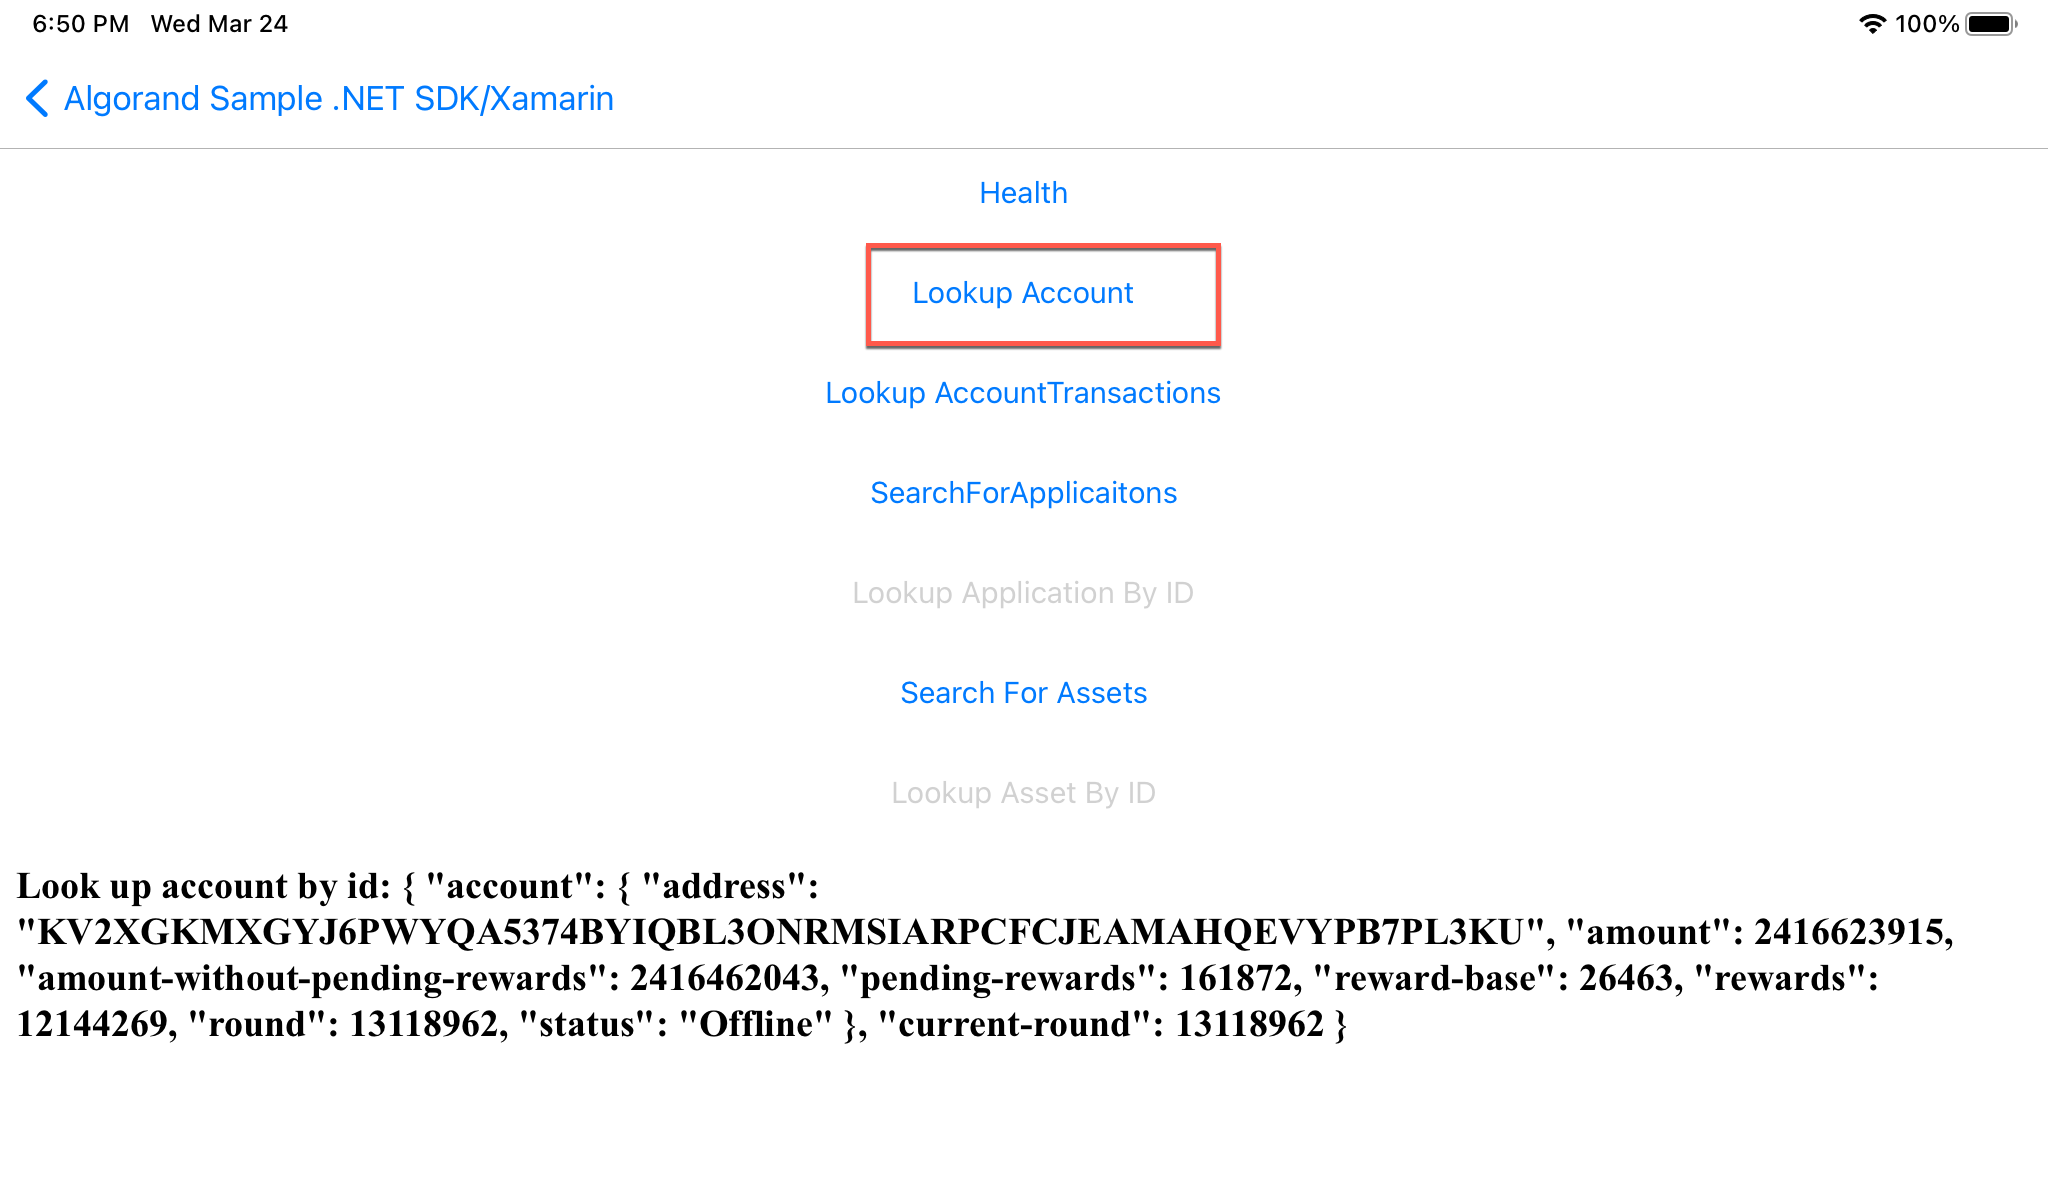
Figure 15-2 Lookup Account by ID
Lookup Account Transactions
void LookupAccountTransactions_Clicked(System.Object sender, System.EventArgs e)
{
    System.Threading.Thread.Sleep(1200); //test in purestake, imit 1 req/sec
    var transInfos = indexer.LookupAccountTransactions(address, 10);
    Debug.WriteLine("Look up account transactions(limit 10): " + transInfos.ToJson());
    DisplayInfo("Look up account transactions(limit 10):  " + transInfos.ToJson());
}
Output should look similar to:
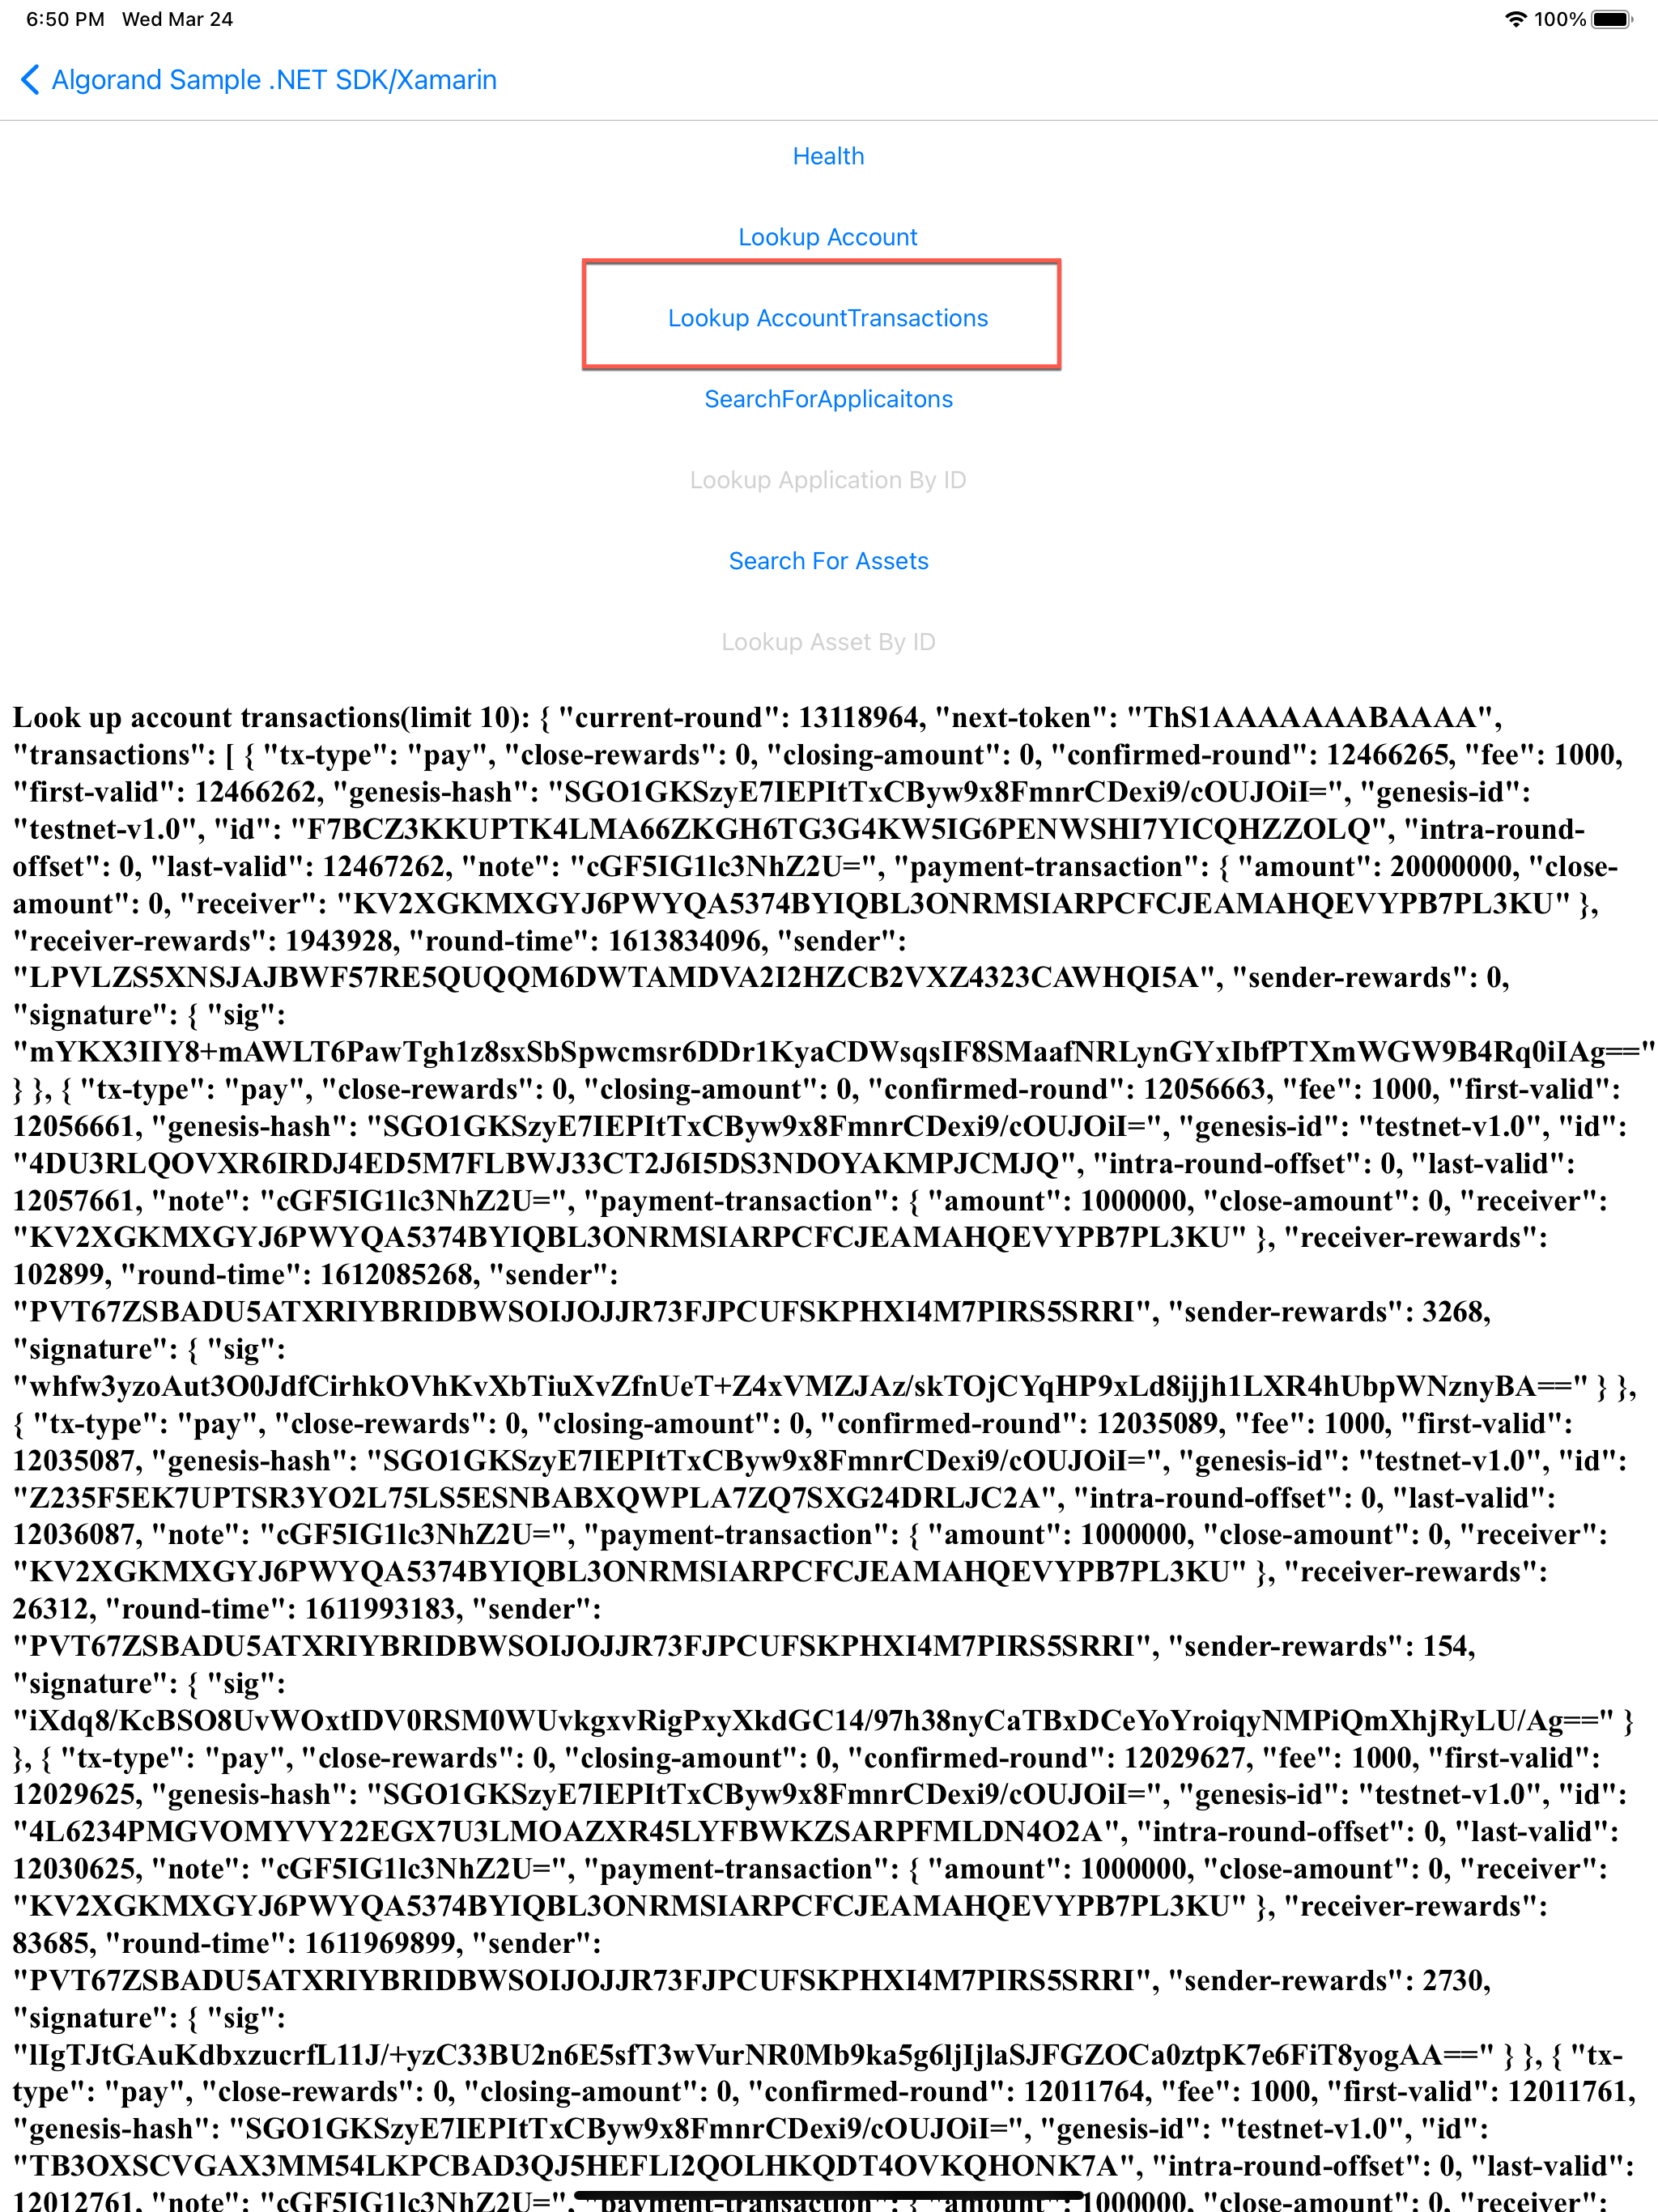
Figure 15-3 Lookup Account Transactions
Search For Applications
void SearchForApplications_Clicked(System.Object sender, System.EventArgs e)
{
    System.Threading.Thread.Sleep(1200); //test in purestake, imit 1 req/sec
    appsInfo = indexer.SearchForApplications(limit: 10);
    Debug.WriteLine("Search for application(limit 10): " + appsInfo.ToJson());
    DisplayInfo("Search for application(limit 10): " + appsInfo.ToJson());
    LookupApplicationByID.IsEnabled = true;
}
Output should look similar to this:
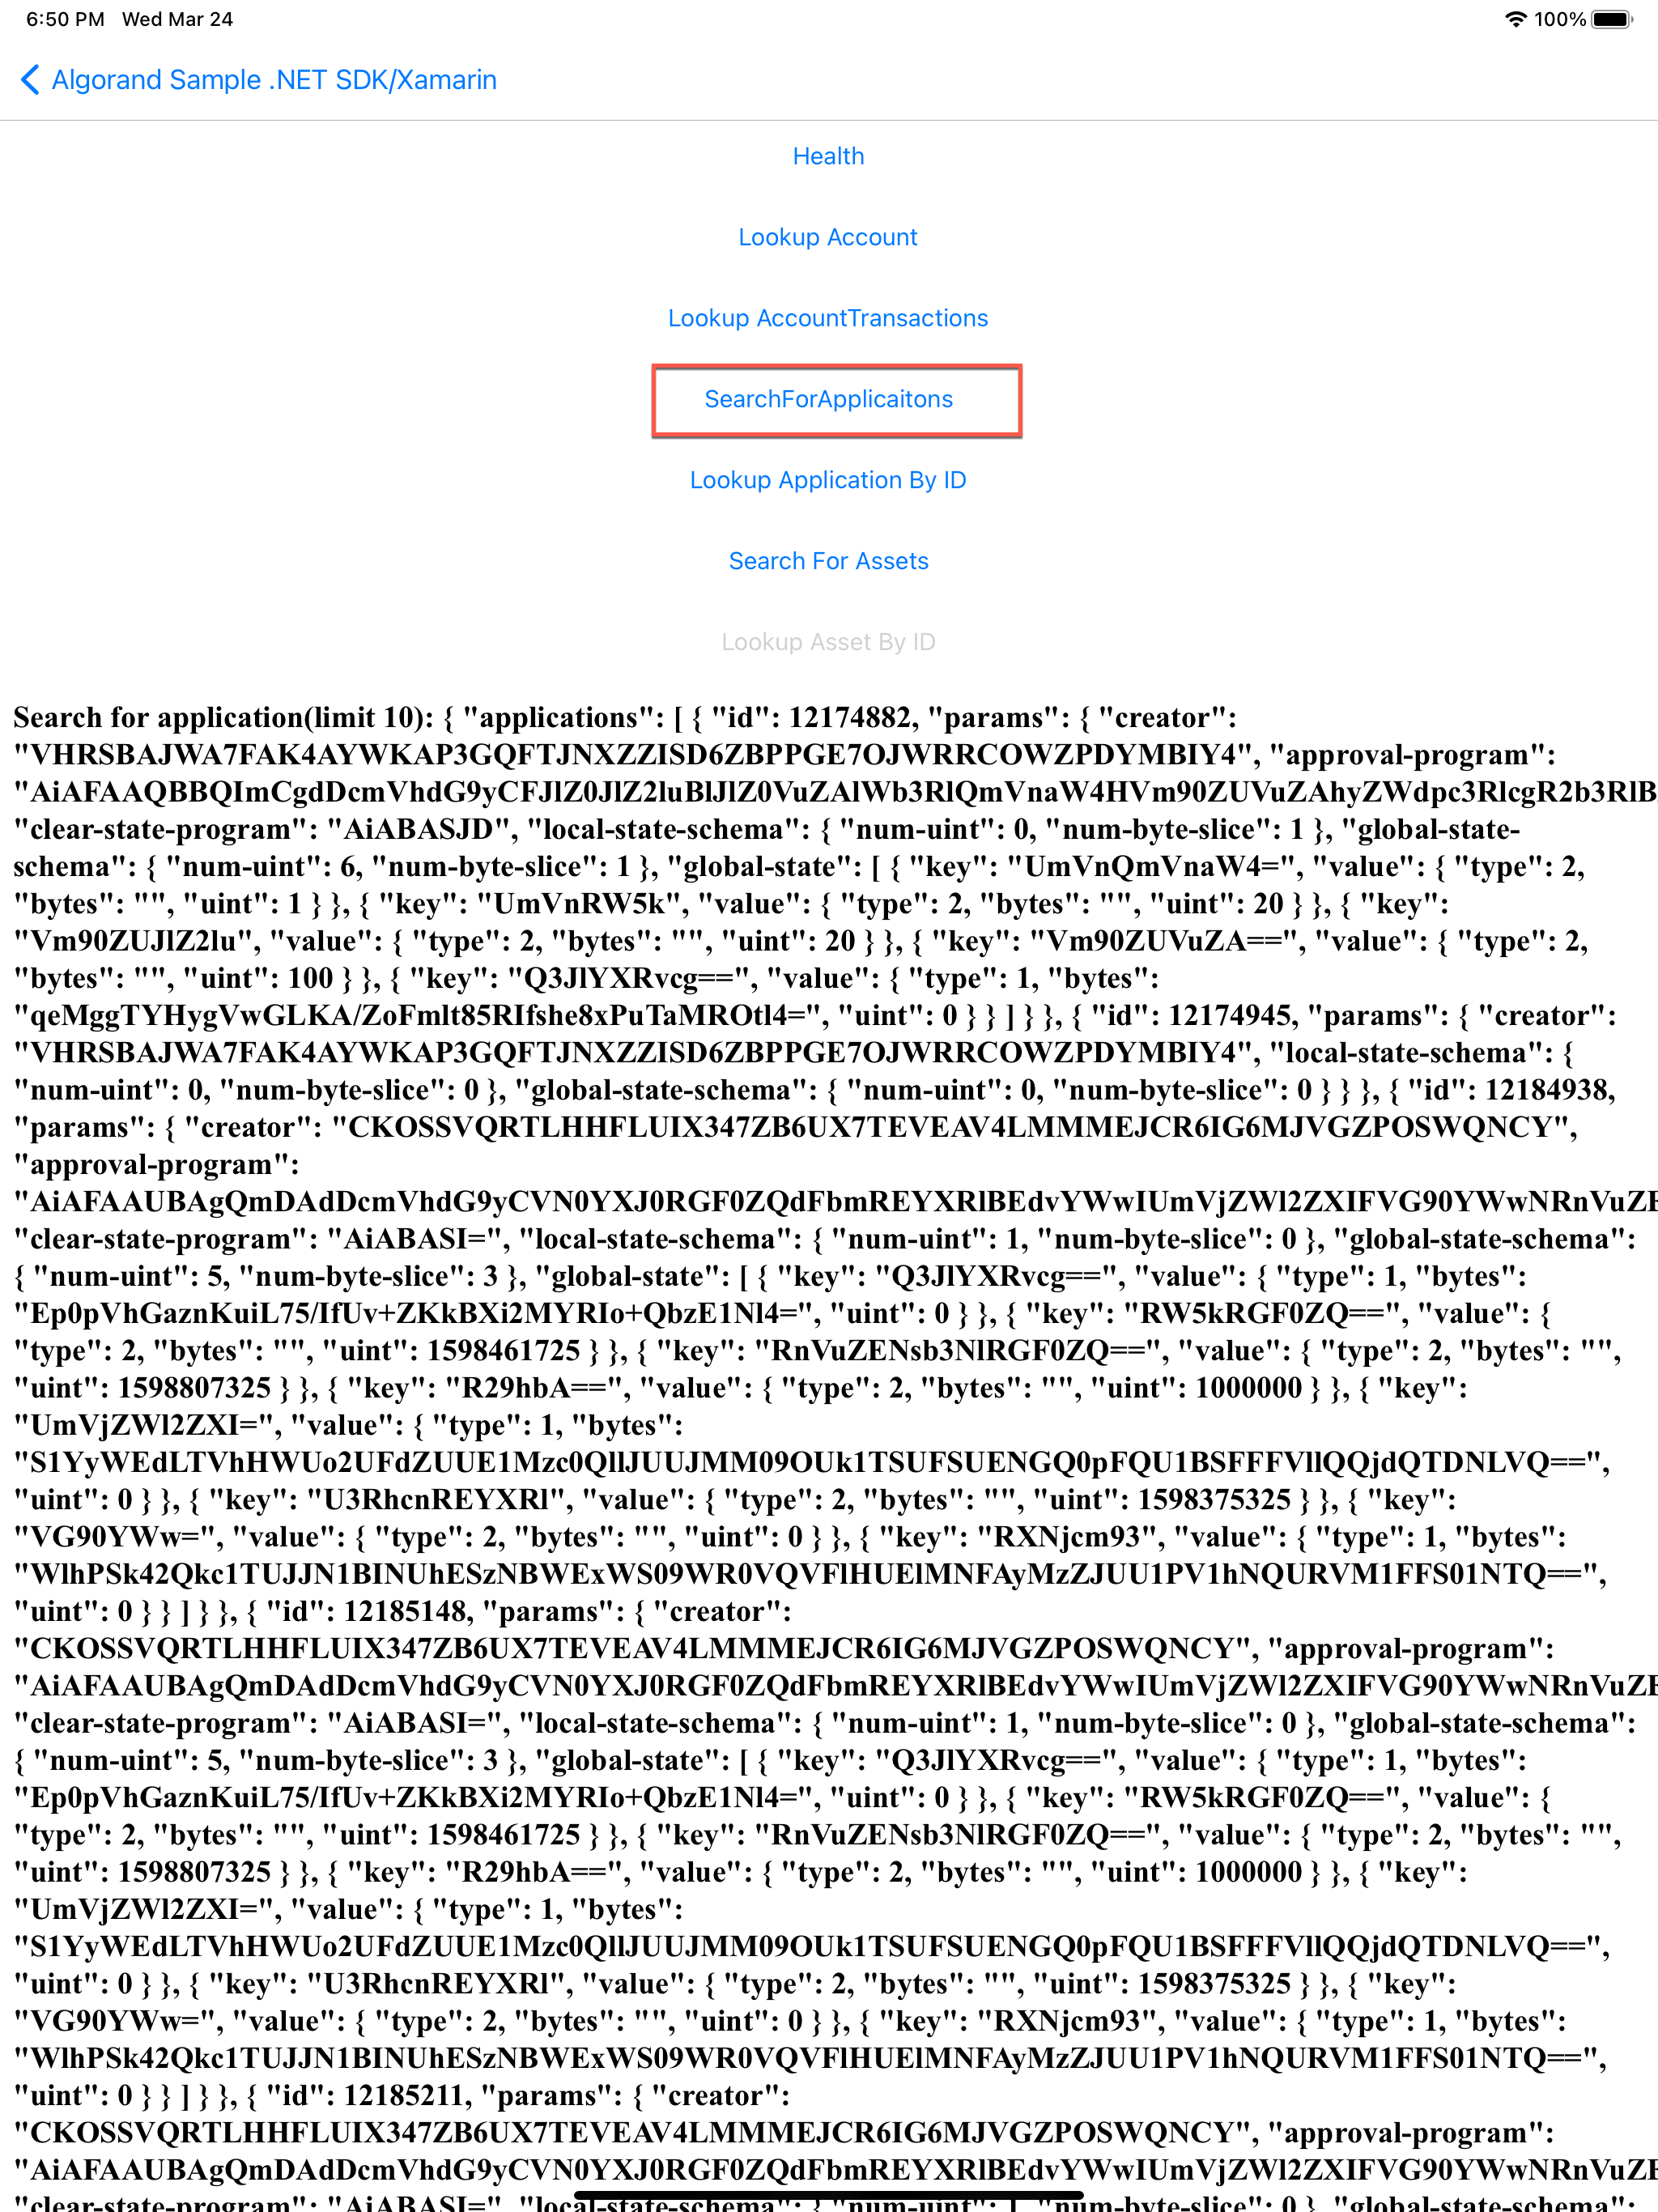
Figure 15-4 Search For Applications
Lookup Application by ID
void LookupApplicationByID_Clicked(System.Object sender, System.EventArgs e)
{
    var appIndex = appsInfo.Applications[0].Id;
    System.Threading.Thread.Sleep(1200); //test in purestake, imit 1 req/sec
    var appInfo = indexer.LookupApplicationByID(appIndex);
    Debug.WriteLine("Look up application by id: " + appInfo.ToJson());
    DisplayInfo("Look up application by id: " + appInfo.ToJson());
}
Output should look similar to this:
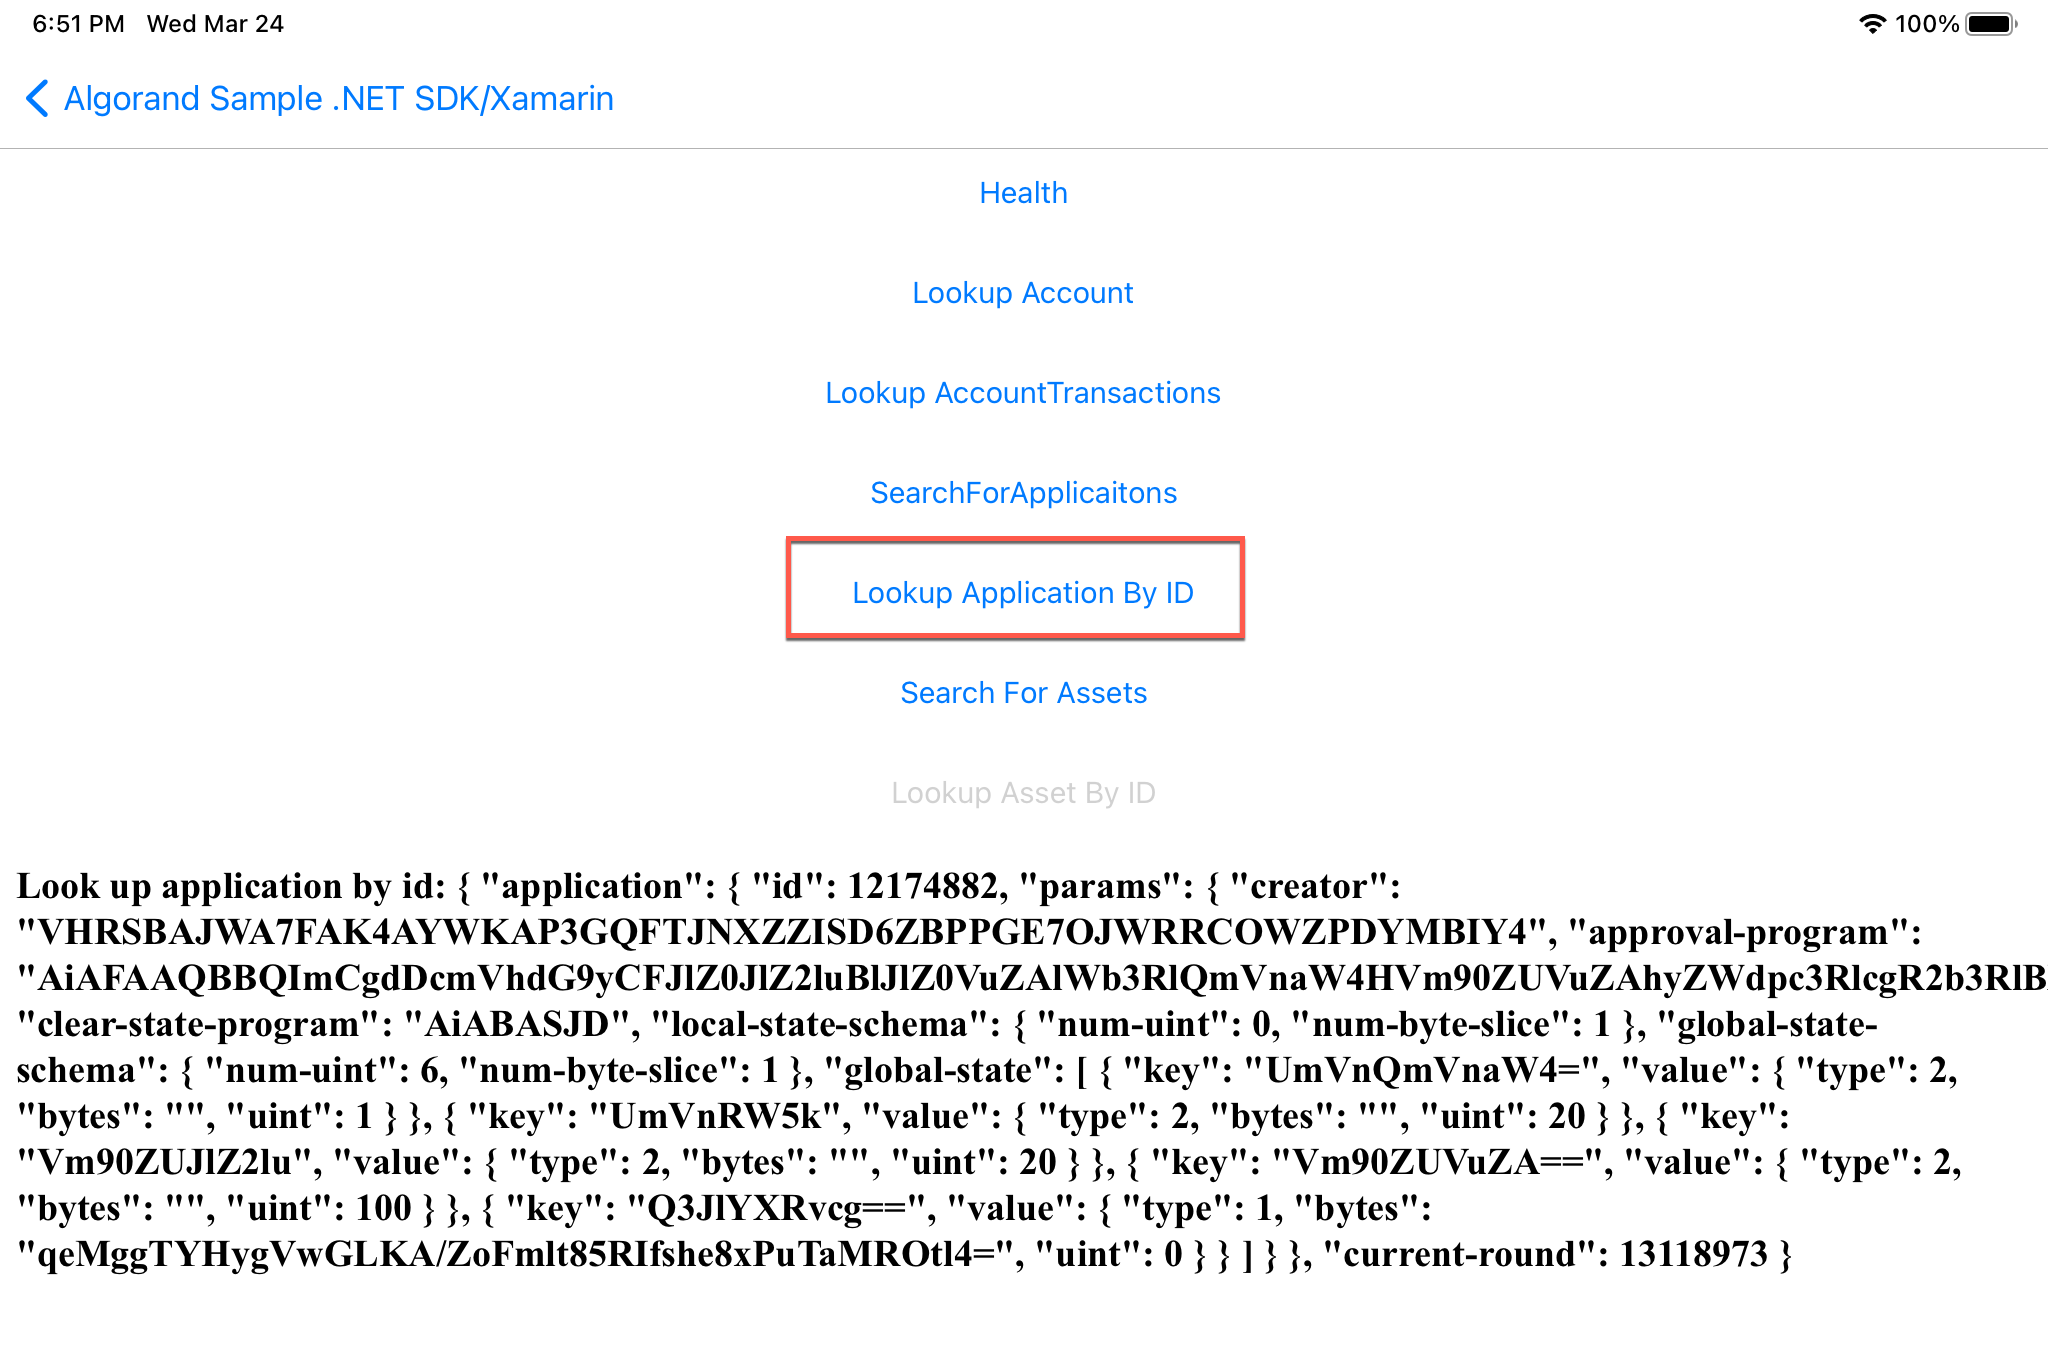
Figure 15-5 Lookup Application by ID
Search For Assets
void SearchForAssets_Clicked(System.Object sender, System.EventArgs e)
{
    System.Threading.Thread.Sleep(1200); //test in purestake, imit 1 req/sec
    assetsInfo = indexer.SearchForAssets(limit: 10, unit: "LAT");
    Debug.WriteLine("Search for assets" + assetsInfo.ToJson());
    LookupAssetByID.IsEnabled = true;
    DisplayInfo("Search for assets" + assetsInfo.ToJson());
}
Output should look similar to this:
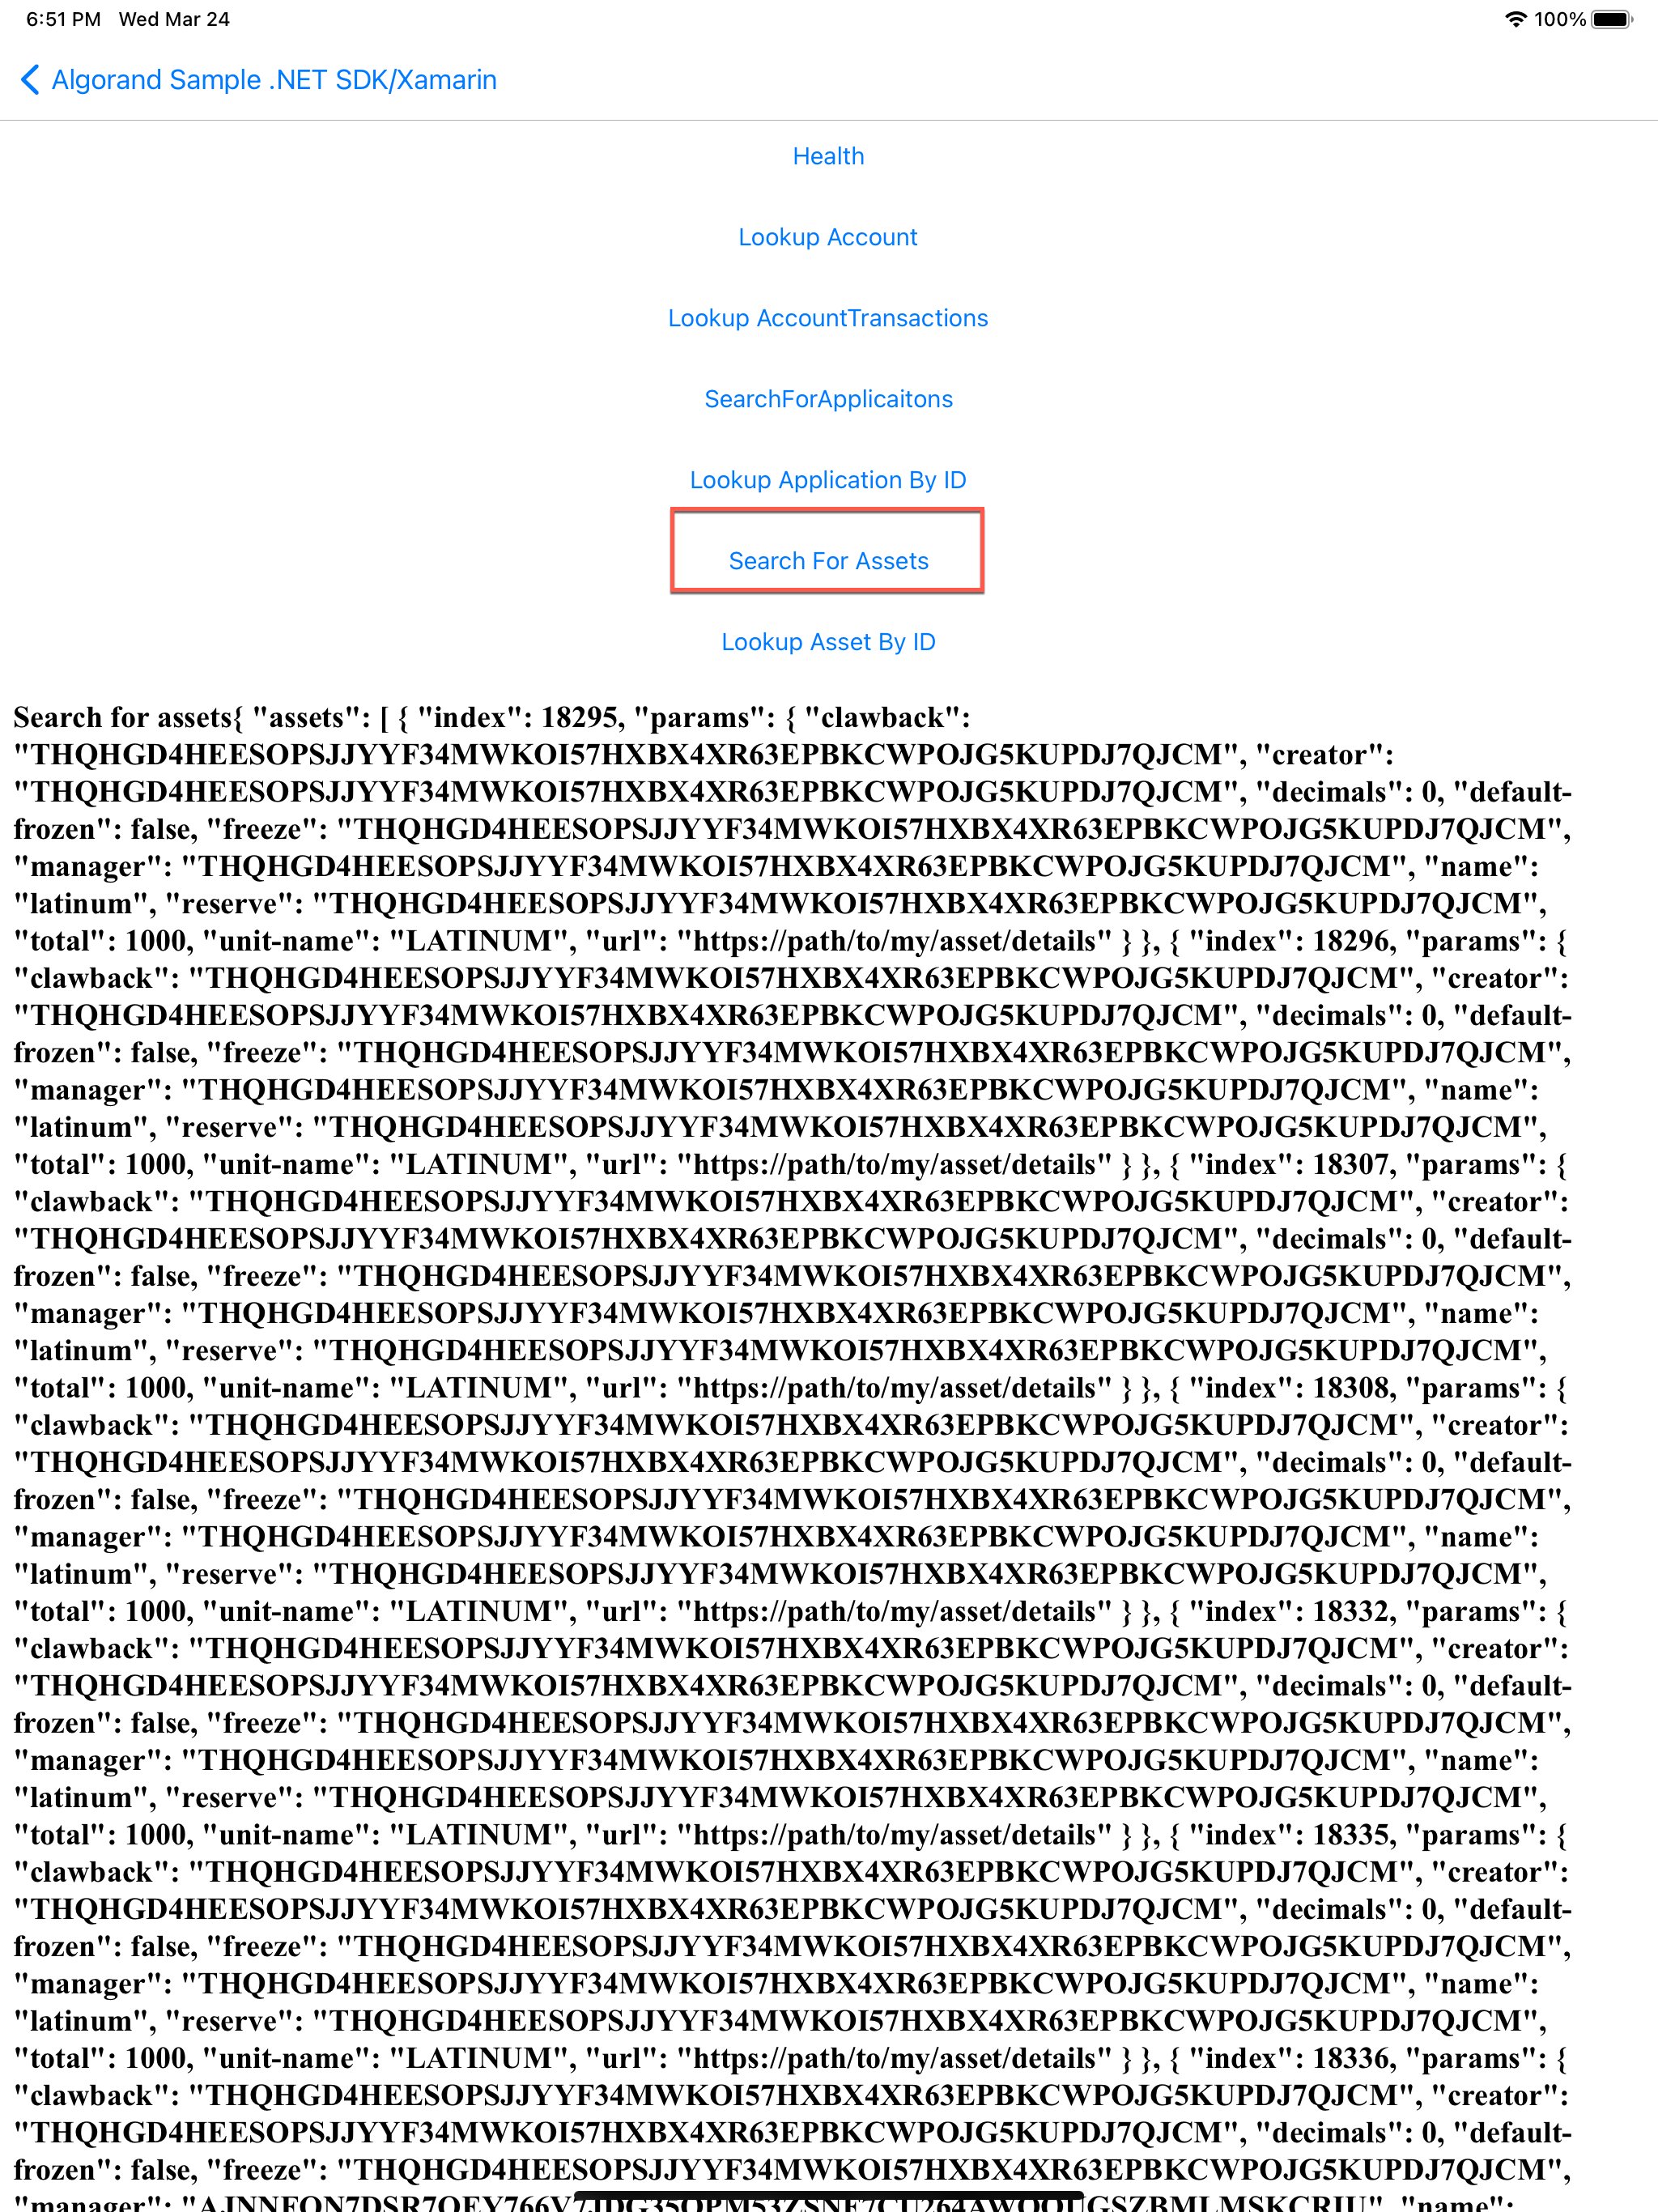
Figure 15-6 Search For Assets
Lookup Asset by ID
void LookupAssetByID_Clicked(System.Object sender, System.EventArgs e)
{
    var assetIndex = assetsInfo.Assets[0].Index;
    System.Threading.Thread.Sleep(1200); //test in purestake, imit 1 req/sec
    var assetInfo = indexer.LookupAssetByID(assetIndex);
    Debug.WriteLine("Look up asset by id:" + assetInfo.ToJson());
    DisplayInfo("Look up asset by id:" + assetsInfo.ToJson());
}
Output should look similar to this:
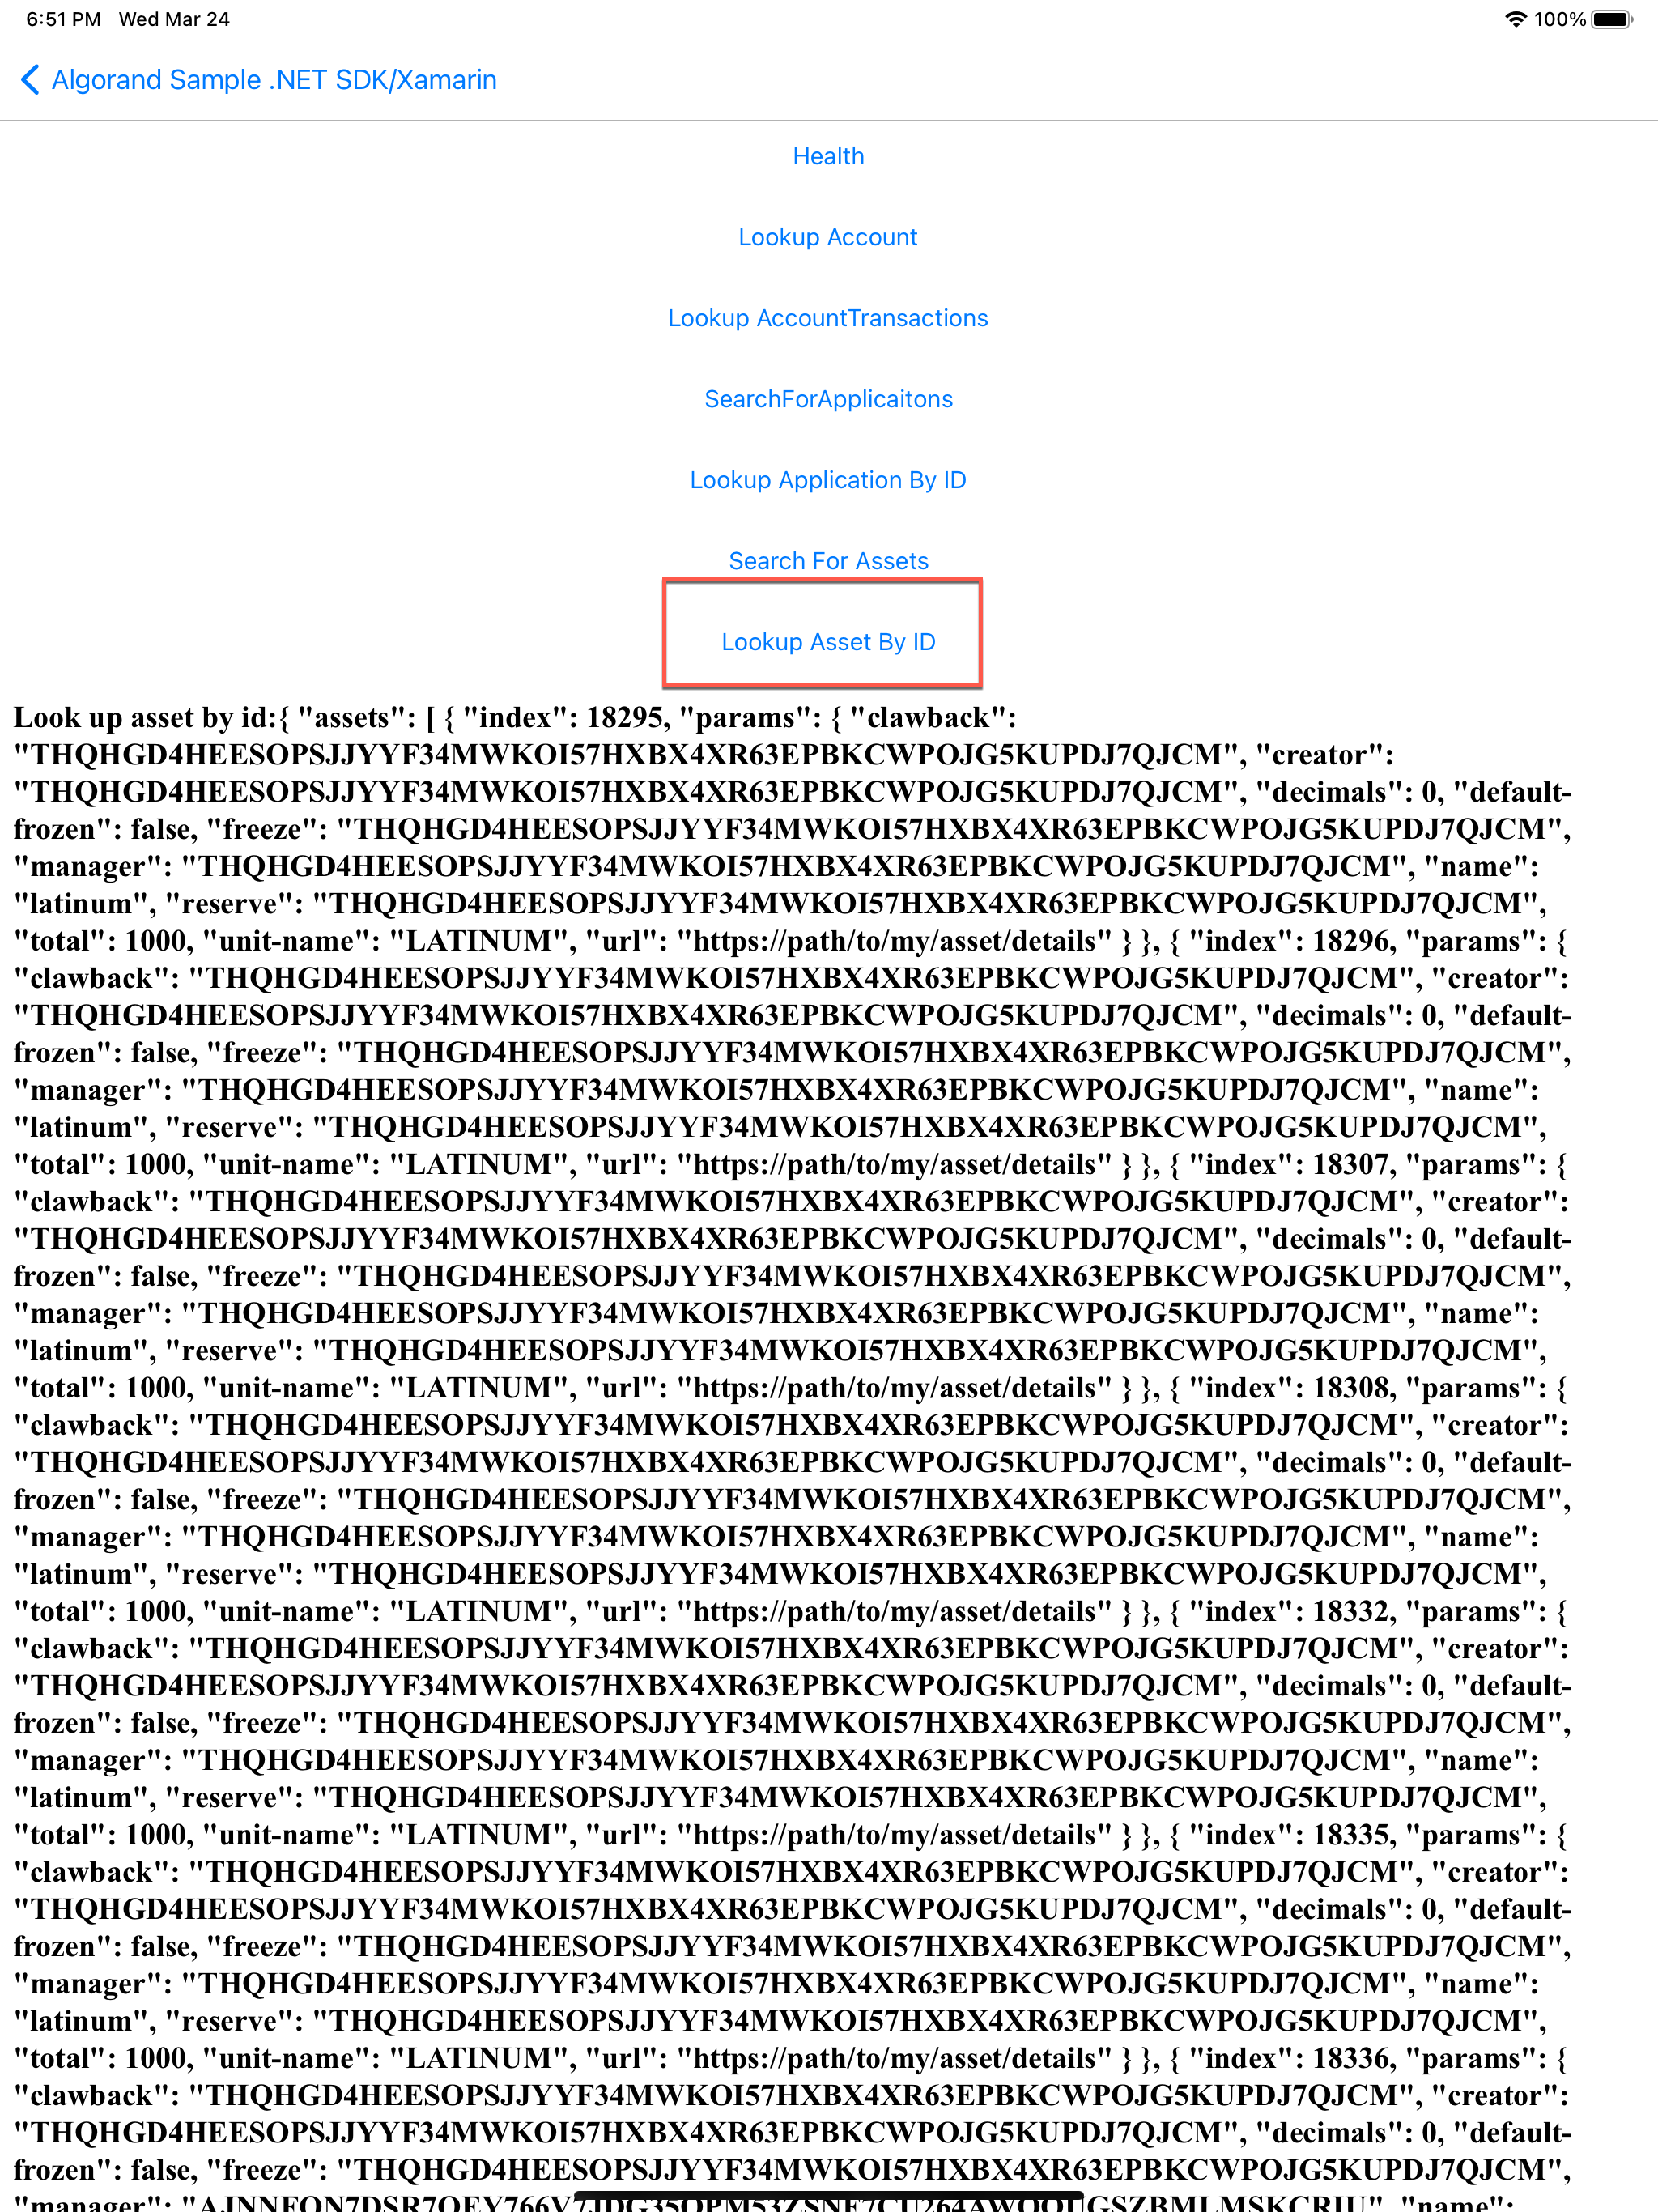
Figure 15-7 Lookup Asset by ID
Rekey
Rekeying is a powerful protocol feature which enables an Algorand account holder to maintain a static public address while dynamically rotating the authoritative private spending key(s). This is accomplished by issuing a “rekey-to transaction” which sets the authorized address field within the account object. Future transaction authorization using the account’s public address must be provided by the spending key(s) associated with the authorized address which may be a single key address, MultiSig address or LogicSig program address. Code can be found in Rekey.xml.cs in the folloeing events.
Optin
void Optin_Clicked(System.Object sender, System.EventArgs e)
{
    var trans = client.TransactionParams();
    Console.WriteLine("Lastround: " + trans.LastRound.ToString());

    ulong? amount = 0;
    //opt-in send tx to same address as sender and use 0 for amount w rekey account to account 1
    var tx = Utils.GetPaymentTransaction(account3.Address, account3.Address, amount, "pay message", trans);
    tx.RekeyTo = account1.Address;

    var signedTx = account3.SignTransaction(tx);
    // send the transaction to the network and
    // wait for the transaction to be confirmed
    PostTransactionsResponse id;
    try
    {
        id = Utils.SubmitTransaction(client, signedTx);
        Console.WriteLine("Transaction ID: " + id);
        //waitForTransactionToComplete(algodApiInstance, signedTx.transactionID);
        //Console.ReadKey();
        Console.WriteLine("Confirmed Round is: " +
            Utils.WaitTransactionToComplete(client, id.TxId).ConfirmedRound);
        DisplayInfo("Account 3 opts in to have Account 1 sign - Confirmed Round is: " +
                Utils.WaitTransactionToComplete(client, id.TxId).ConfirmedRound);
        OptinBtn.IsEnabled = false;
        AccountSign.IsEnabled = true;
        ResetBack.IsEnabled = true;
    }
    catch (Exception err)
    {
        //e.printStackTrace();
        Console.WriteLine(err.Message);
        DisplayInfo("Error: " + err.Message);

        return;
    }
Output should look similar to this
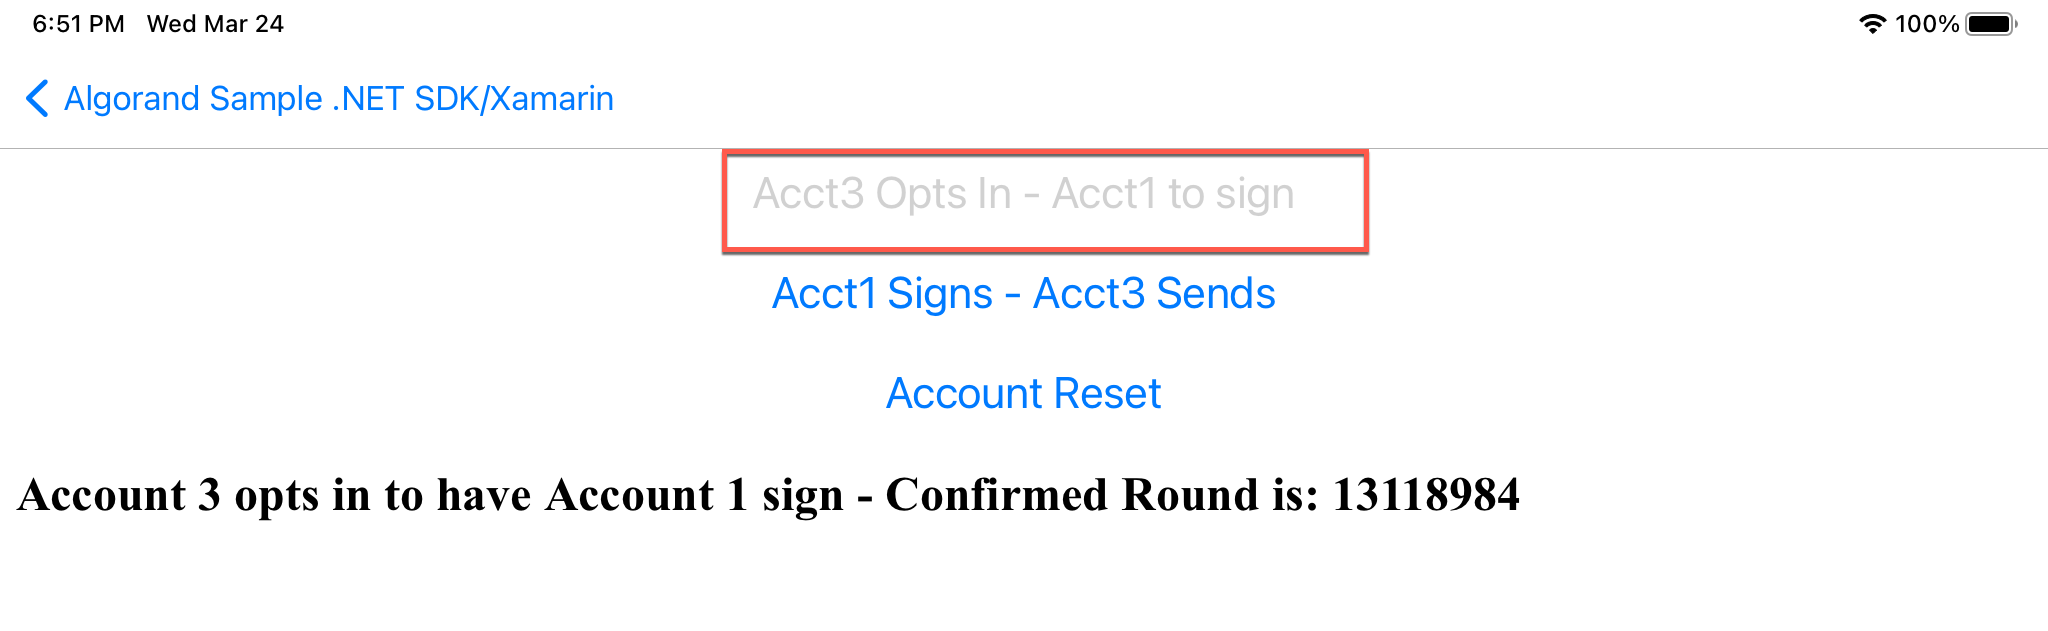
Figure 16-1 Optin
Rekeyed Account Signs
 void AccountSign_Clicked(System.Object sender, System.EventArgs e)
{
    var trans = client.TransactionParams();
    Console.WriteLine("Lastround: " + trans.LastRound.ToString());

    var act = client.AccountInformation(account3.Address.ToString());
    Console.WriteLine(act);

    ulong? amount2 = 1000000;
    var tx2 = Utils.GetPaymentTransaction(account3.Address, account2.Address, amount2, "pay message", trans);
    tx2.RekeyTo = account1.Address;
    var signedTx2 = account1.SignTransaction(tx2);
    try
    {
        var id = Utils.SubmitTransaction(client, signedTx2);
        Console.WriteLine("Transaction ID: " + id);
        Console.WriteLine("Confirmed Round is: " +
            Utils.WaitTransactionToComplete(client, id.TxId).ConfirmedRound);
        DisplayInfo("Account 3 send to Account 2, rekeyed to sign by  Account 1 - Confirmed Round is: " +
                Utils.WaitTransactionToComplete(client, id.TxId).ConfirmedRound);
        OptinBtn.IsEnabled = false;
        ResetBack.IsEnabled = true;

    }
    catch (Exception err)
    {
        Console.WriteLine(err.Message);
        DisplayInfo("Error: " + err.Message);
        return;
    }
Output should look similar to this:
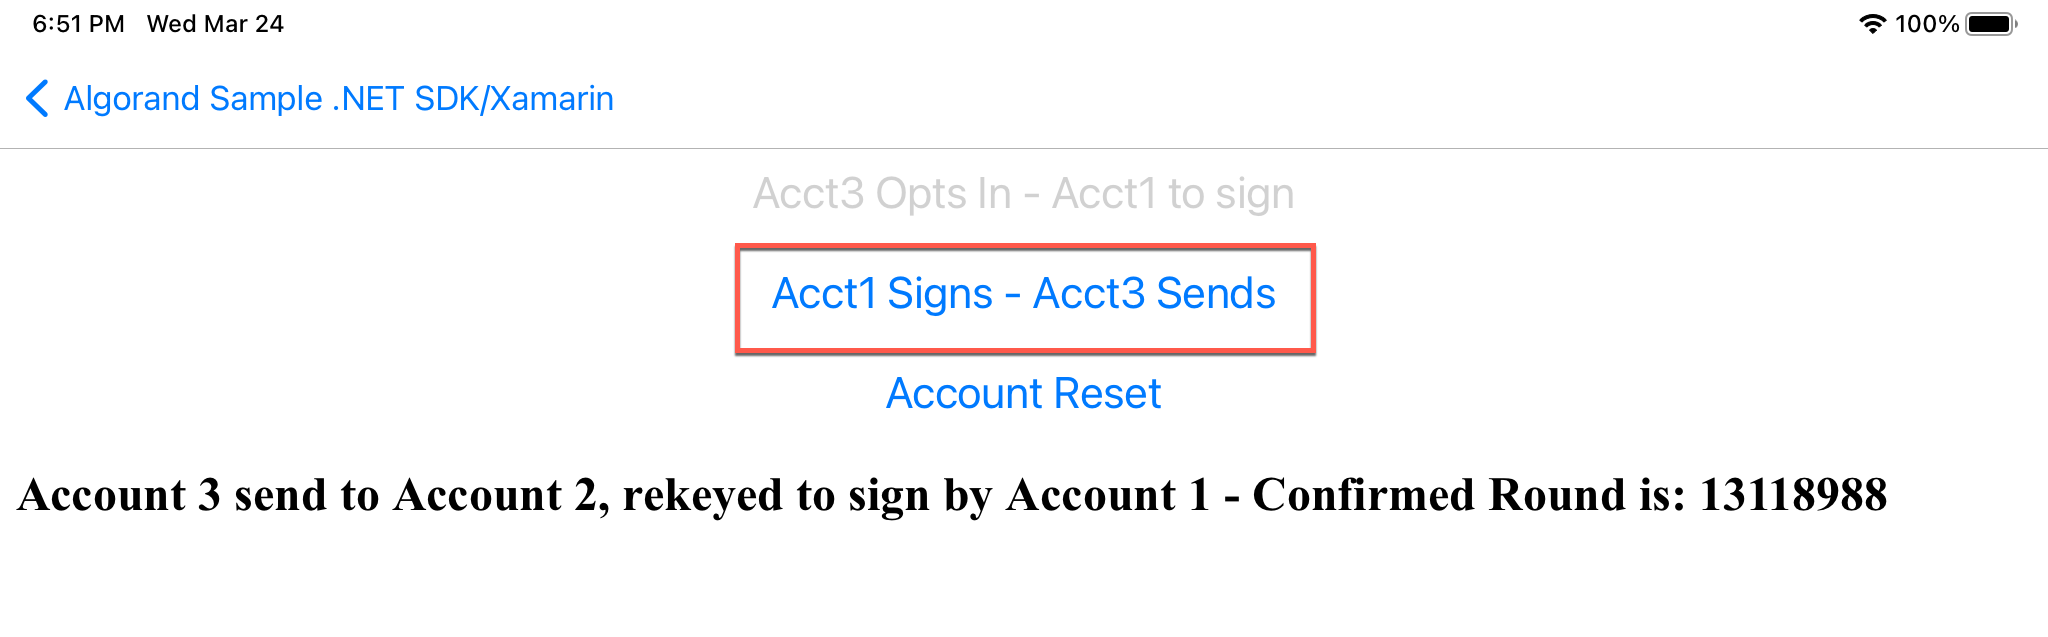
Figure 16-2 Rekeyed Account Signs
Reset and Change Back
void ResetBack_Clicked(System.Object sender, System.EventArgs e)
{
    var trans = client.TransactionParams();
    Console.WriteLine("Lastround: " + trans.LastRound.ToString());

    ulong? amount = 0;
    //opt-in send tx to same address as sender and use 0 for amount w rekey back account to account 3
    var tx = Utils.GetPaymentTransaction(account3.Address, account3.Address, amount, "pay message", trans);
    tx.RekeyTo = account3.Address;

    var signedTx = account1.SignTransaction(tx);
    // send the transaction to the network and
    // wait for the transaction to be confirmed
    try
    {
        var id = Utils.SubmitTransaction(client, signedTx);
        Console.WriteLine("Transaction ID: " + id);
        //waitForTransactionToComplete(algodApiInstance, signedTx.transactionID);
        //Console.ReadKey();
        Console.WriteLine("Confirmed Round is: " +
            Utils.WaitTransactionToComplete(client, id.TxId).ConfirmedRound);
        DisplayInfo("Account 3 opts in to have Account 3 sign - signed by Account 1 Confirmed Round is: " +
                Utils.WaitTransactionToComplete(client, id.TxId).ConfirmedRound);
        ResetBack.IsEnabled = false;
        AccountSign.IsEnabled = false;
        OptinBtn.IsEnabled = true;
    }
    catch (Exception err)
    {
        //e.printStackTrace();
        Console.WriteLine(err.Message);
        DisplayInfo("Error: " + err.Message);
        return;
    }
Output should look similar to this
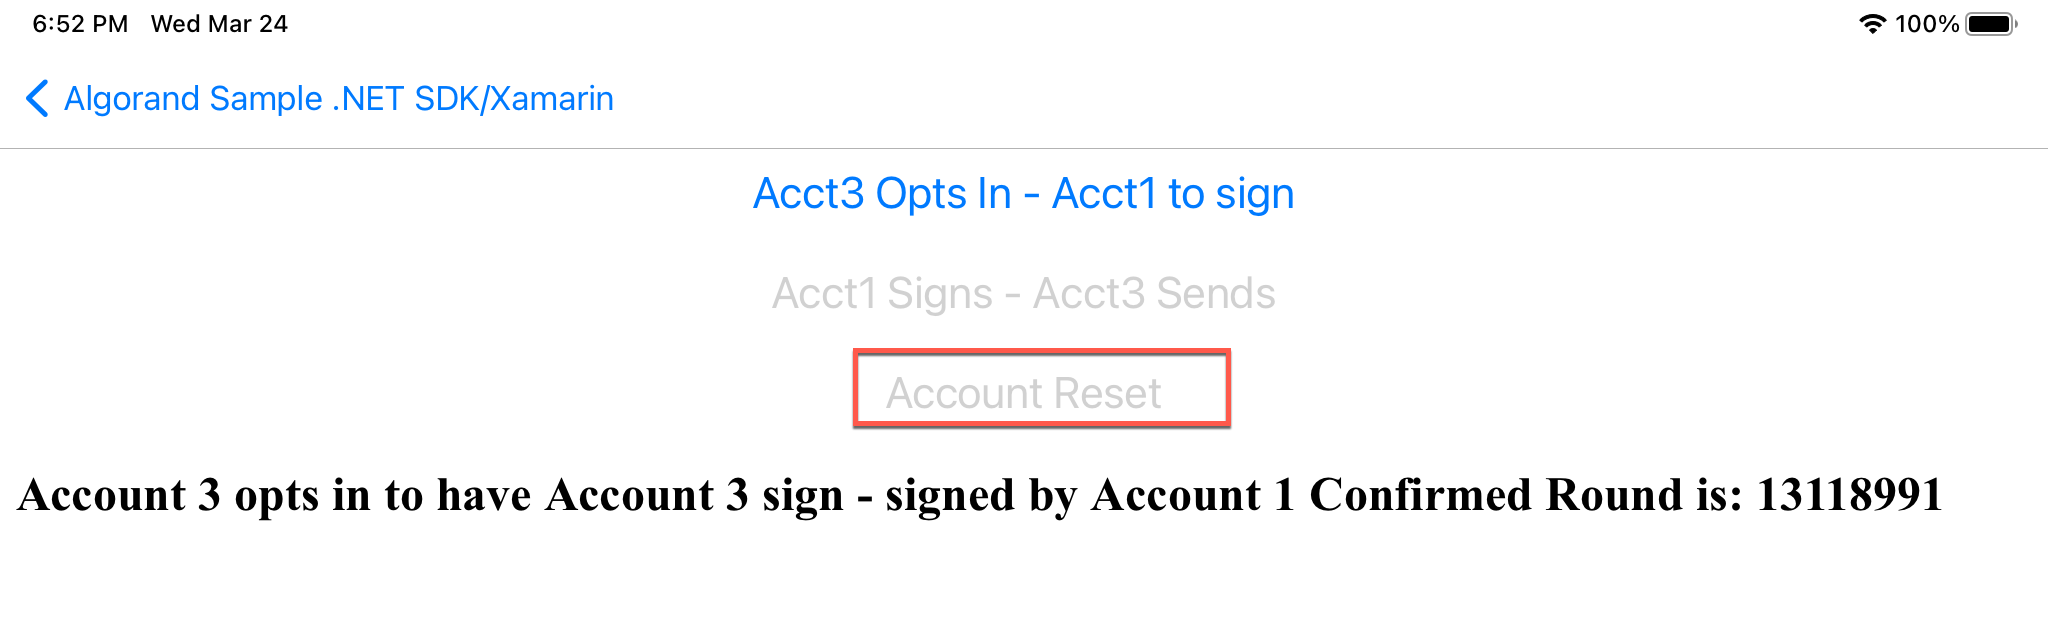
Figure 16-3 Reset and Change Back
Stateful Contracts
Stateful smart contracts are contracts that live on the chain and are used to keep track of some form of global and/or local state for the contract. More information of the lifecycle for a stateful contract can be found here.
The code can be found in StatefulContracts.xaml.cs. Event handlers:
Create App
long? CreateApp(AlgodApi client, Account creator, TEALProgram approvalProgram,
    TEALProgram clearProgram, ulong? globalInts, ulong? globalBytes, ulong? localInts, ulong? localBytes)
{
    try
    {
        var transParams = client.TransactionParams();
        var tx = Utils.GetApplicationCreateTransaction(creator.Address, approvalProgram, clearProgram,
            new StateSchema(globalInts, globalBytes), new StateSchema(localInts, localBytes), transParams);
        var signedTx = creator.SignTransaction(tx);
        Console.WriteLine("Signed transaction with txid: " + signedTx.transactionID);
        // DisplayInfo("Signed transaction with txid: " + signedTx.transactionID);
        var id = Utils.SubmitTransaction(client, signedTx);
        Console.WriteLine("Successfully sent tx with id: " + id.TxId);
        var resp = Utils.WaitTransactionToComplete(client, id.TxId);
        Console.WriteLine("Application ID is: " + resp.ApplicationIndex.ToString());
        DisplayInfo("Application ID is: " + resp.ApplicationIndex.ToString());
        return resp.ApplicationIndex;
    }
    catch (ApiException e)
    {
        Console.WriteLine("Exception when calling create application: " + e.Message);
        return null;
    }

}
Output should look similar to this:
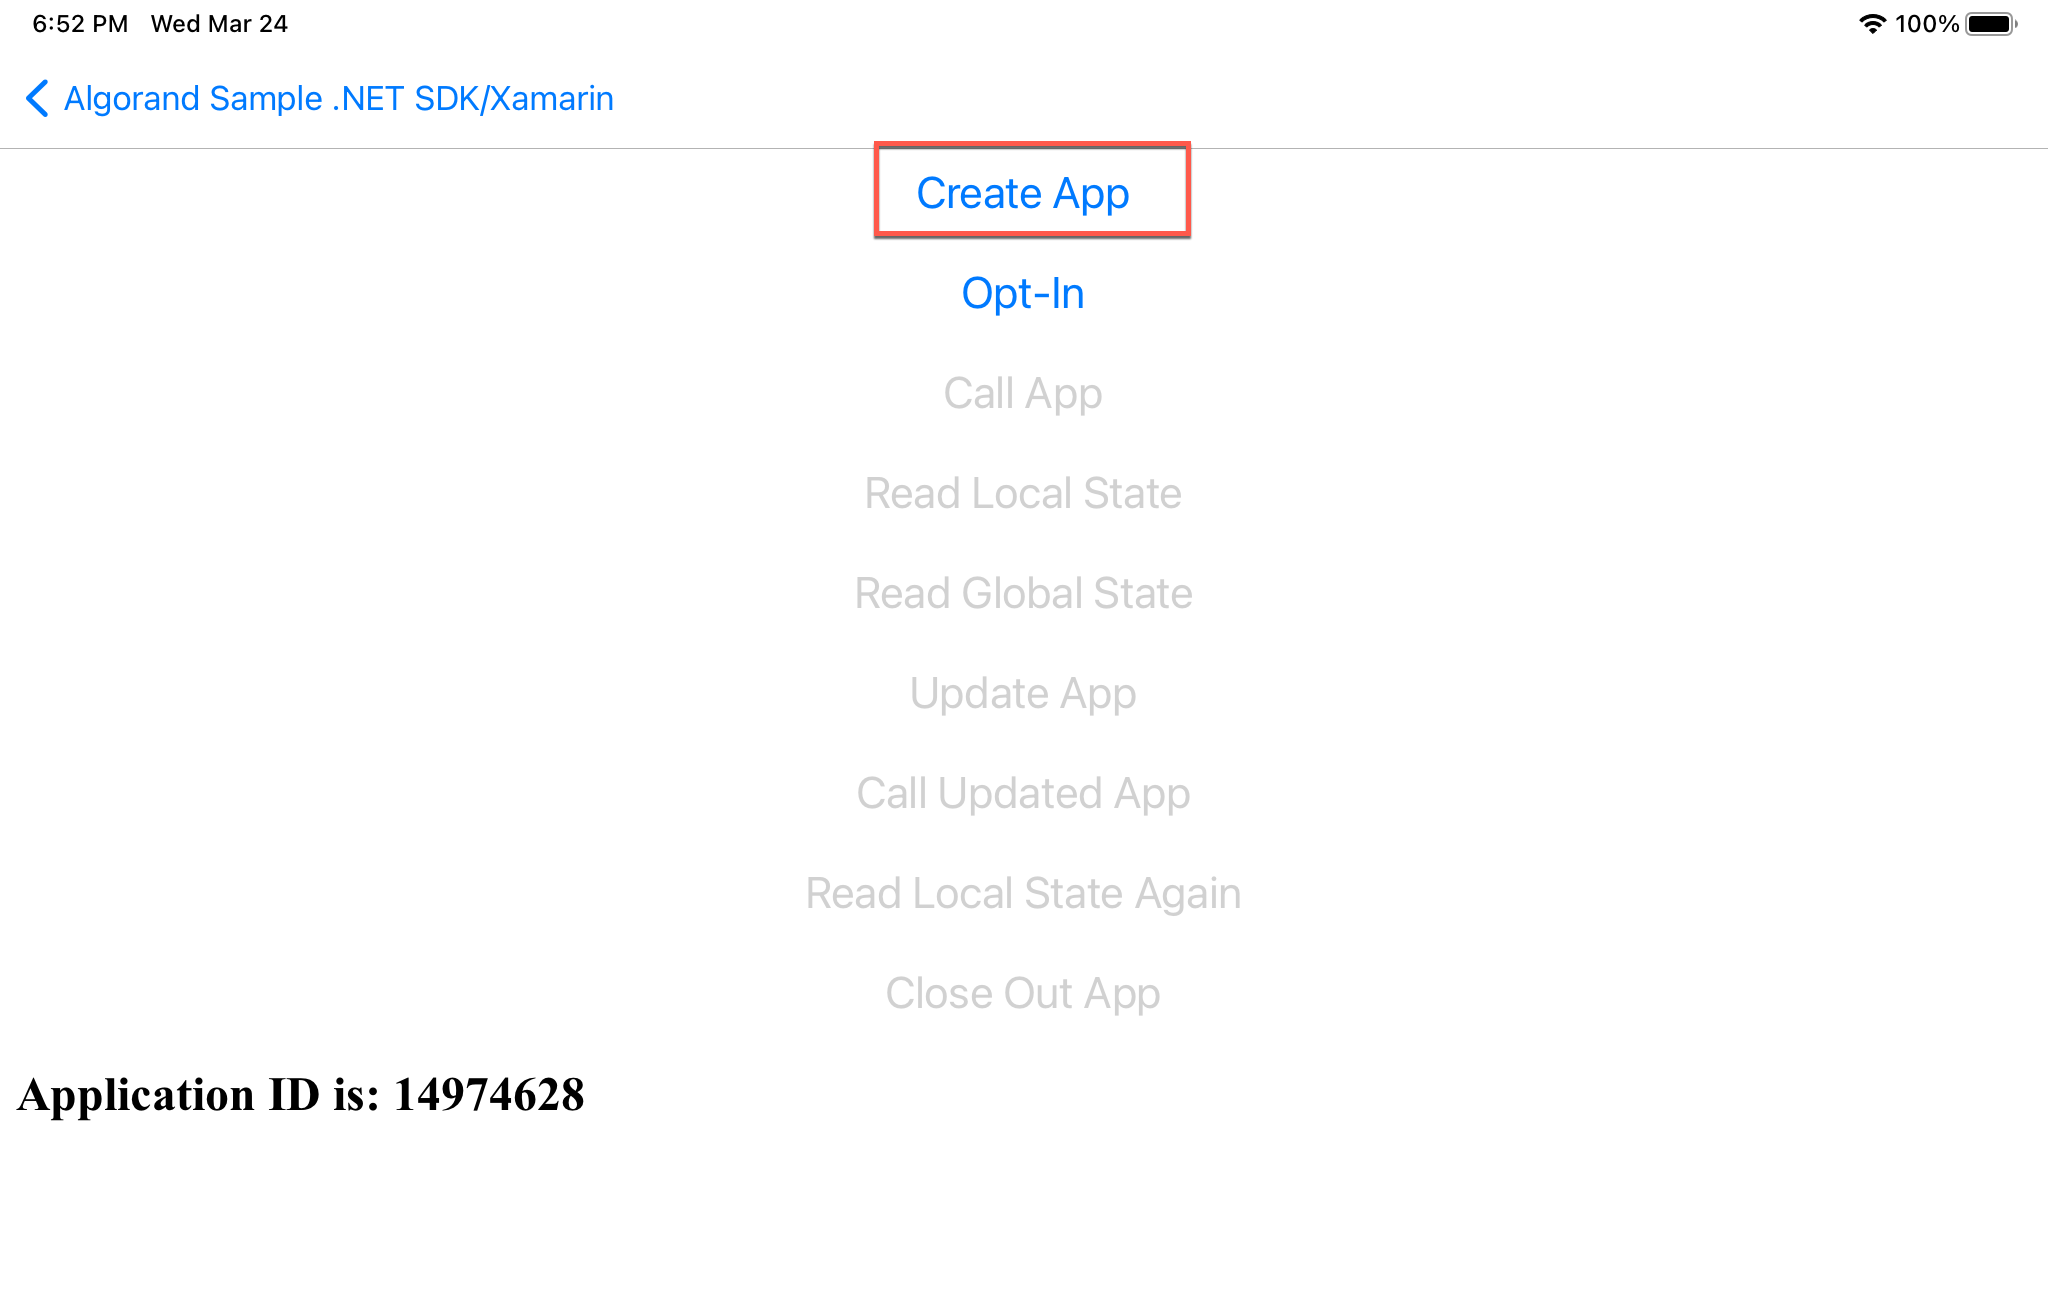
Figure 17-1 Create App
Optin
void OptIn(AlgodApi client, Account sender, long? applicationId)
{
    try
    {
        var transParams = client.TransactionParams();
        var tx = Utils.GetApplicationOptinTransaction(sender.Address, (ulong?)applicationId, transParams);
        var signedTx = sender.SignTransaction(tx);
        Console.WriteLine("Signed transaction with txid: " + signedTx.transactionID);

        var id = Utils.SubmitTransaction(client, signedTx);
        Console.WriteLine("Successfully sent tx with id: " + id.TxId);
        var resp = Utils.WaitTransactionToComplete(client, id.TxId);
        Console.WriteLine(string.Format("Address {0} optin to Application({1})",
            sender.Address.ToString(), (resp.Txn as JObject)["txn"]["apid"]));
        DisplayInfo(string.Format("Address {0} optin to Application({1})",
            sender.Address.ToString(), (resp.Txn as JObject)["txn"]["apid"]));

    }
    catch (ApiException e)
    {
        Console.WriteLine("Exception when calling create application: " + e.Message);
    }
}
Output should look similar to this:

Figure 17-2 Optin
Call App
     void CallApp(AlgodApi client, Account sender, long? applicationId, List<byte[]> args)
        {
            try
            {
                var transParams = client.TransactionParams();
                var tx = Utils.GetApplicationCallTransaction(sender.Address, (ulong?)applicationId, transParams, args);
                var signedTx = sender.SignTransaction(tx);
                Console.WriteLine("Signed transaction with txid: " + signedTx.transactionID);

                var id = Utils.SubmitTransaction(client, signedTx);
                Console.WriteLine("Successfully sent tx with id: " + id.TxId);
                var resp = Utils.WaitTransactionToComplete(client, id.TxId);
                Console.WriteLine("Confirmed at round: " + resp.ConfirmedRound);
                Console.WriteLine(string.Format("Call Application({0}) success.",
                    (resp.Txn as JObject)["txn"]["apid"]));
                DisplayInfo(string.Format("Call Application({0}) success.",
                    (resp.Txn as JObject)["txn"]["apid"]));

                //System.out.println("Called app-id: " + pTrx.txn.tx.applicationId);
                if (resp.GlobalStateDelta != null)
                {
                    var outStr = "    Global state: ";
                    foreach (var v in resp.GlobalStateDelta)
                    {
                        outStr += v.ToString();
                    }
                    Console.WriteLine(outStr);
                }
                if (resp.LocalStateDelta != null)
                {
                    var outStr = "    Local state: ";
                    foreach (var v in resp.LocalStateDelta)
                    {
                        outStr += v.ToString();
                    }
                    Console.WriteLine(outStr);
                }
            }
            catch (ApiException e)
            {
                Console.WriteLine("Exception when calling create application: " + e.Message);
            }
        }
Output should look similar to this:

Figure 17-3 Call App
Read Local State
public void ReadLocalState(AlgodApi client, Account account, long? appId)
{
    var acctResponse = client.AccountInformation(account.Address.ToString());
    var applicationLocalState = acctResponse.AppsLocalState;
    for (int i = 0; i < applicationLocalState.Count; i++)
    {
        if (applicationLocalState[i].Id == appId)
        {
            var outStr = "User's application local state: ";
            foreach (var v in applicationLocalState[i].KeyValue)
            {
                outStr += v.ToString();
            }
            Console.WriteLine(outStr);
            DisplayInfo(outStr);
        }
    }
}
The output should look similar to this:
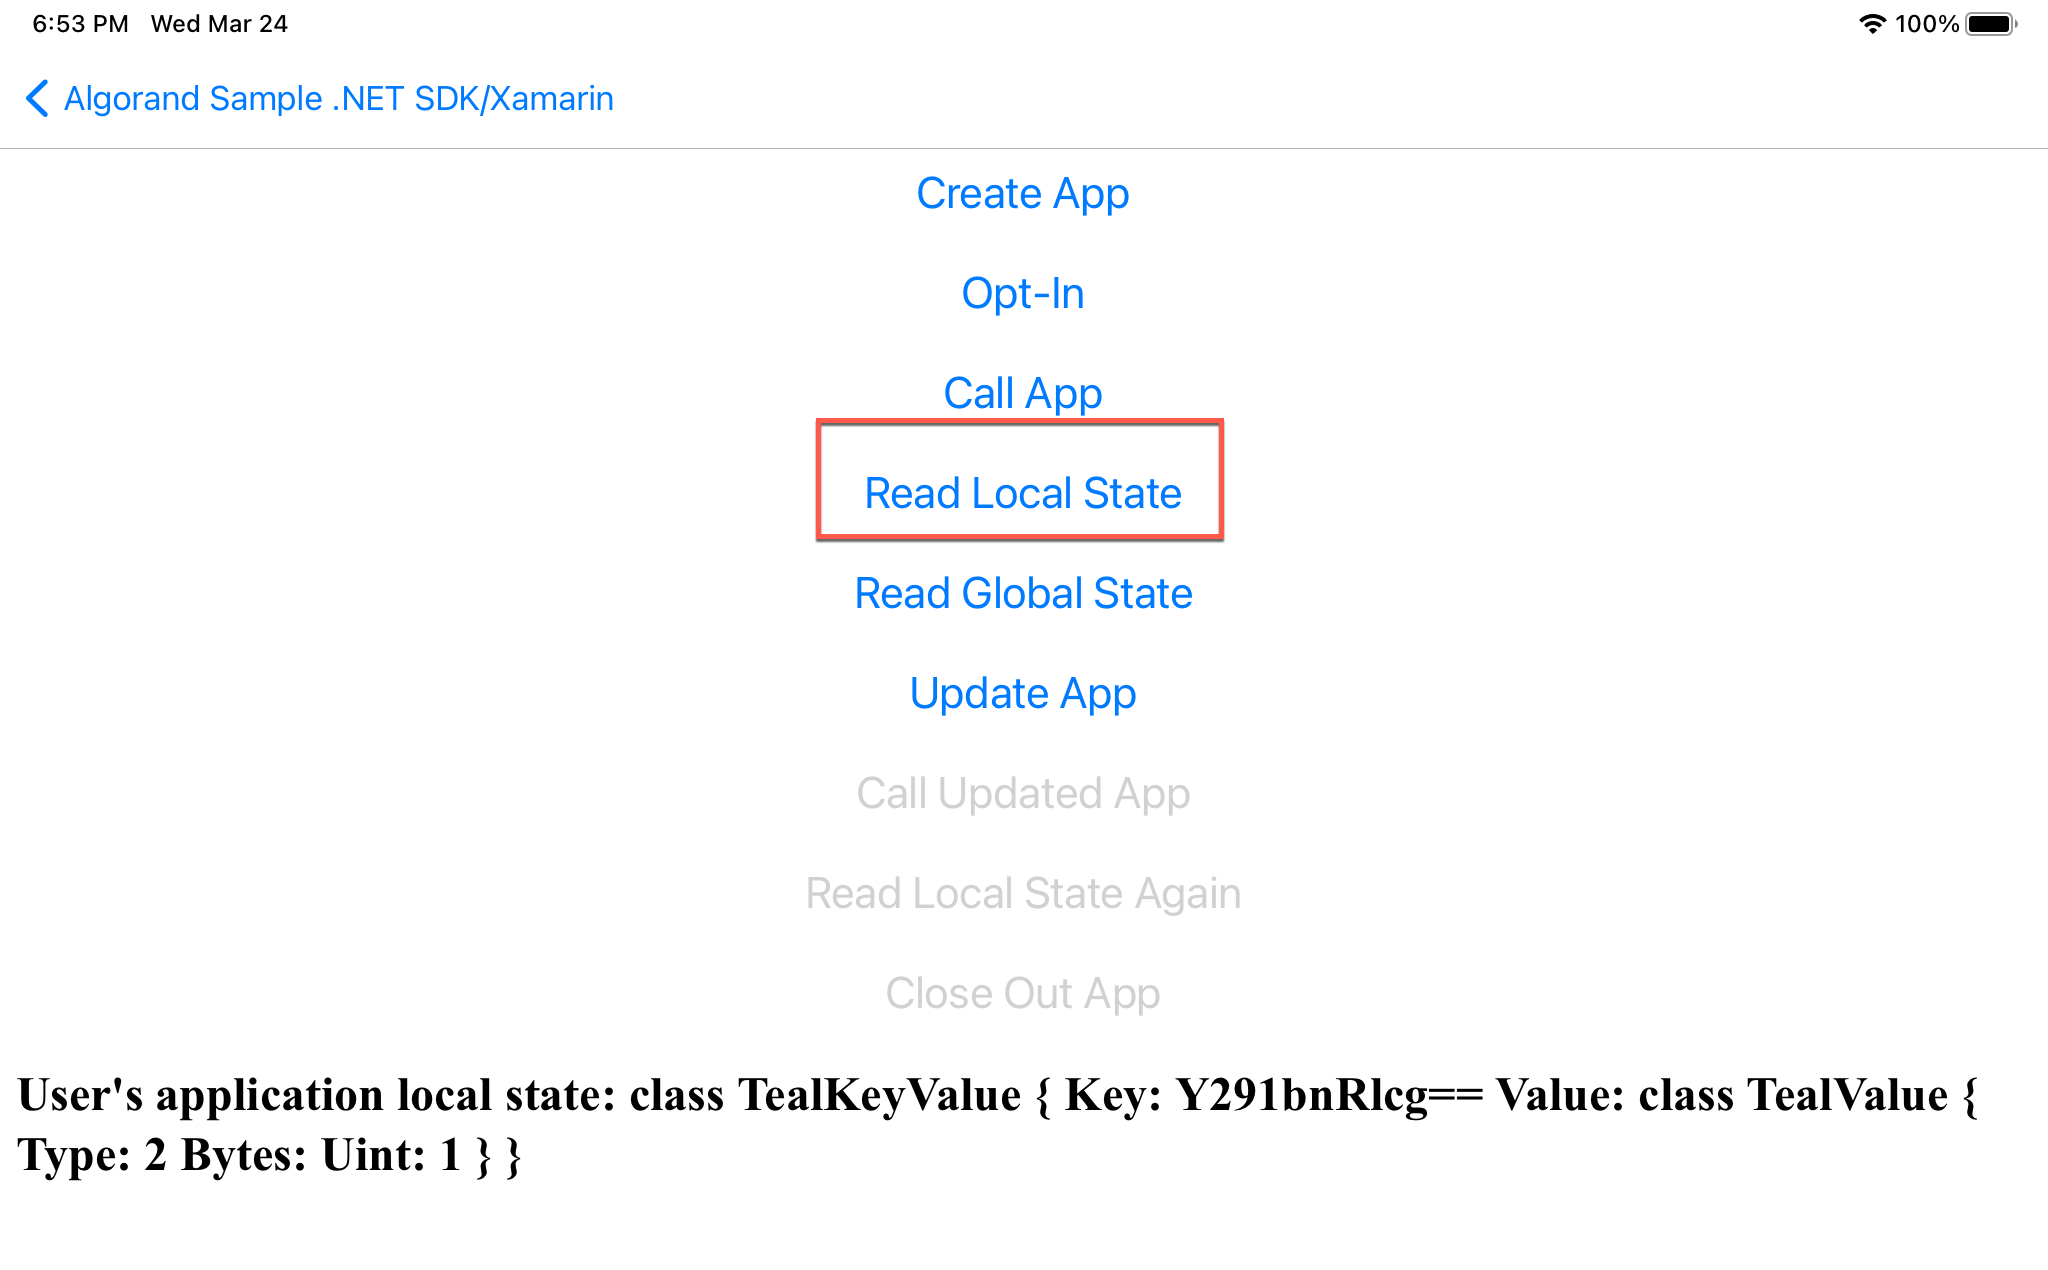
Figure 17-4 Read Local State
Read Global State
public void ReadGlobalState(AlgodApi client, Account account, long? appId)
{
    var acctResponse = client.AccountInformation(account.Address.ToString());
    var createdApplications = acctResponse.CreatedApps;
    for (int i = 0; i < createdApplications.Count; i++)
    {
        if (createdApplications[i].Id == appId)
        {
            var outStr = "Application global state: ";
            foreach (var v in createdApplications[i].Params.GlobalState)
            {
                outStr += v.ToString();
            }
            Console.WriteLine(outStr);
            DisplayInfo(outStr);
        }
    }
}
The output should look similar to this:
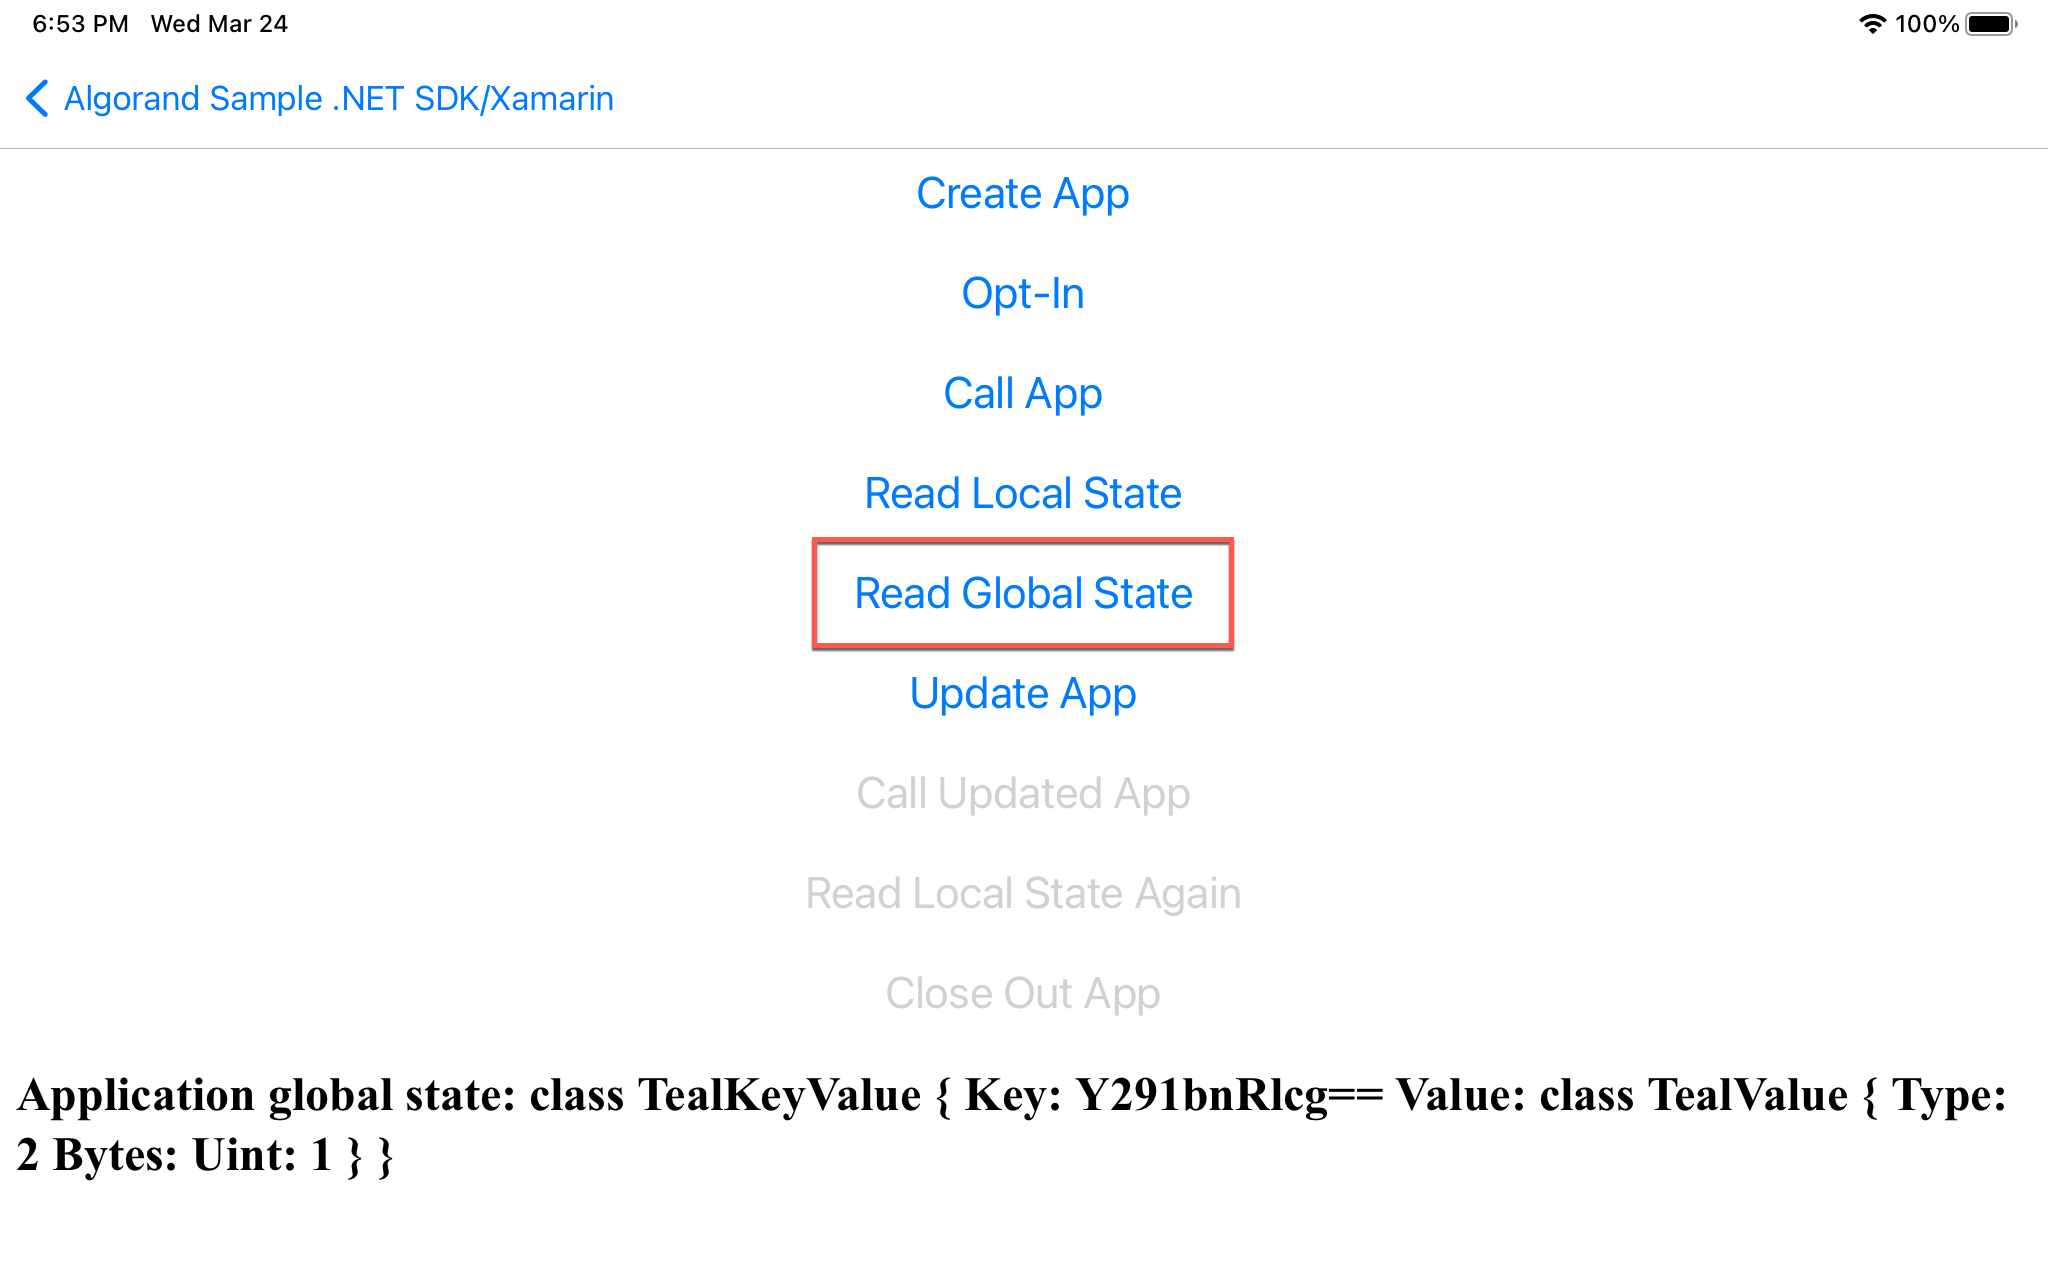
Figure 17-5 Read Global State
Update App
private void UpdateApp(AlgodApi client, Account creator, long? appid, TEALProgram approvalProgram, TEALProgram clearProgram)
{
    try
    {
        var transParams = client.TransactionParams();
        var tx = Utils.GetApplicationUpdateTransaction(creator.Address, (ulong?)appid, approvalProgram, clearProgram, transParams);
        var signedTx = creator.SignTransaction(tx);
        Console.WriteLine("Signed transaction with txid: " + signedTx.transactionID);

        var id = Utils.SubmitTransaction(client, signedTx);
        Console.WriteLine("Successfully sent tx with id: " + id.TxId);
        var resp = Utils.WaitTransactionToComplete(client, id.TxId);
        Console.WriteLine("Confirmed Round is: " + resp.ConfirmedRound);
        Console.WriteLine("Application ID is: " + appid);

        DisplayInfo("Successfully Updated with  tx id: " + id.TxId);
    }
    catch (ApiException e)
    {
        Console.WriteLine("Exception when calling create application: " + e.Message);
    }
}
The output should look similar to this:
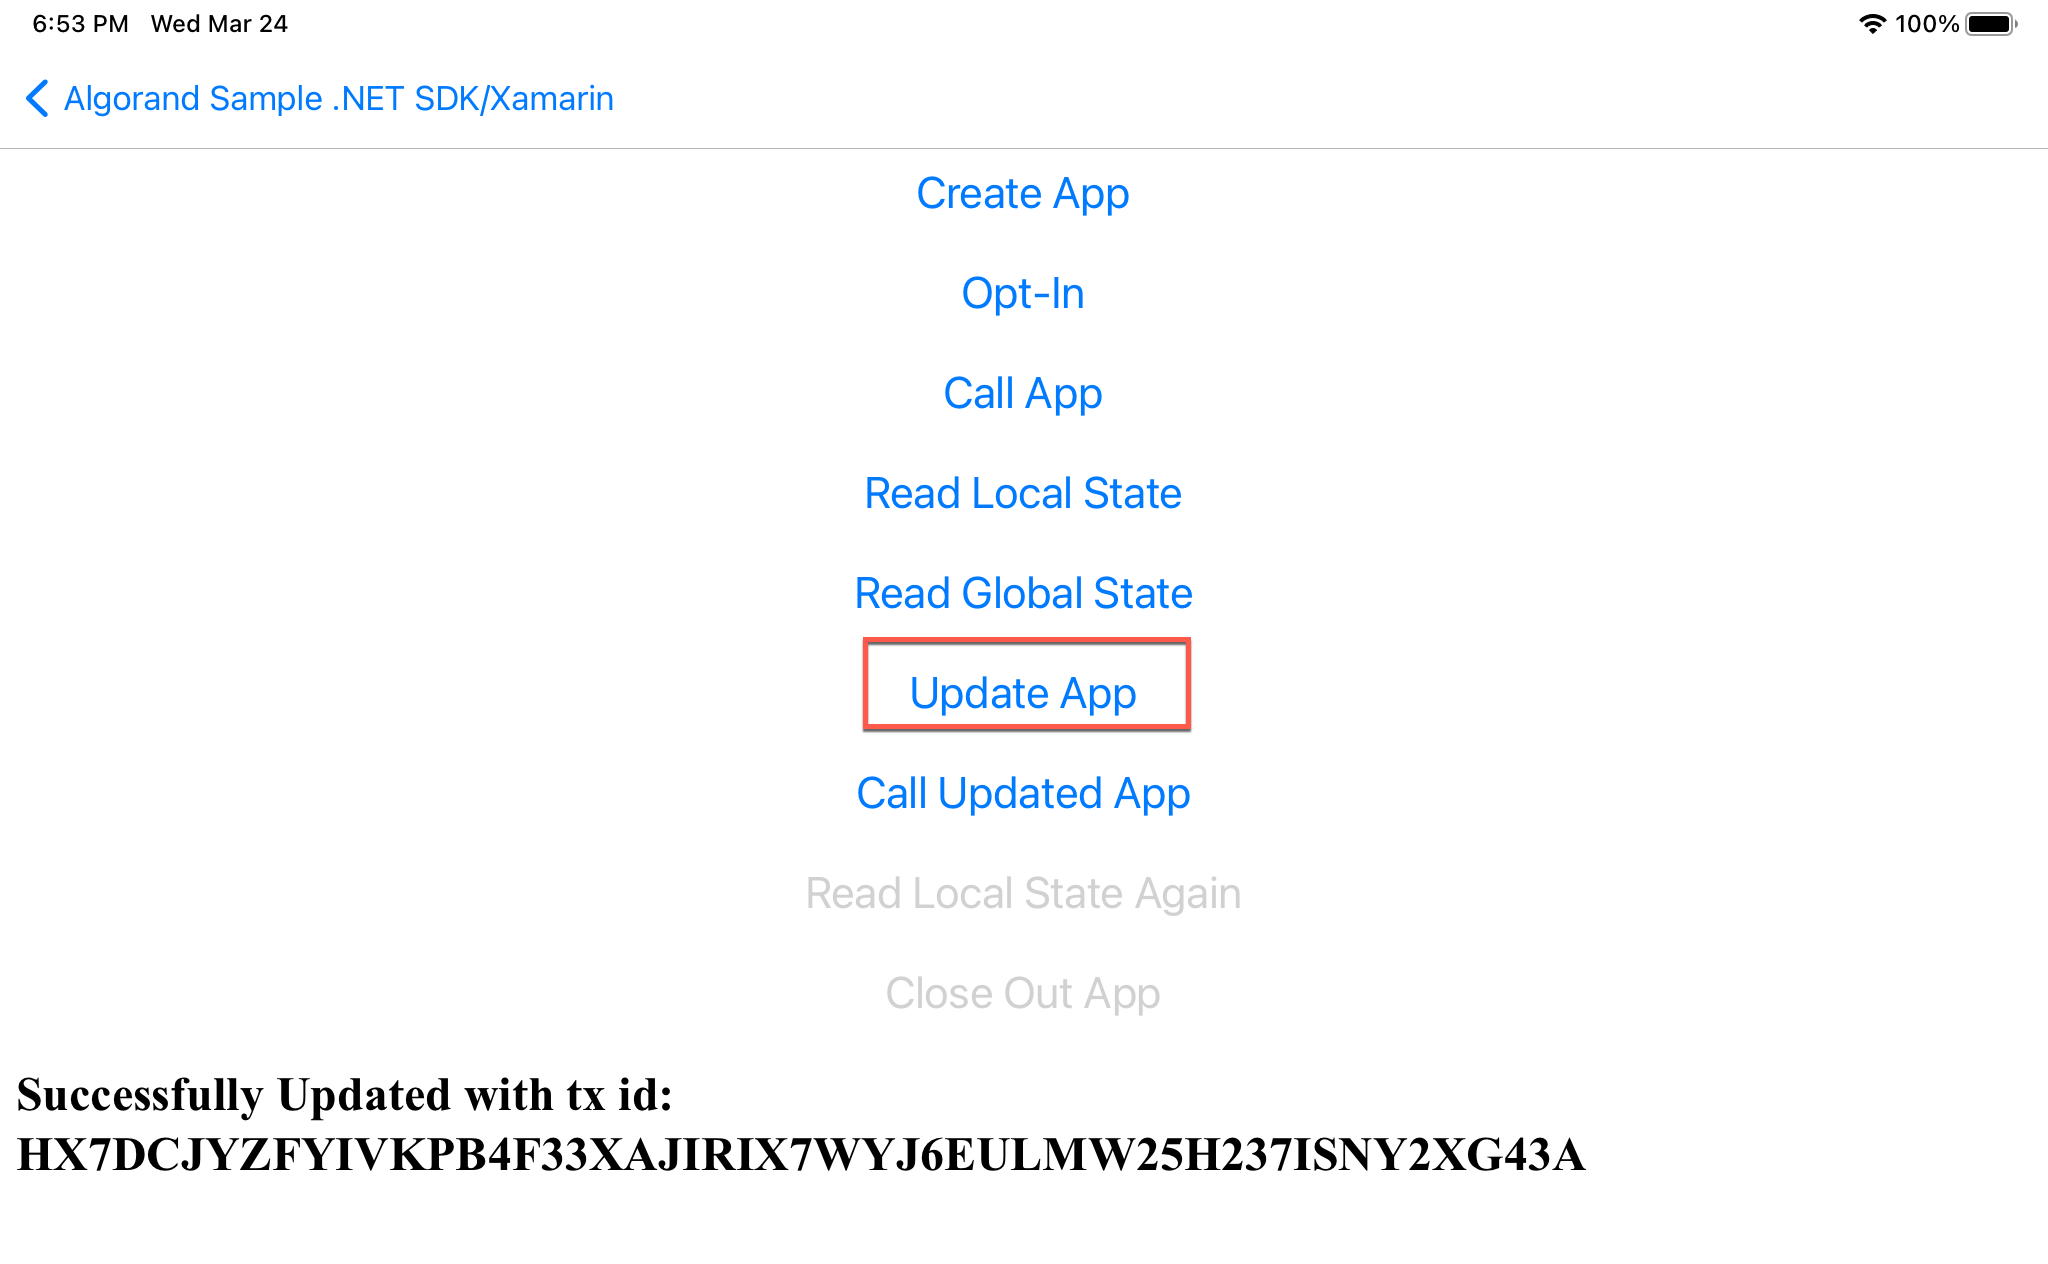
Figure 17-6 Update App
Call Updated App
void CallUpdatedApp_Clicked(System.Object sender, System.EventArgs e)
{
    var date = DateTime.Now;
    Console.WriteLine(date.ToString("yyyy-MM-dd 'at' HH:mm:ss"));
    List<byte[]> appArgs = new List<byte[]>
        {
            Encoding.UTF8.GetBytes(date.ToString("yyyy-MM-dd 'at' HH:mm:ss"))
        };
    CallApp(client, user, appid, appArgs);
}
The output should look similar to this:
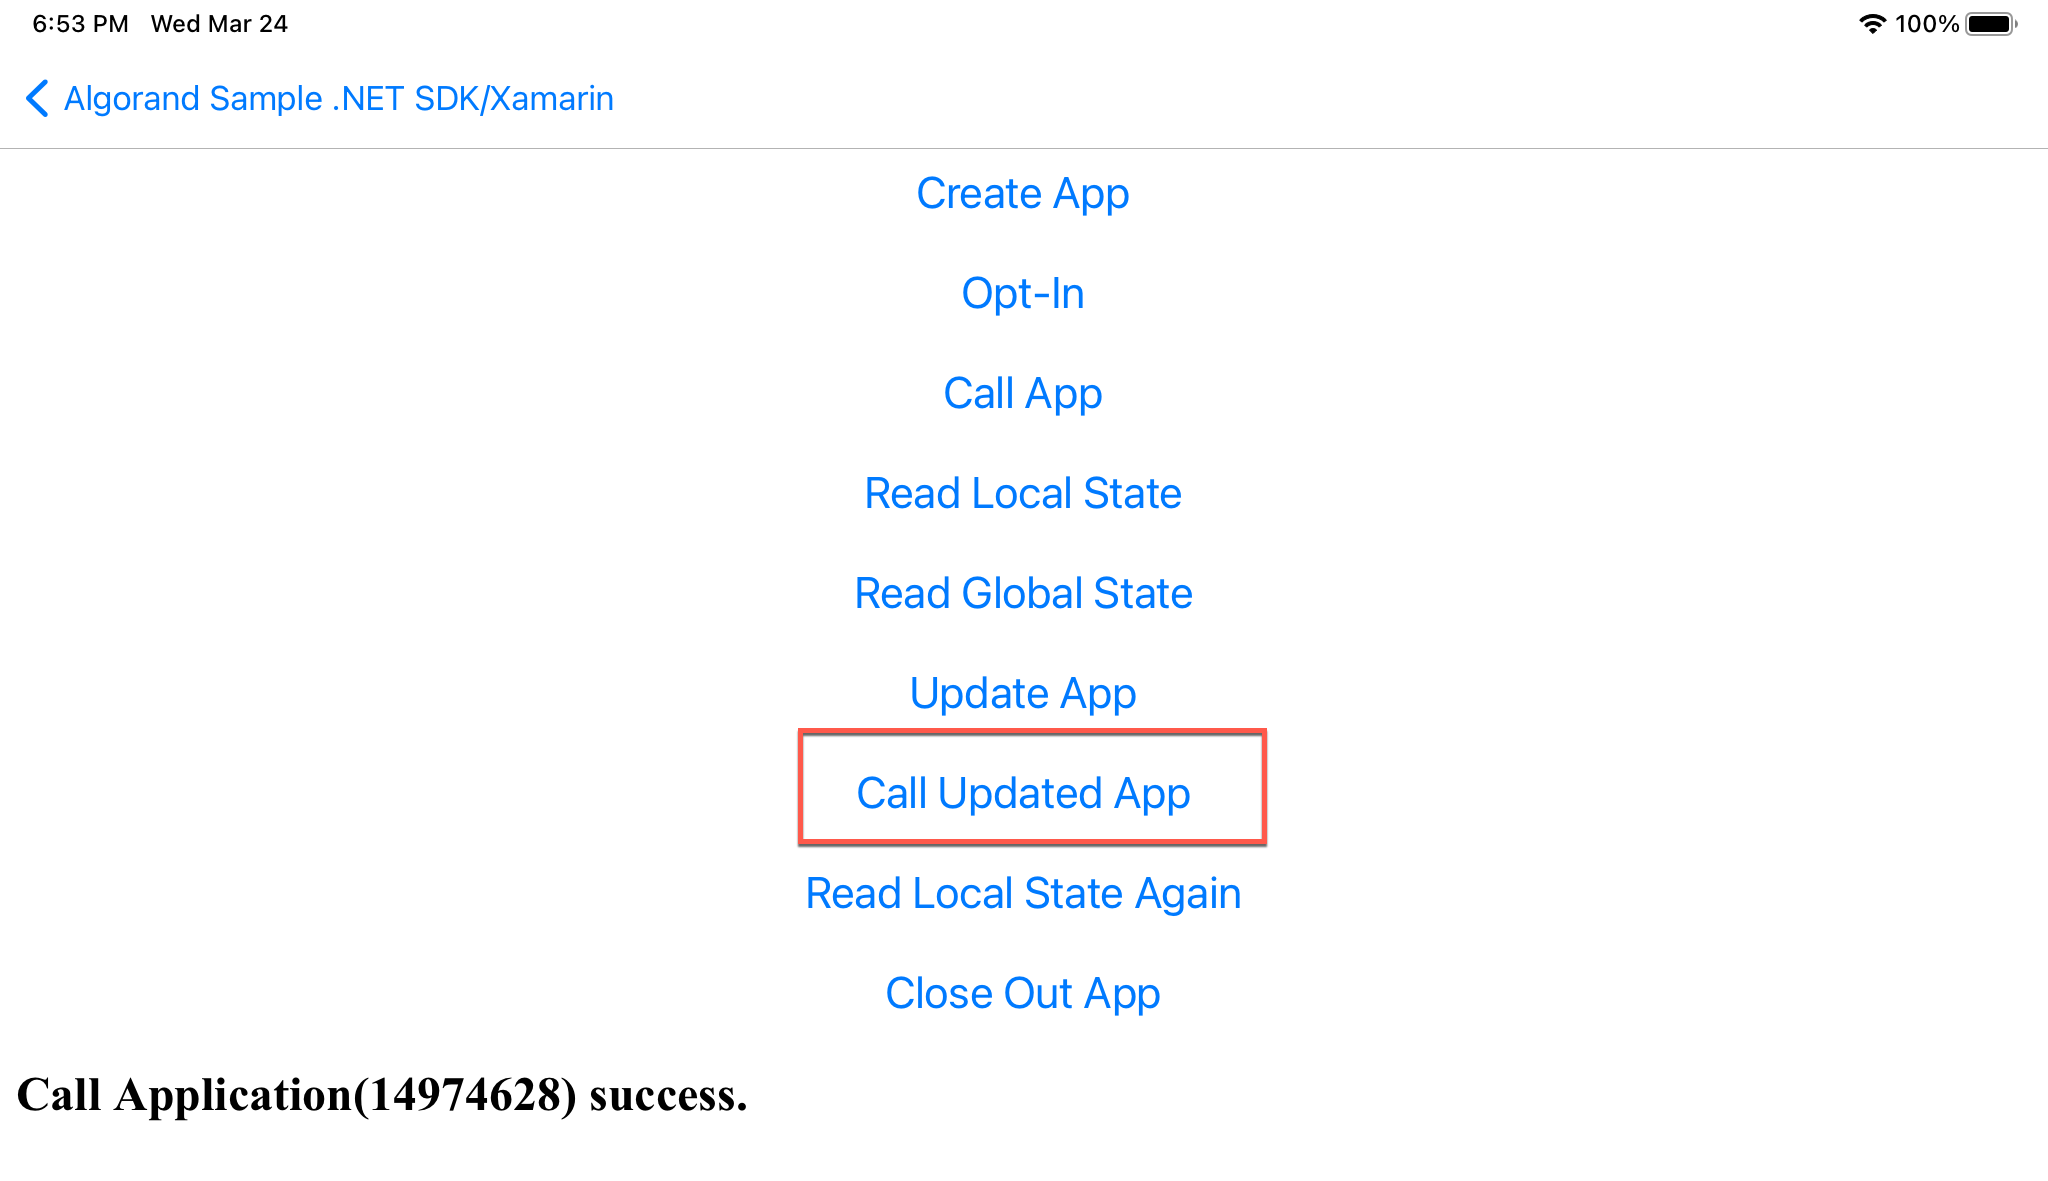
Figure 17-7 Call Updated App
Read Local State Again
public void ReadLocalState(AlgodApi client, Account account, long? appId)
{
    //see above
...
}
The output should look similar to this:
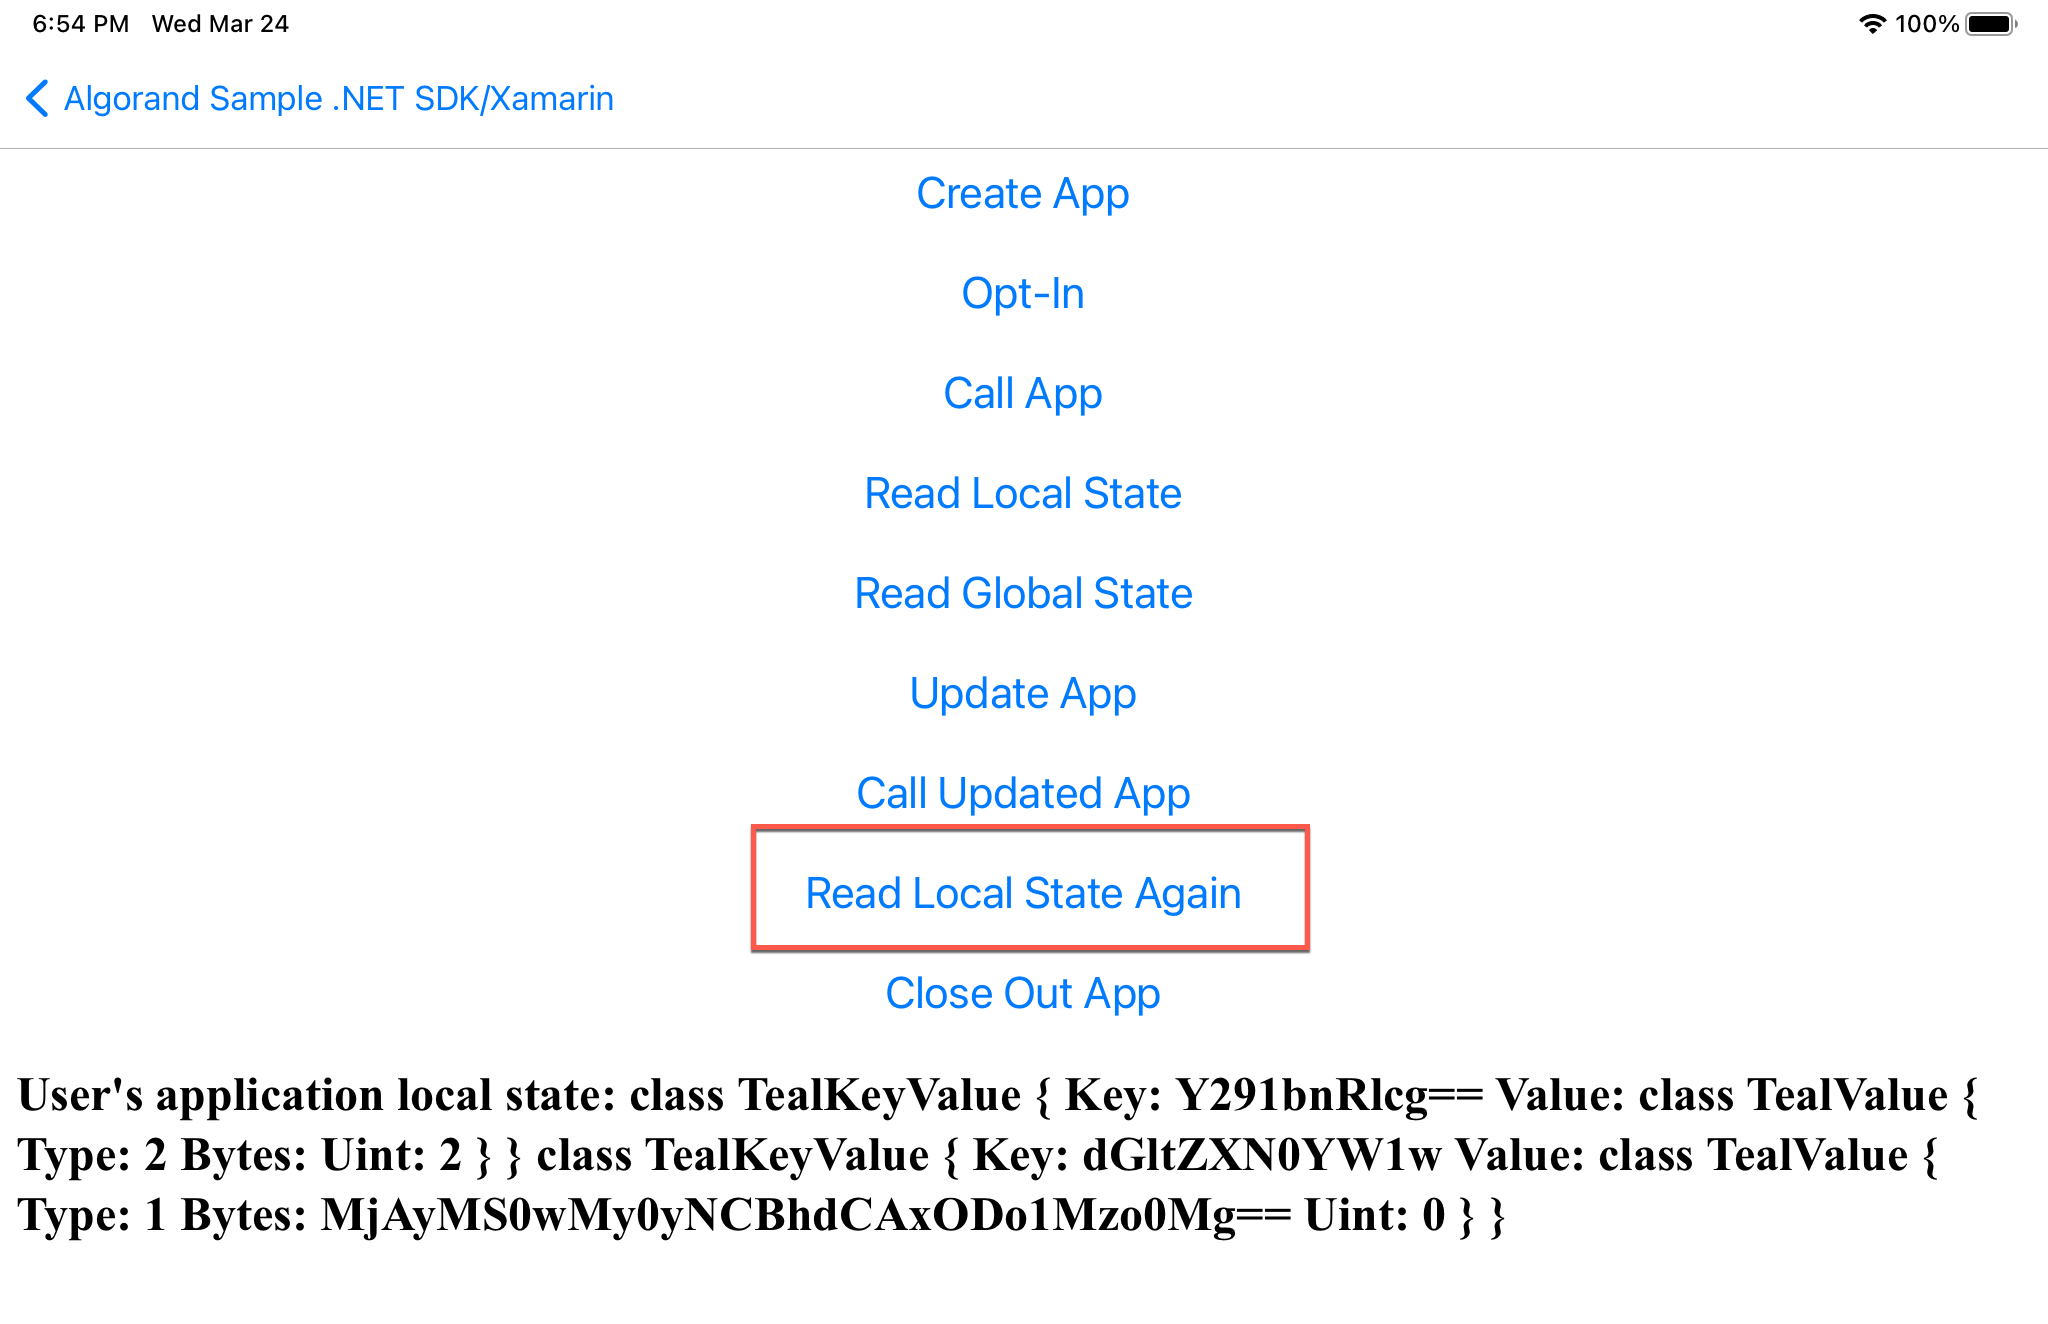
Figure 17-8 Read Local State Again
Close Out App
void CloseOutApp(AlgodApi client, Account sender, ulong appId)
{
    try
    {
        var transParams = client.TransactionParams();
        var tx = Utils.GetApplicationCloseTransaction(sender.Address, (ulong?)appId, transParams);
        var signedTx = sender.SignTransaction(tx);
        Console.WriteLine("Signed transaction with txid: " + signedTx.transactionID);

        var id = Utils.SubmitTransaction(client, signedTx);
        Console.WriteLine("Successfully sent tx with id: " + id.TxId);
        var resp = Utils.WaitTransactionToComplete(client, id.TxId);
        Console.WriteLine("Confirmed Round is: " + resp.ConfirmedRound);
        Console.WriteLine("Application ID is: " + appId);
        DisplayInfo("Successfully Closed out with  tx id: " + id.TxId);
    }
    catch (ApiException e)
    {
        Console.WriteLine("Exception when calling create application: " + e.Message);
    }
}
The output should look similar to this:
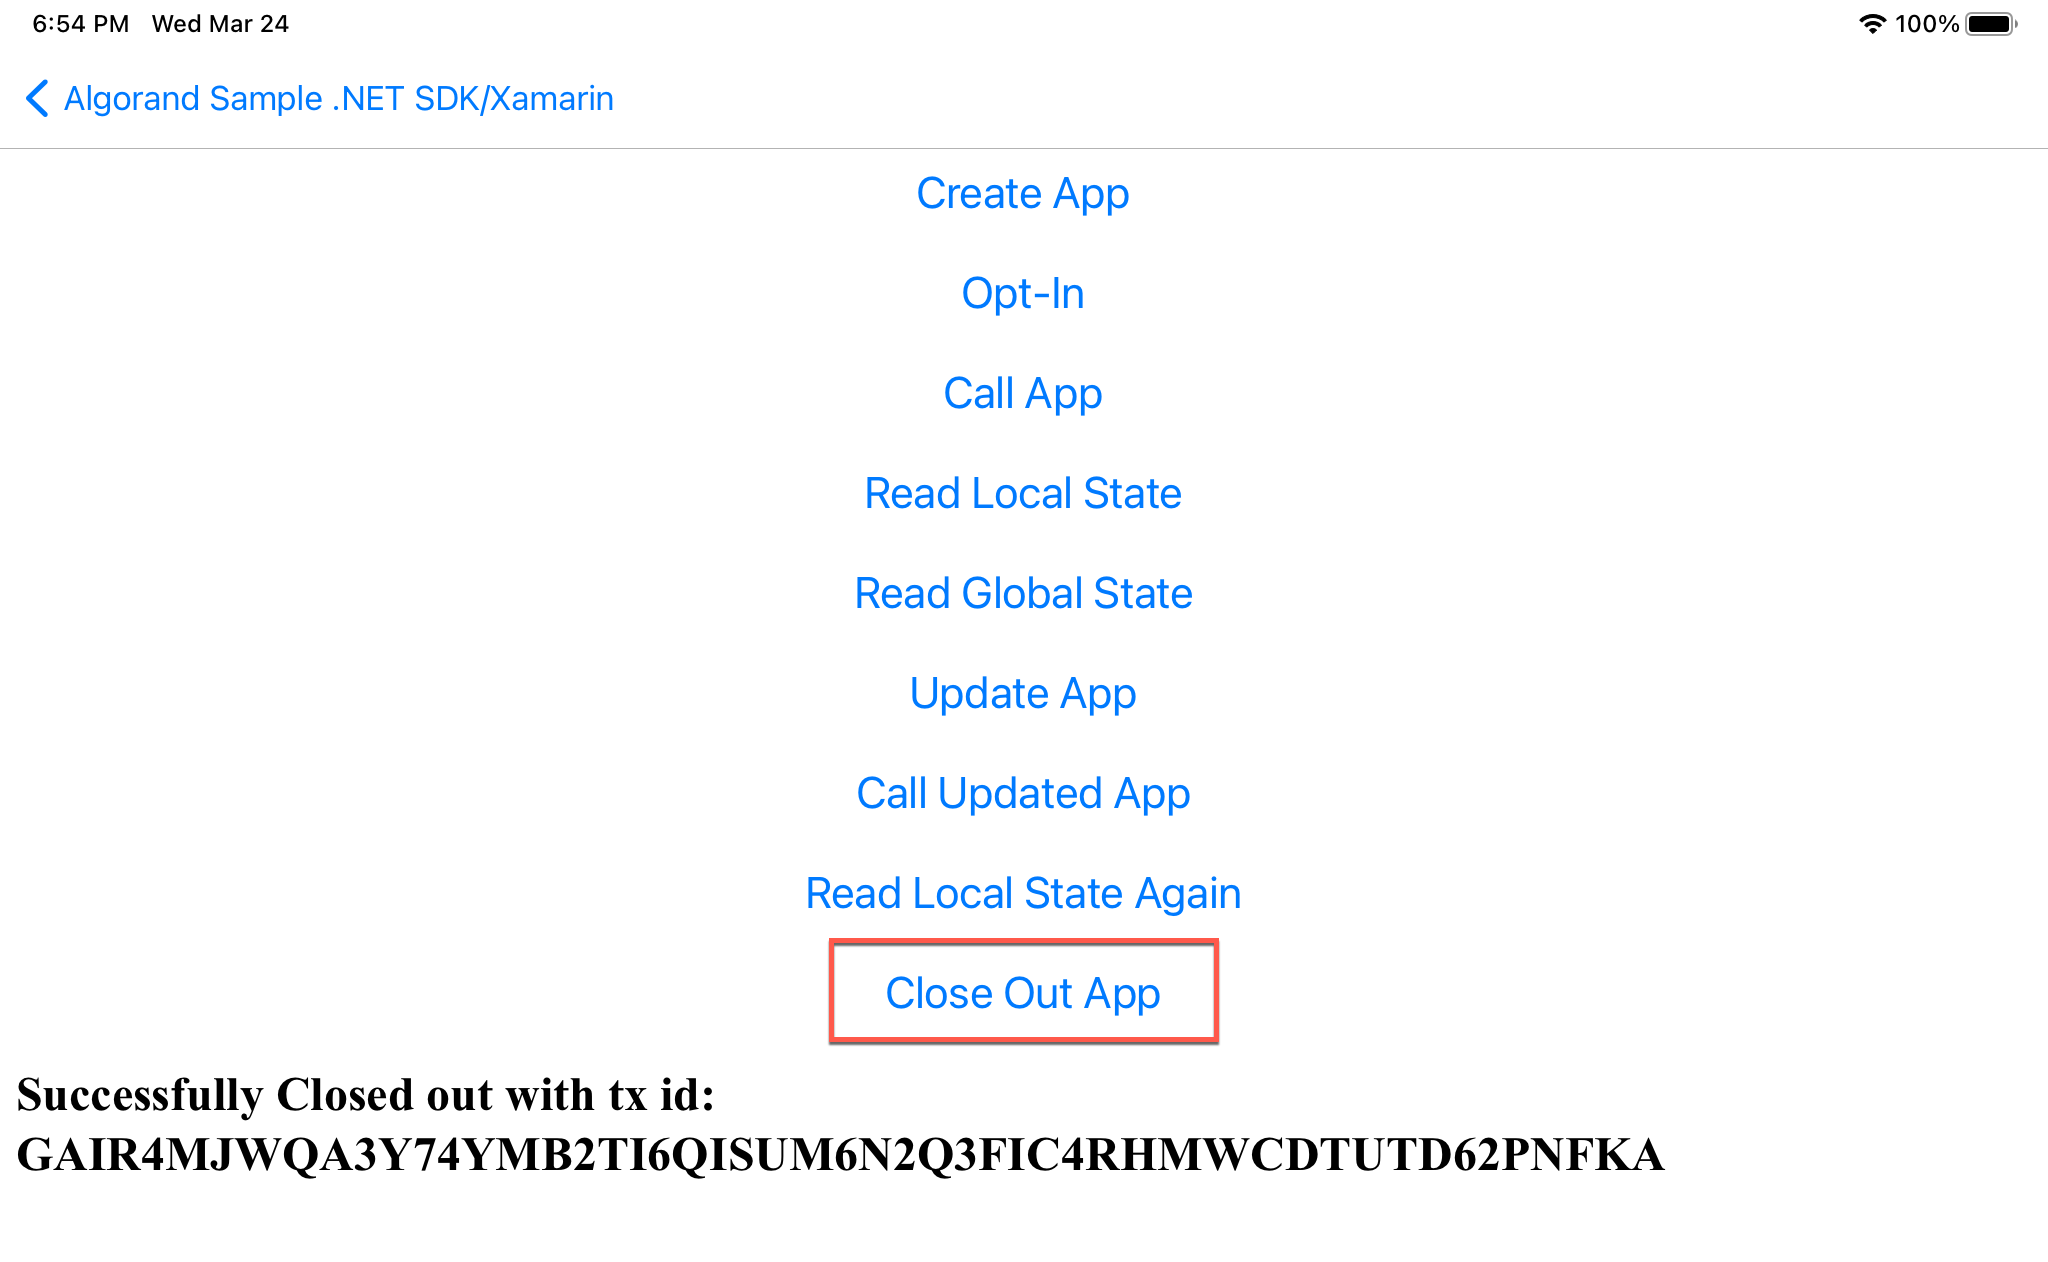
Figure 17-9 Close Out App
Conclusion
This app provides everything you need to know on how to program Algorand blockchain functions using C#. We reviewed the basics of getting a block and creating an account. Also, we covered Transactions and MultiSig transactions. Then we looked at another set of transactions for Algorand Standard Assets including SDK methods that Create, Change, Opt-In, Transfer, Freeze, Clawback, and Destroy Assets. Atomic transfers and Algorand Smart Contracts were also covered. The solution has also been updated to include examples on Compile Teal, Dryrun debugging, Indexer, Rekey and Stateful Smart Contracts. Have fun building your next app, using Algorand!
The source code for this solution can be found in the Devrel repository at this location.
A video walkthrough of this solution is here: