
Create Your First ORE ID Application
Utilizing some of the most popular JavaScript frameworks, we open blockchain development to all kinds of developers and make it easier for developers to learn new blockchain technologies. ORE ID is built on top of an open source JavaScript library called ChainJS. ReactJS is a JavaScript progressive framework for building user interfaces.

 JavaScript
Requirements
- Node v10.3
- NPM
- ORE ID GitHub
- Complete the How to run the ORE ID Sample App tutorial to understand the user flow.
- (Recommended) An Integrated Development Environment (IDE). Since this tutorial is a step-by-step tutorial, using an IDE such as Visual Studio is recommended.
Background
ORE ID is a service that allows you to add user authentication to your application. It uses standard OAuth flows to connect common identity providers (Google, Facebook, Twitter) to a crypto identity. ORE ID provides an endpoint (/auth) to allow you to trigger a web-hosted user login flow that is branded for your app.
The goal of this tutorial is to configure oreid-js for your very own “Hello World” app. You should complete the “How to run the ORE ID Sample App”” tutorial before setting up your test app.
Steps
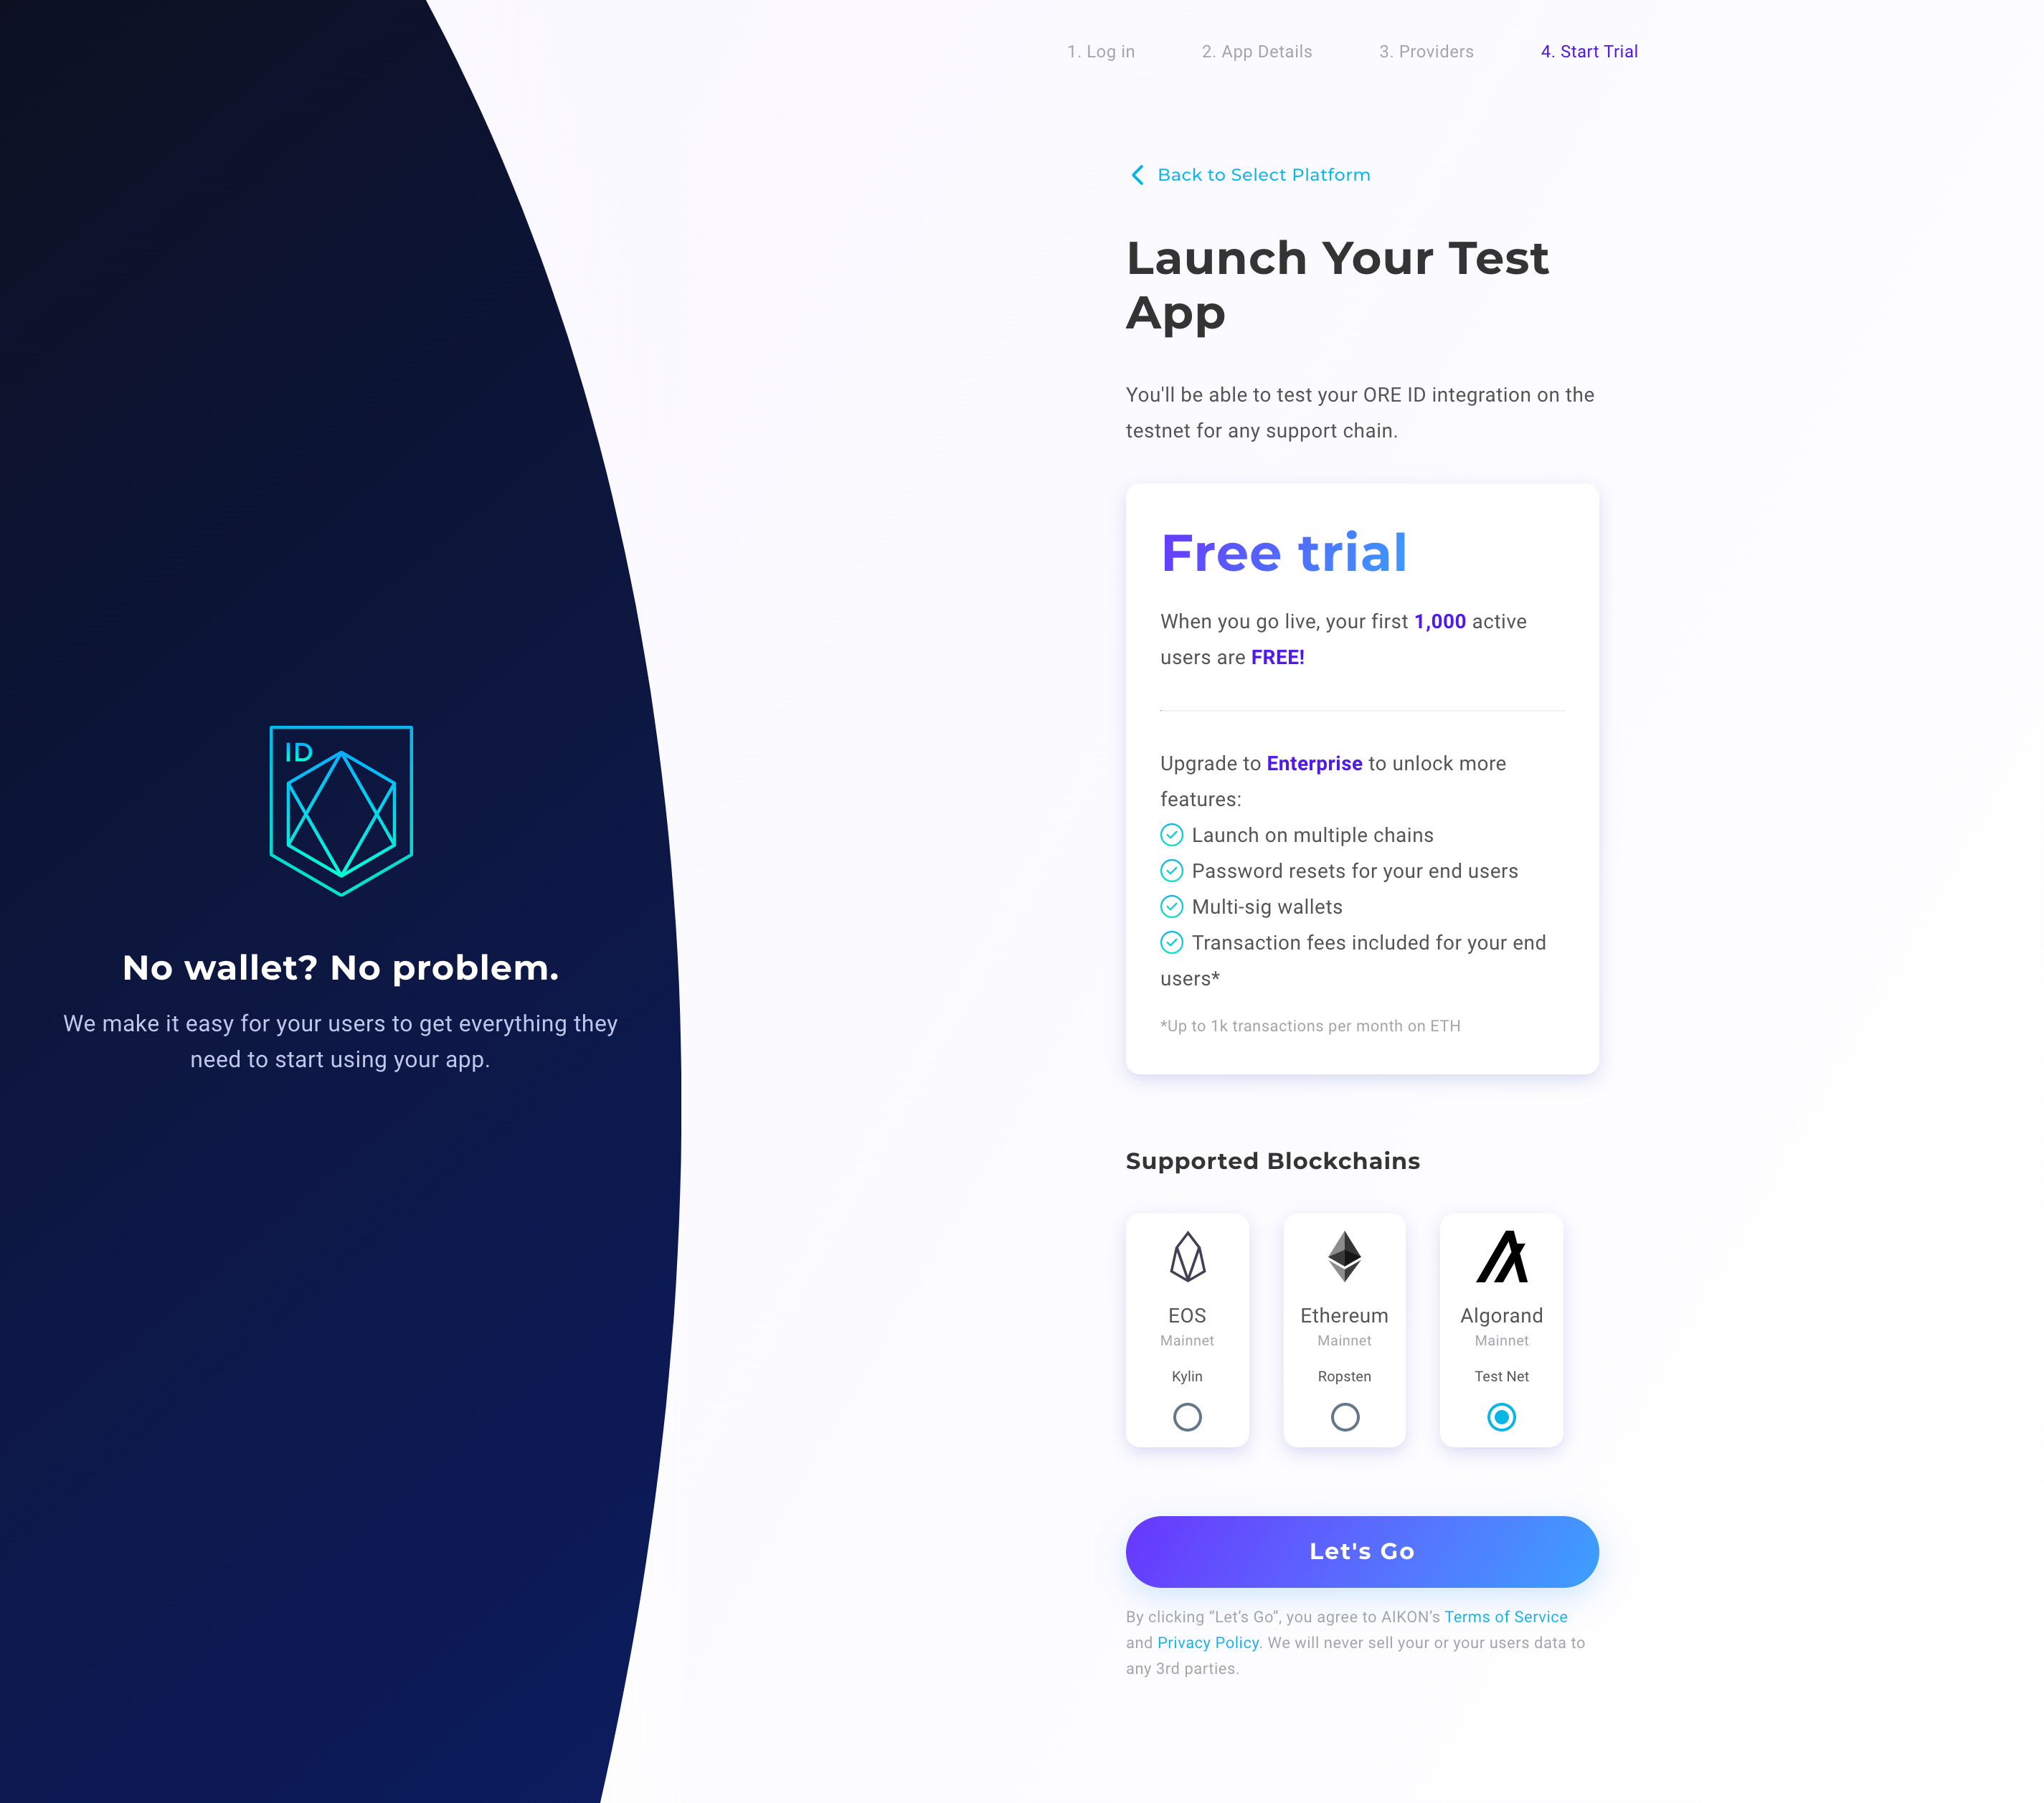
1. Create an app on oreid.io
A) First, login to ORE ID and create a developer app here.
B) You will have the option to upload a logo if you have one ready, but don’t worry if you don’t!

C) Next, select which social logins you want to allow your users to Auth with.

D) Lastly, you will see that ORE ID supports various chains including Ethereum and EOS, but today we’re here for Algorand.
2. Setup your environment
Since you already have completed the “How to run the ORE ID Sample App” tutorial, you should already have the sample application files on your machine. If you need to download the files again you can clone the repository.
git clone https://github.com/TeamAikon/ore-id-docs.git
Info
If you haven’t already, follow the instructions for “How to run the ORE ID Sample App” tutorial before completing this one.
After downloading the files, navigate to the react folder in the directory
cd ore-id-docs/examples/_algorand/react
3. Create an .env file for your test app
As a react app, the .env file houses the secrets for the config of your app deploy, including things like your App ID and API Key.
A) Find the example .env file named .env.example in the root of the ore-id-docs/examples/_algorand/react directory.
Tip
Use the ls -a command to view .env files in a directory.
Currently, the env.example we have created contains Sample App config— the App ID and API Key are already populated.
B) Duplicate the .env.example file into the same folder and rename it .env.
Tip
There is more than one way to duplicate the .env.example file. You can either 1. Create a copy of the file then rename the new file .env or 2. Create a new file, name the new file .env then populate the file with the contents of the .env.example file.
C) Navigate to the new .env file you just created
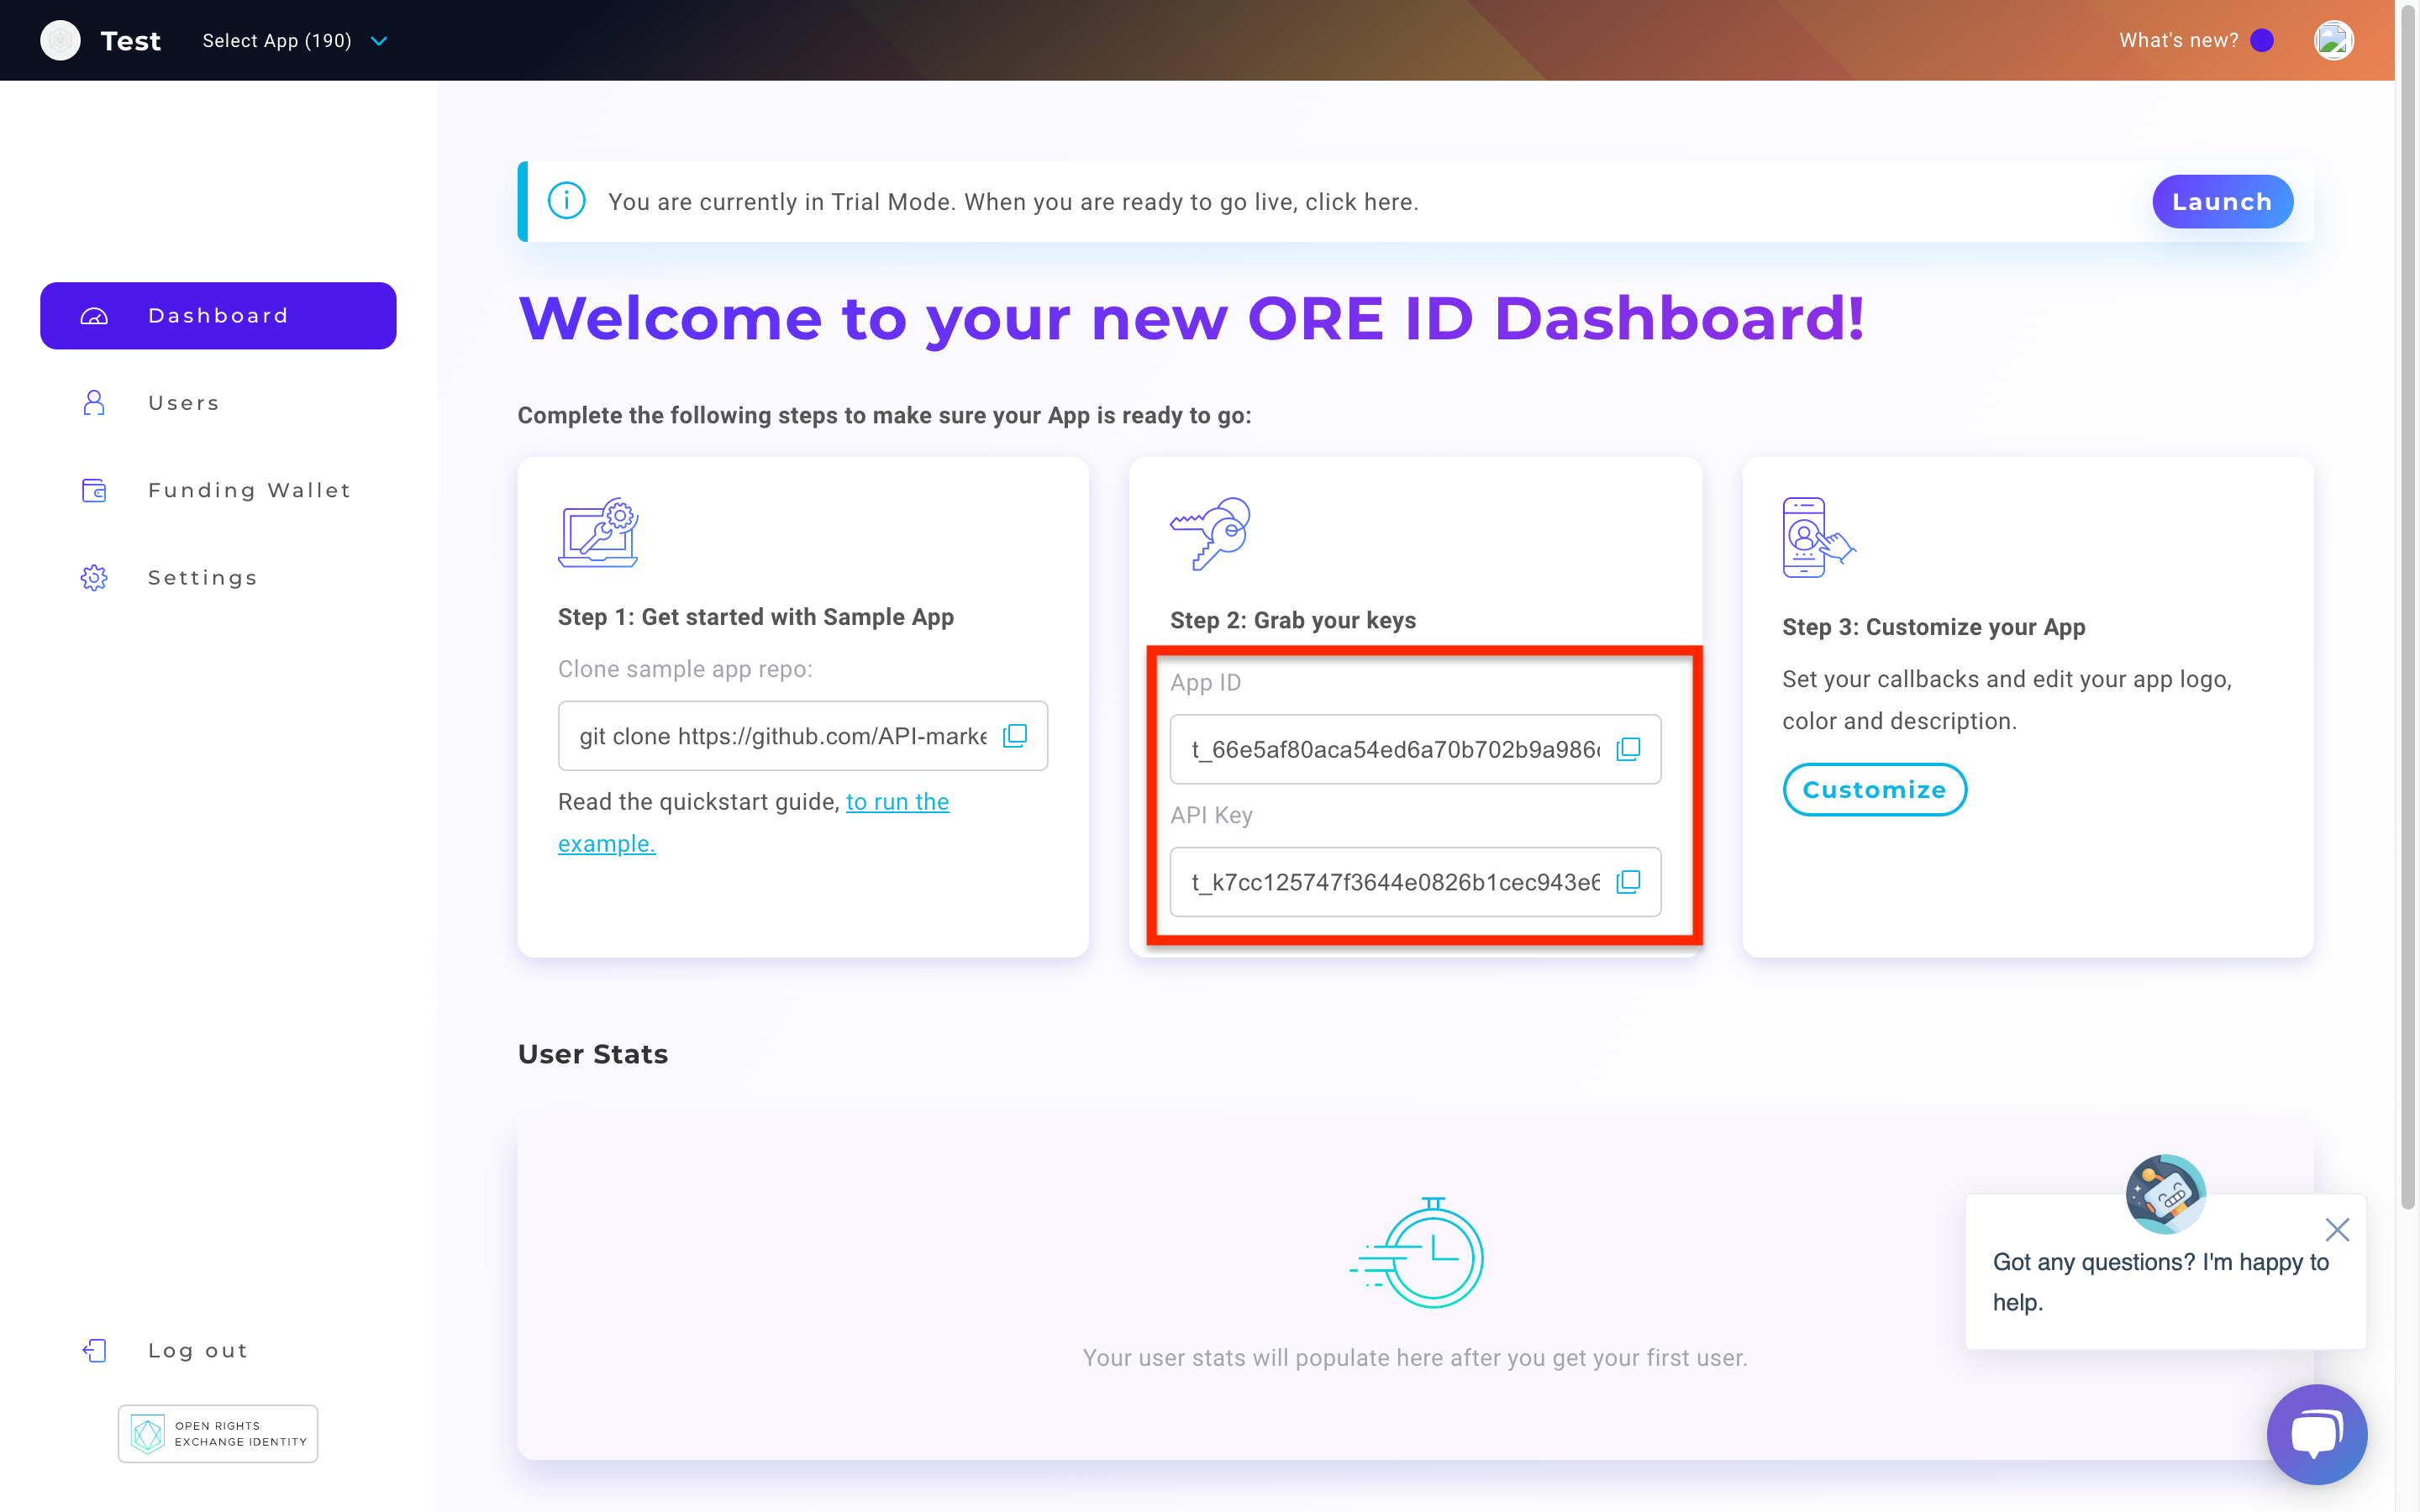
D) Replace example App ID and API Key with unique keys generated for your app that you can find on your ORE ID dashboard.
4. Launch the React App
After changing your config files we will use react to launch a sample app in your browser. Launch the app with
yarn start
5. Login with OAuth
The app should appear in your browser on localhost:3000
Please login by choosing the social OAuth platform you prefer.
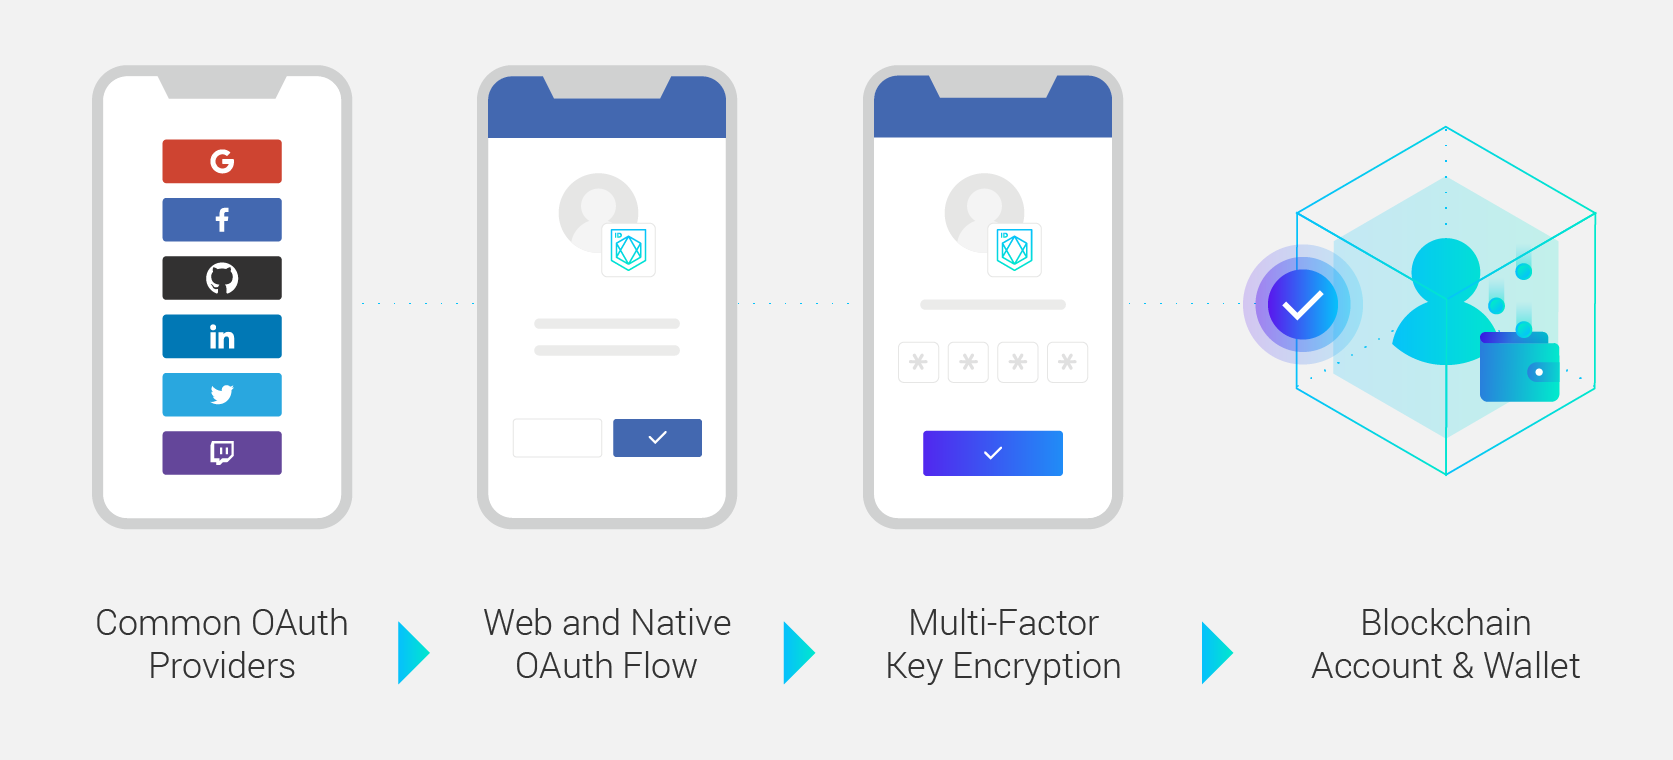
That’s all it takes to create an account! ORE ID provides all of the popular social OAuth platforms, email and phone number as login options for your users ensuring a comfortable onboarding path for your end users.
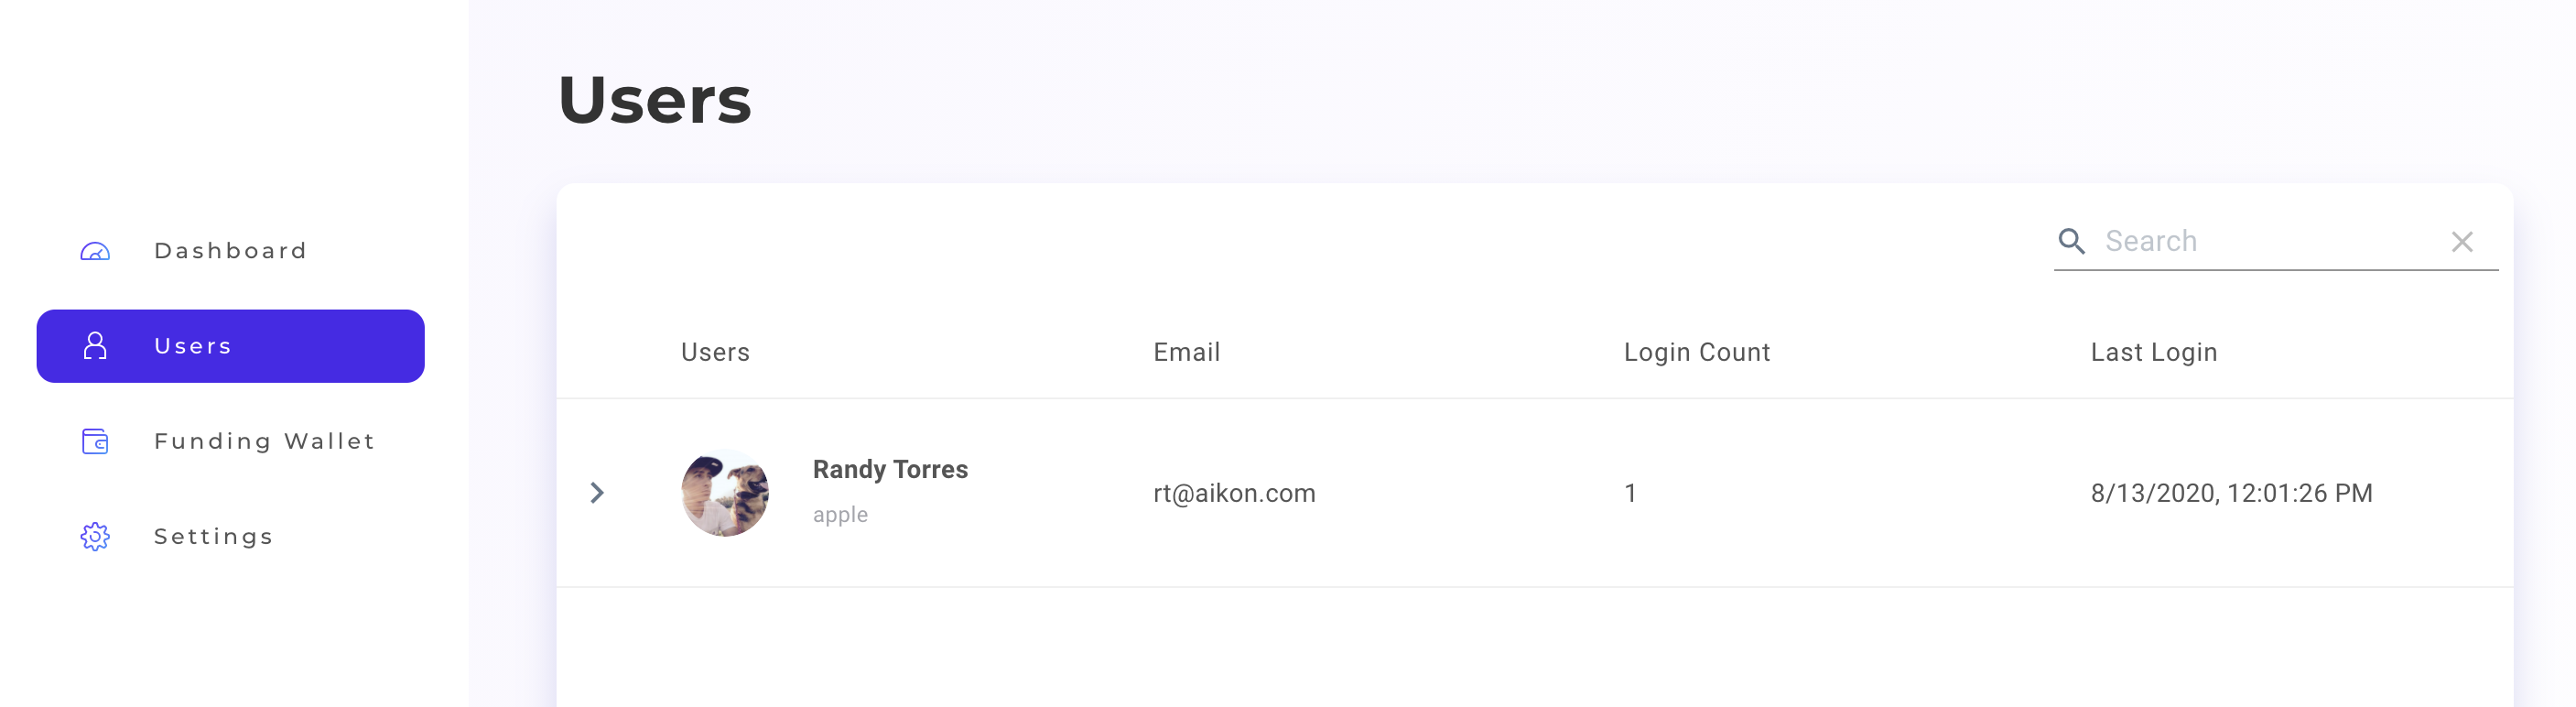
6. View your user account in the dashboard
As you just found out, your app dashboard contains your unique API Key and AppID. From here you can also view your user’s stats and info in the Users tab.
7. Update your app settings
You can also use your dashboard to set up your funding wallet, change how your app looks, update your callback URLs, configure whitelist actions, plus more!
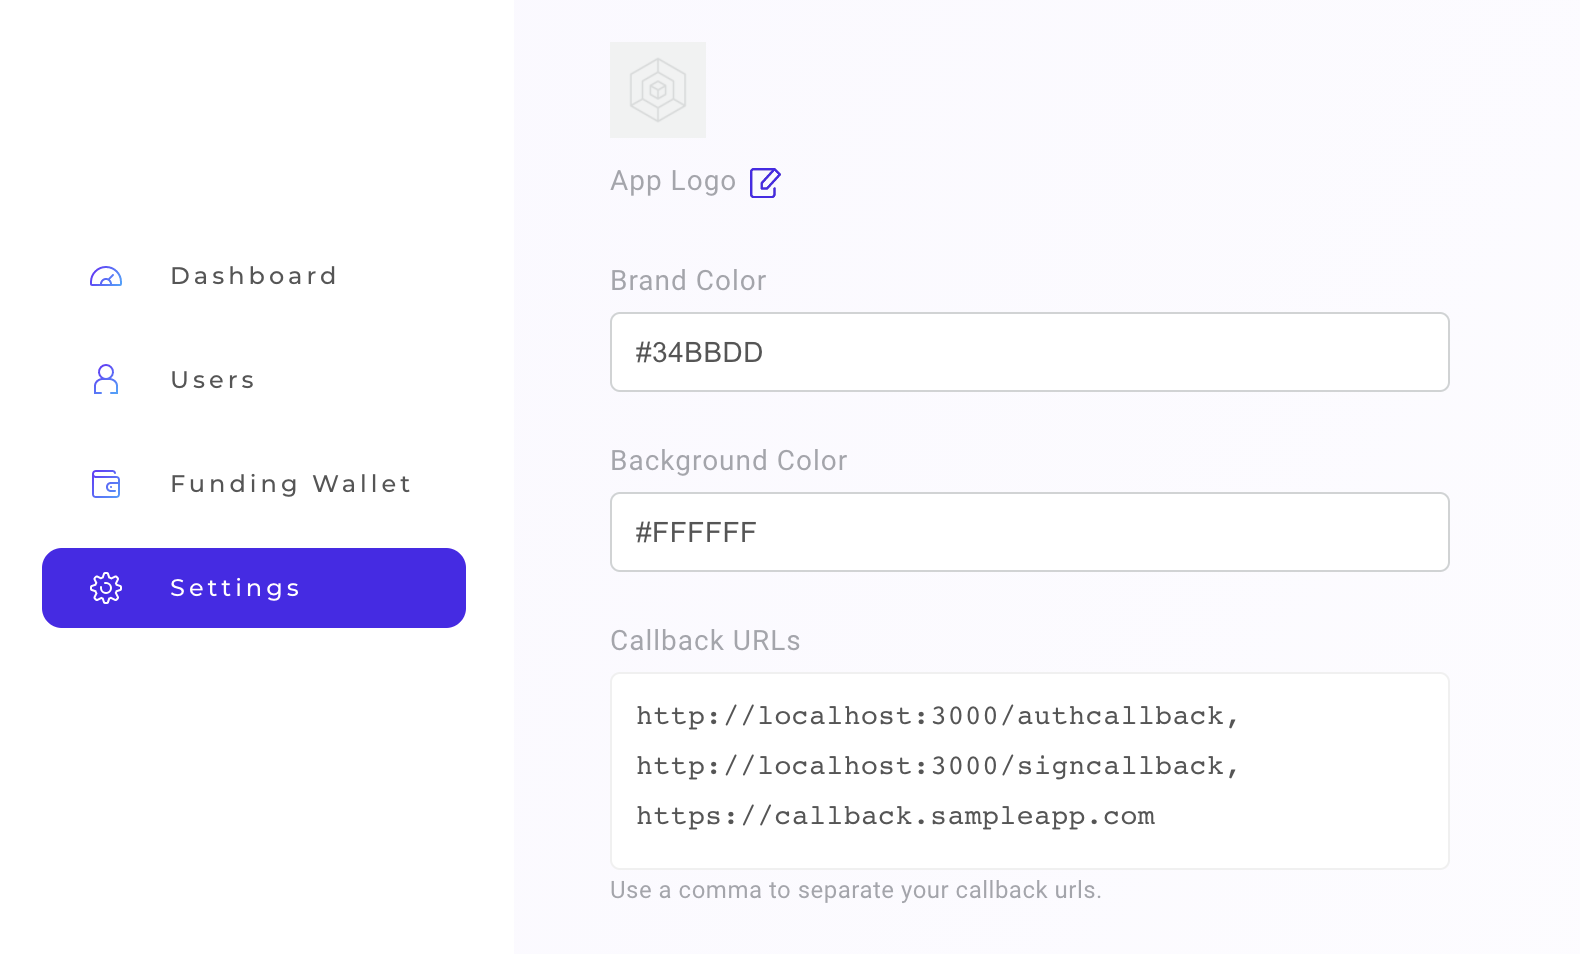
Here the brand color will be the color for your Buttons and the background color will update the background of your user’s Auth and Sign Transaction screens in ORE ID.
Adding callback URLs will also be necessary as you further test your hosted app integration. You can add additional callback URLs in the form field as a comma separated list.
Recap
- You registered your own ORE ID test application.
- You updated the React sample app and logged in as your first user!
- You viewed your first users activity on your apps ORE ID dashboard.
- You experienced how easy ORED ID makes it for your users to log into your app.
Your test app is up and running you can always return to your dashboard to view user info, customizations, and learn more about ORE ID at oreid.io.
If you have questions contact us!