
Deploying Sandbox to a Linux VM in Azure
The prevalence of cloud computing is undeniable and is only growing greater. This tutorial will provide the necessary information to get anyone, of any experience level, set up with a development environment for the Algorand blockchain running in Azure. It is my belief that this is the best way to get started with Algorand development as it provides a closed environment to test and experiment. This is also the first step in getting involved in the much broader Algorand development ecosystem.
 goal
goal
Requirements
- Have an Azure account with an active subscription: Create an account
- Have an SSH enabled terminal. If you are on Windows, Windows Terminal is recommended.
- Have an SSH key pair created: Guide 1 Guide 2
- Know your SSH public key
Steps
Creating and configuring the virtual machine
With the power of Azure templates, this step can be skipped if you are familiar with Azure. There will be instructions in the associated repository, which can be accessed at the bottom of the page, to use an Azure template to get this virtual machine environment set up in mere minutes! However, if you are unfamiliar with Azure, I highly recommend you follow this section as it will serve as a basis for setting up additional resources in future tutorials.
Create the virtual machine
Start off by logging into the Azure portal: https://portal.azure.com/
If this is your first time logging in, your screen may appear slightly different but it’s not an issue. Look around for a button that says Create a resource as shown in Figure 1-1. This can also be accessed from the drop down menu at the top left, if needed.
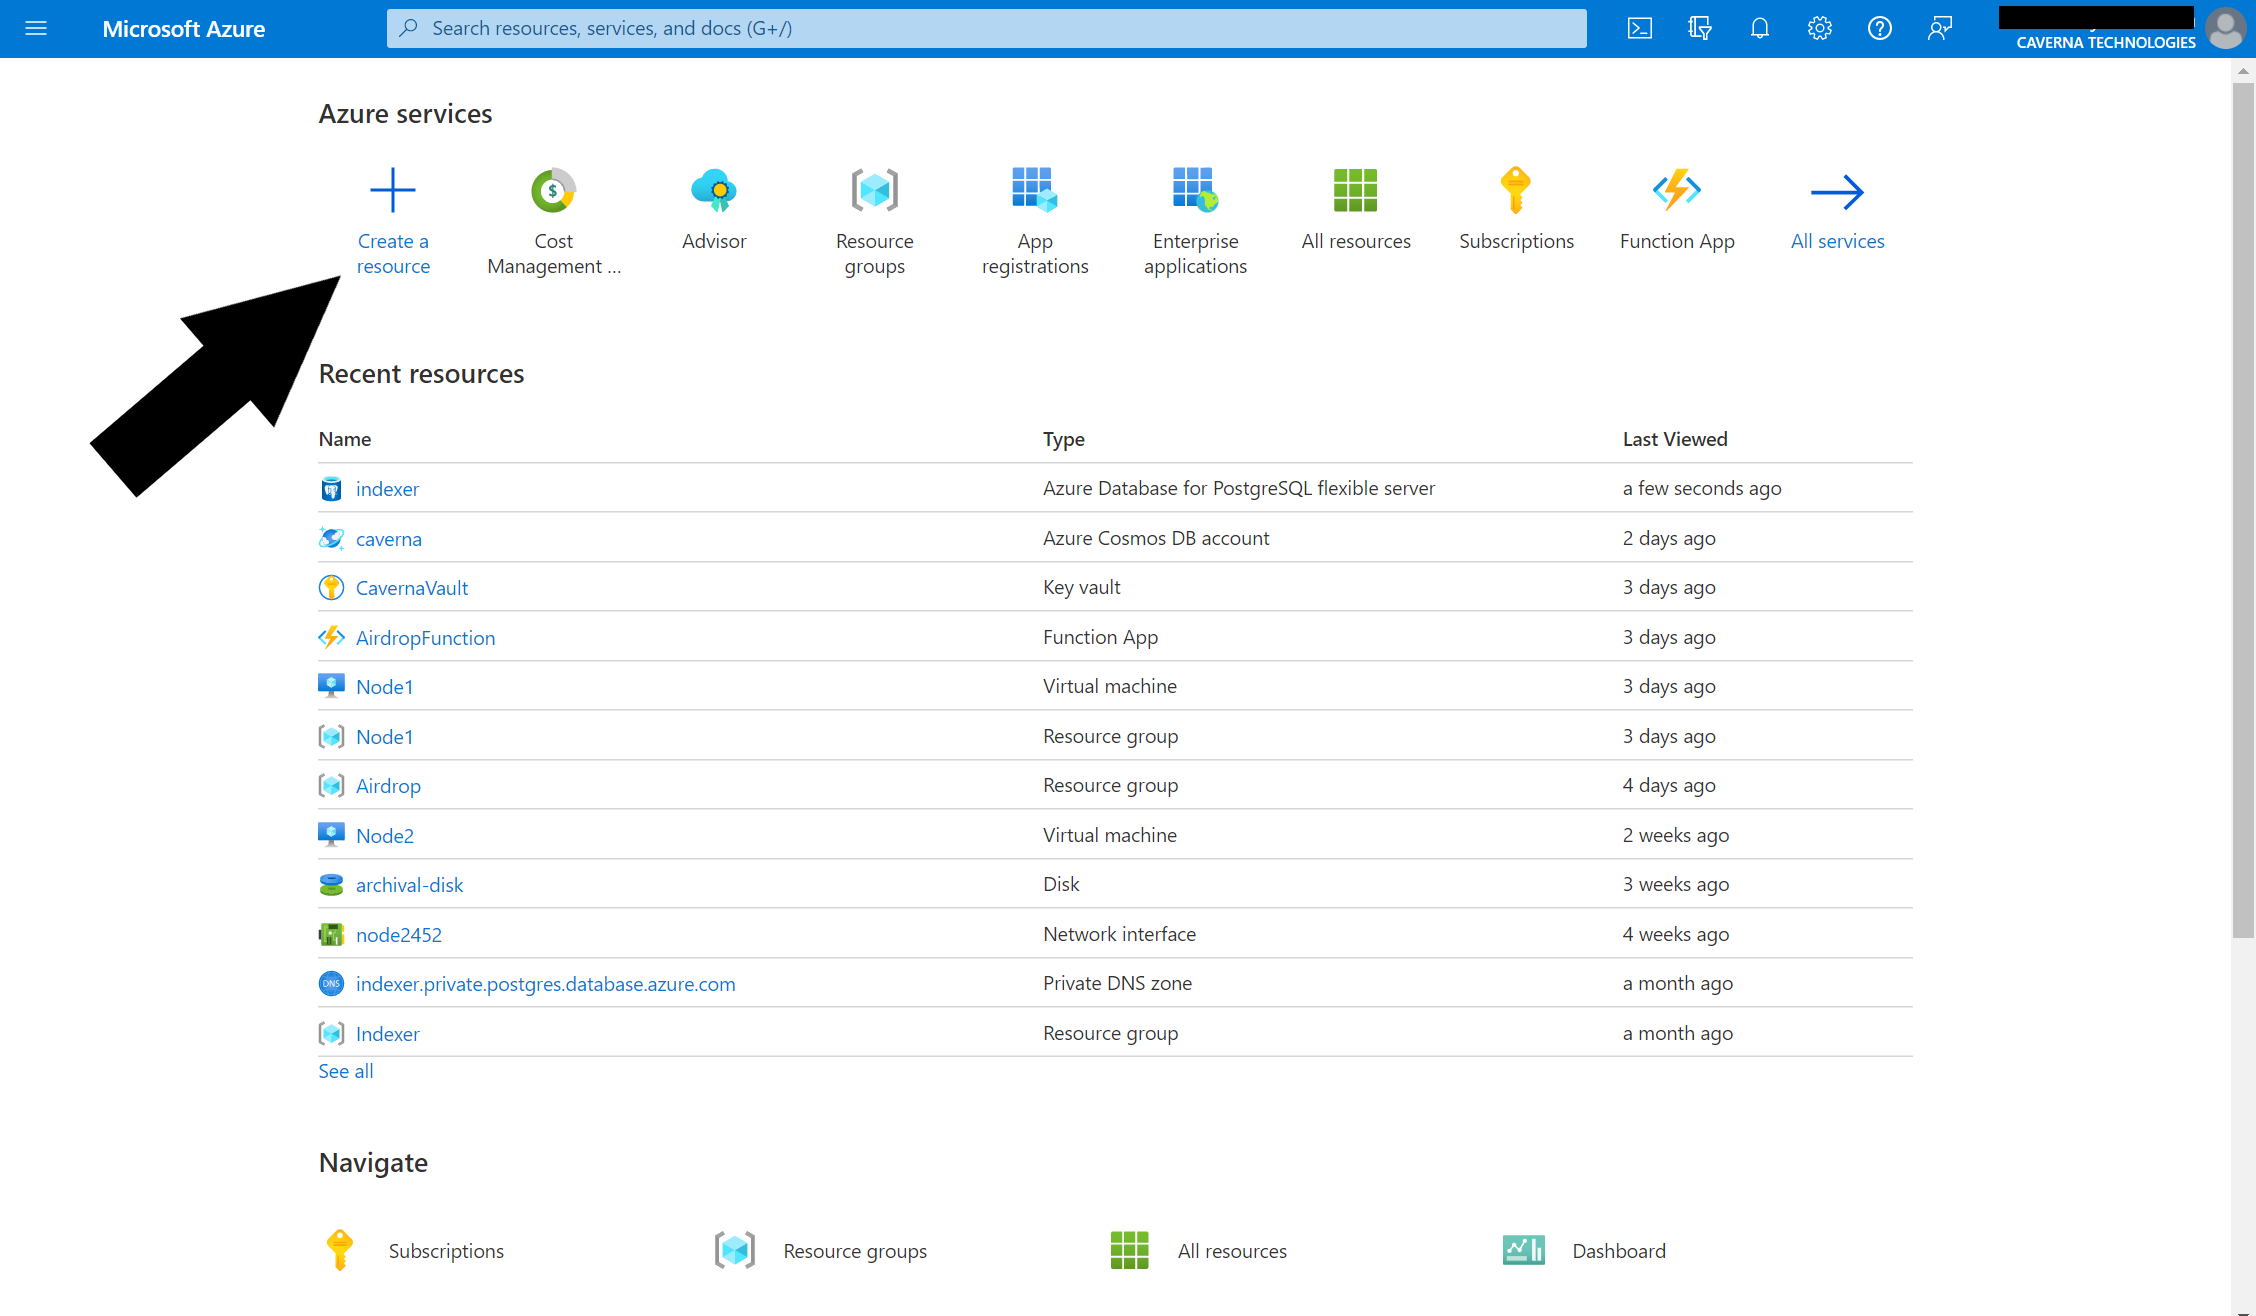
Figure 1-1: Create a resource
As you may have expected, you will now be met with the screen for creating a resource. There are many standard options to choose from, but we will be creating a Ubuntu Server 20.04 LTS resource, as shown in Figure 1-2. At the time of writing this tutorial, it is a standard recommendation Azure provides, but it can always be searched for if have trouble finding it.
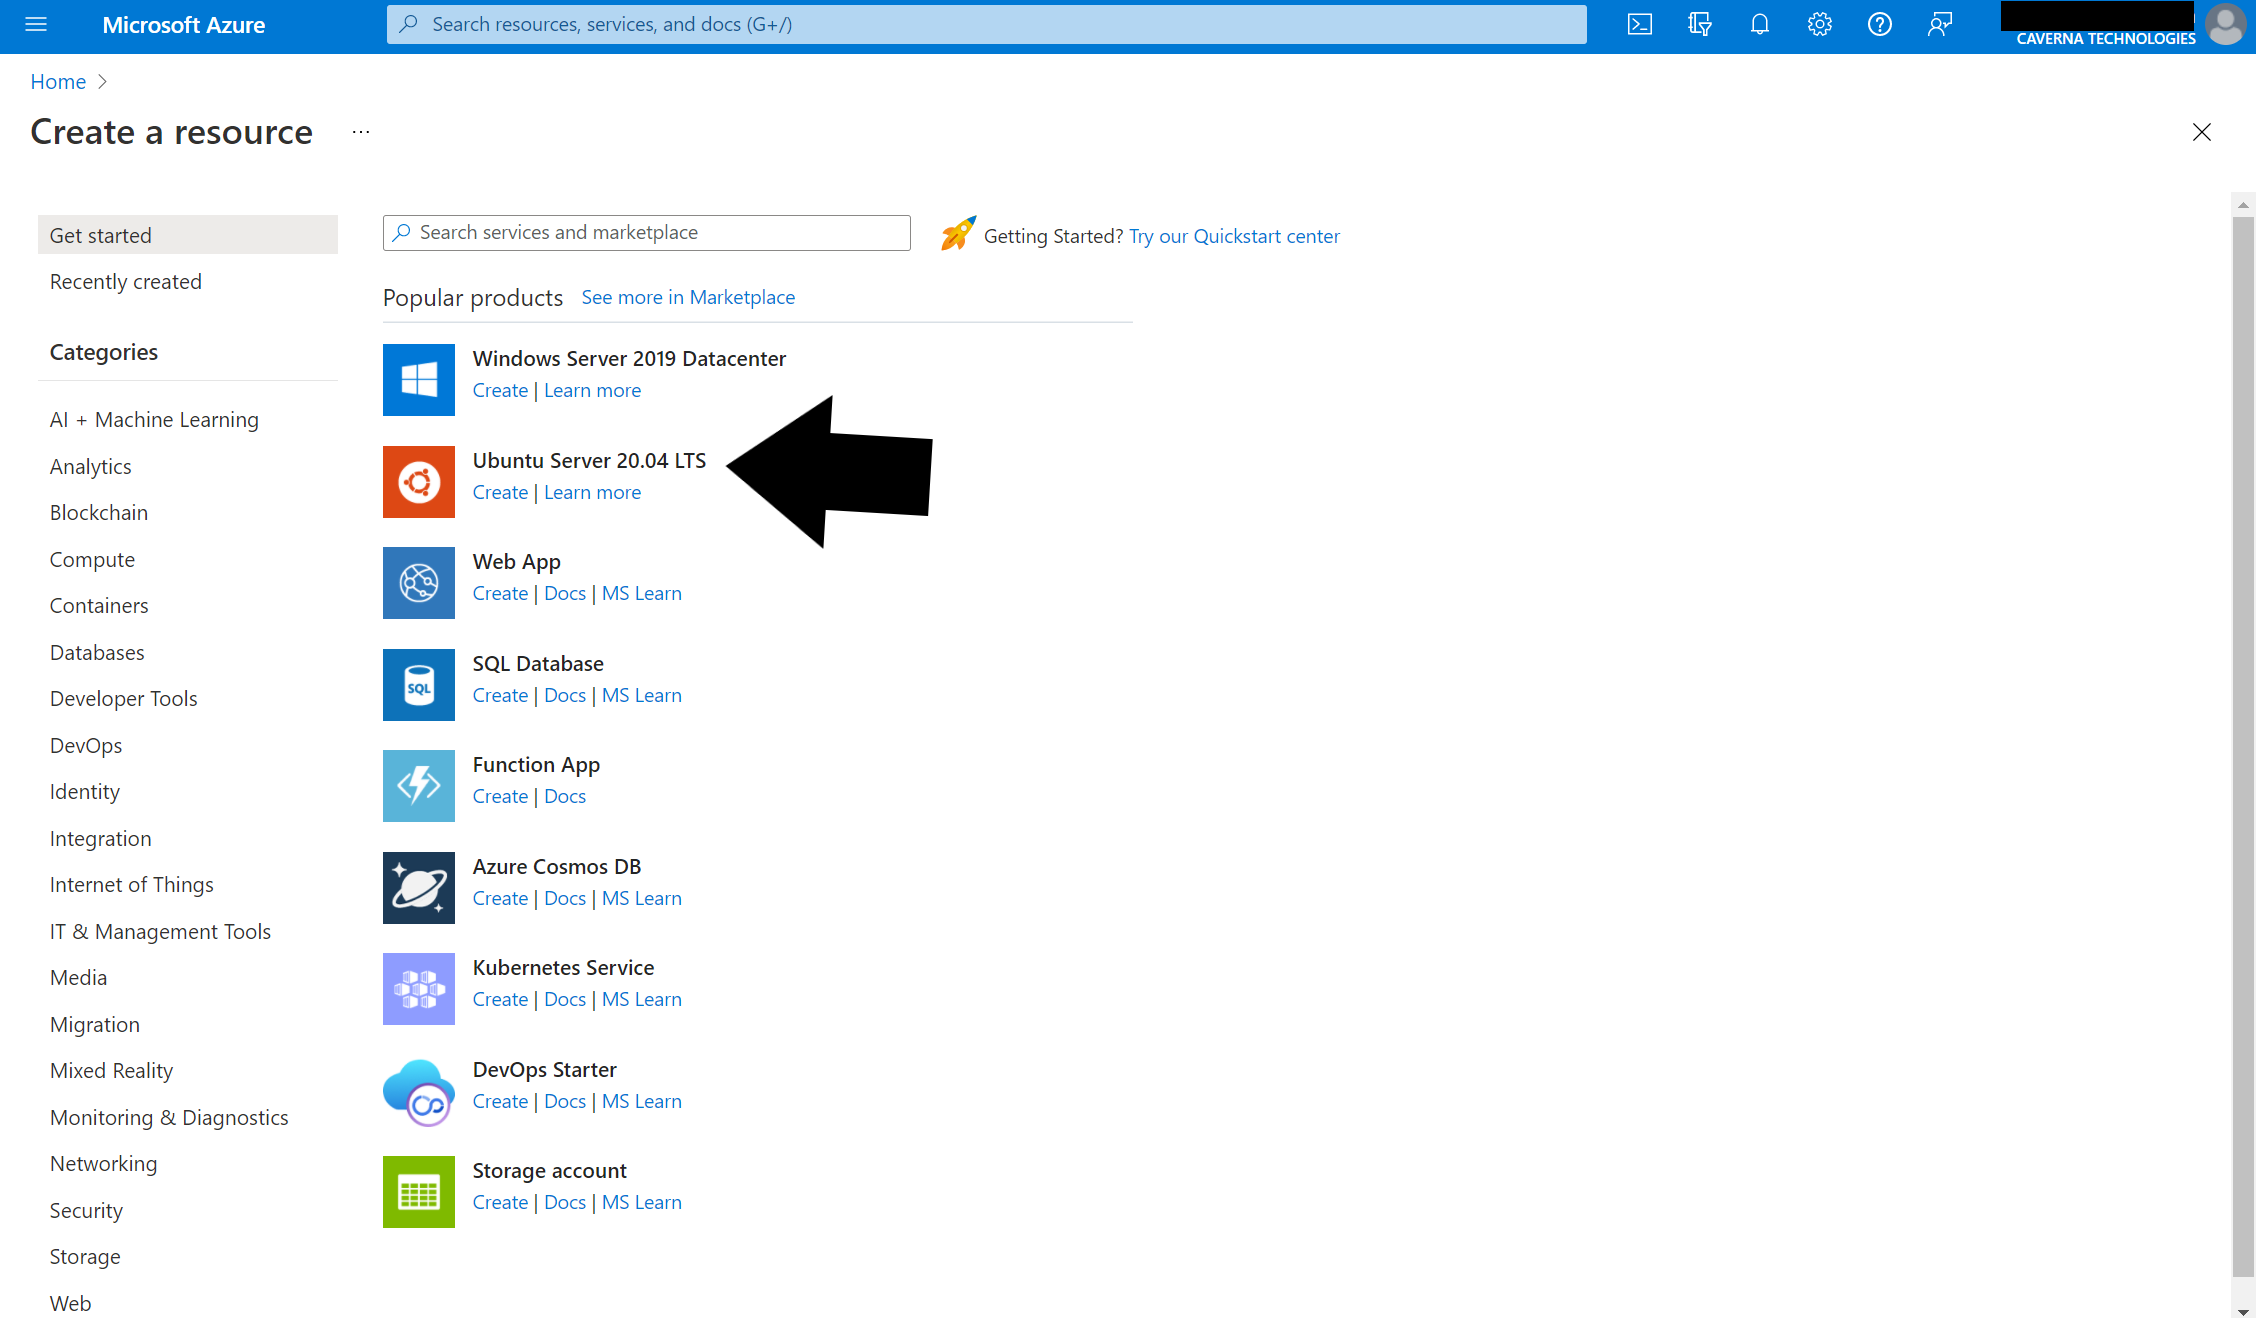
Figure 1-2: Ubuntu Server 20.04 LTS
Under the resource, click the Create button and you will be moved to another screen. We will now be setting the configurable parts of this virtual machine. Barring any UI changes, subscription name, or default auto filled fields, your screen should look similar to the one in Figure 1-3. Upon completing the next few actions, your fields should also be filled similar to the ones in Figure 1-3.
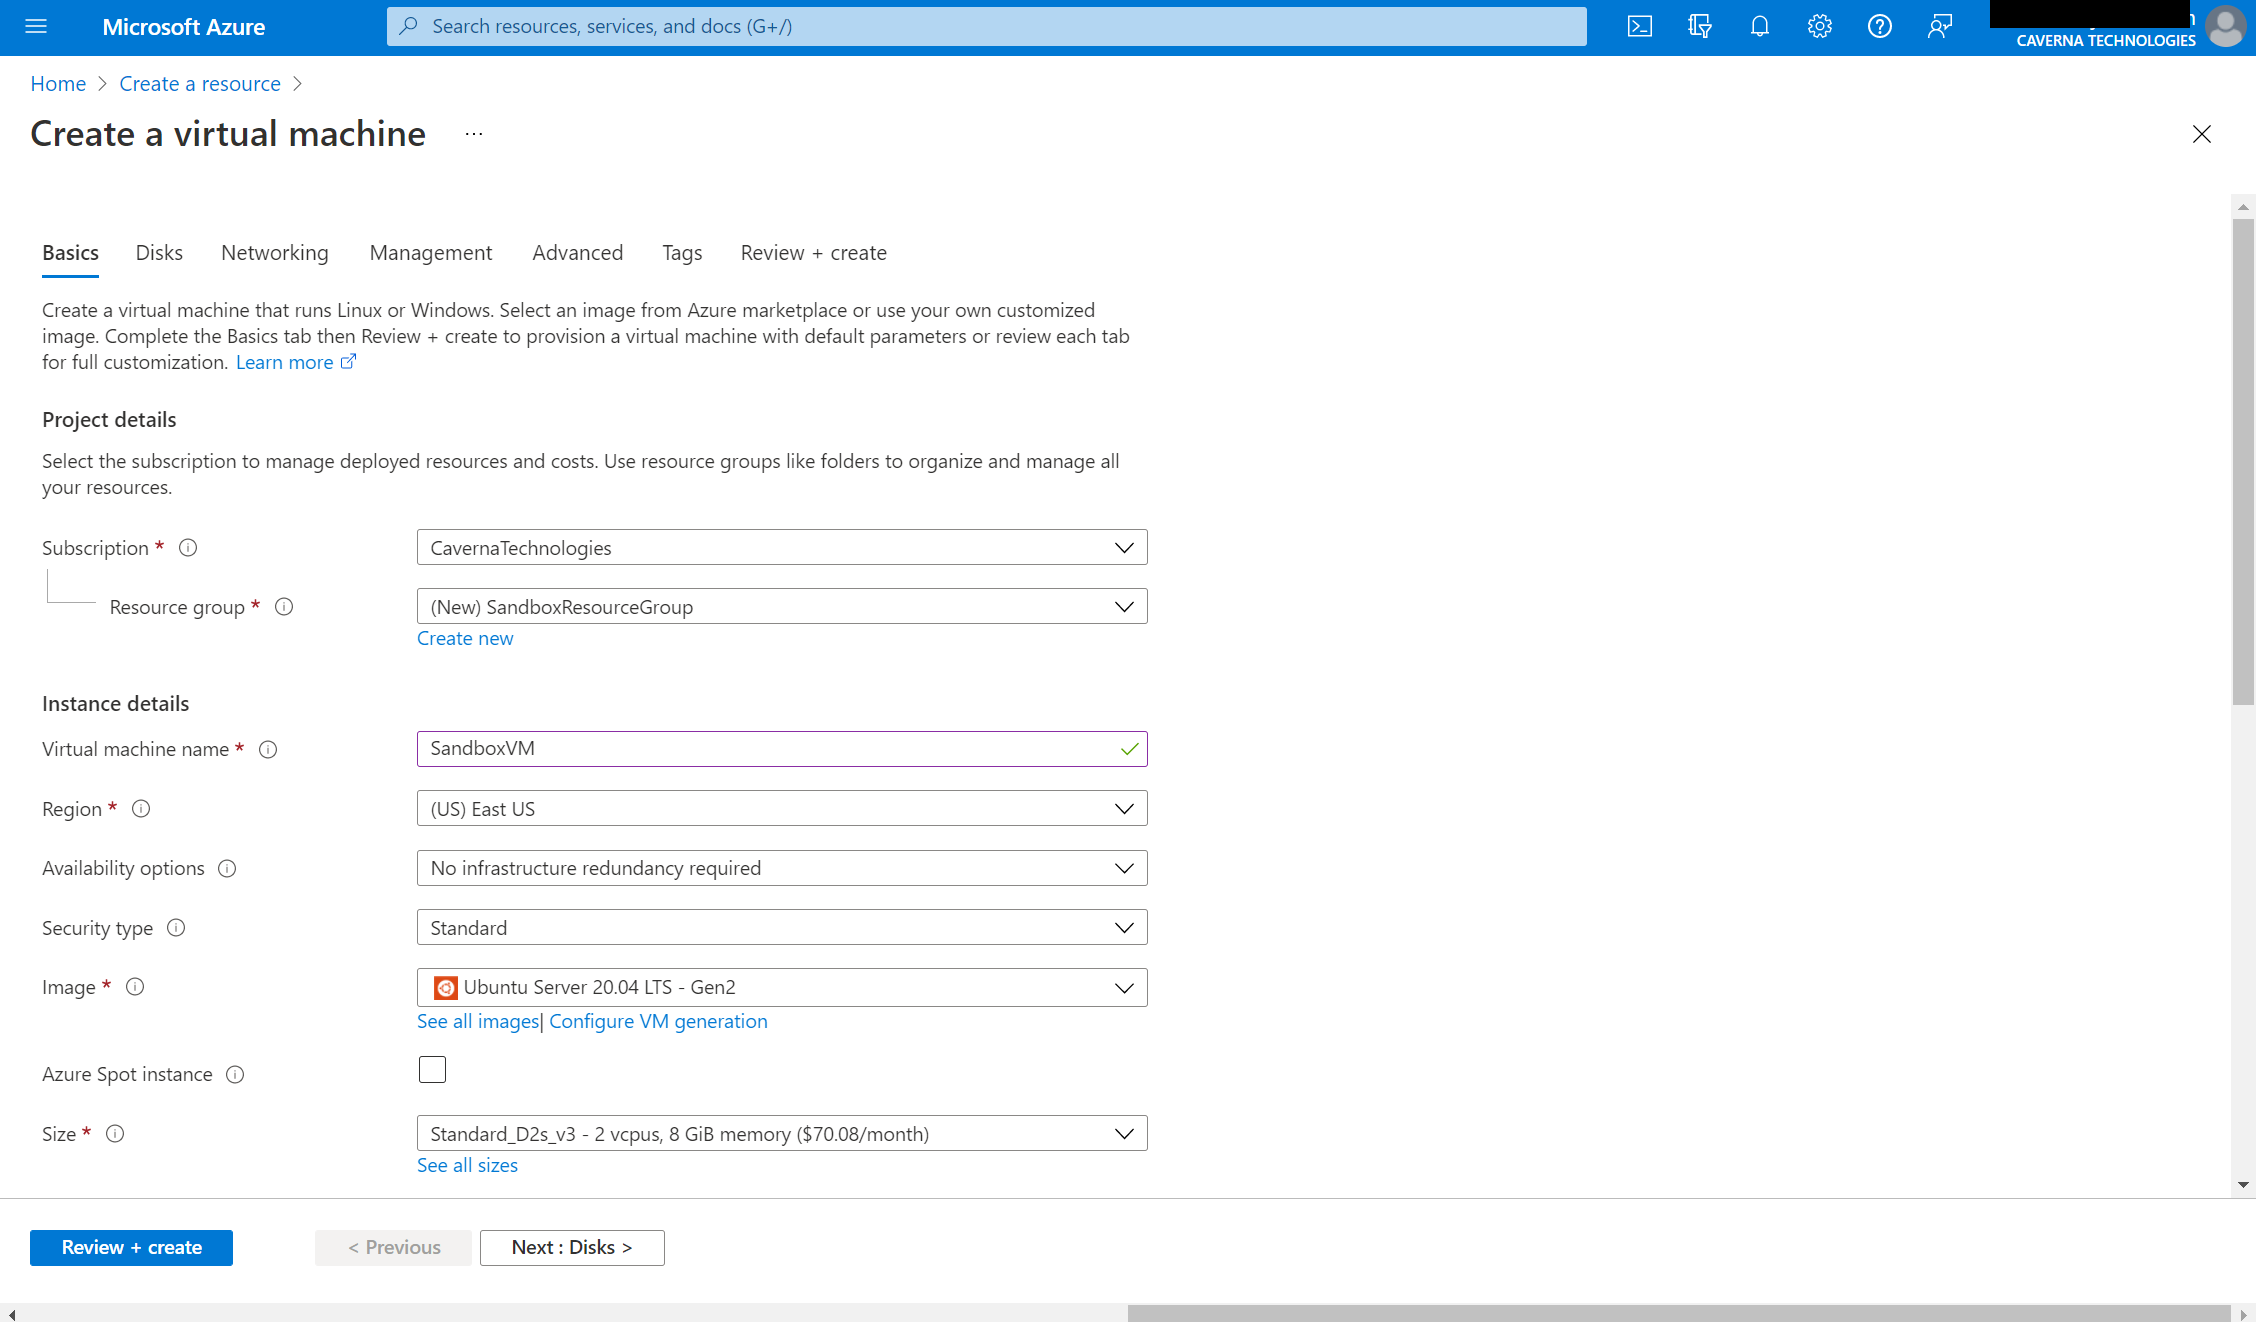
Figure 1-3: Create a virtual machine
Firstly, you will want to create a new resource group. Resource groups are a convenient way to organize resources in Azure. We’ll name our resource group SandboxResourceGroup. Do this by clicking Create new under resource group and entering the name. This can be seen in Figure 1-4.
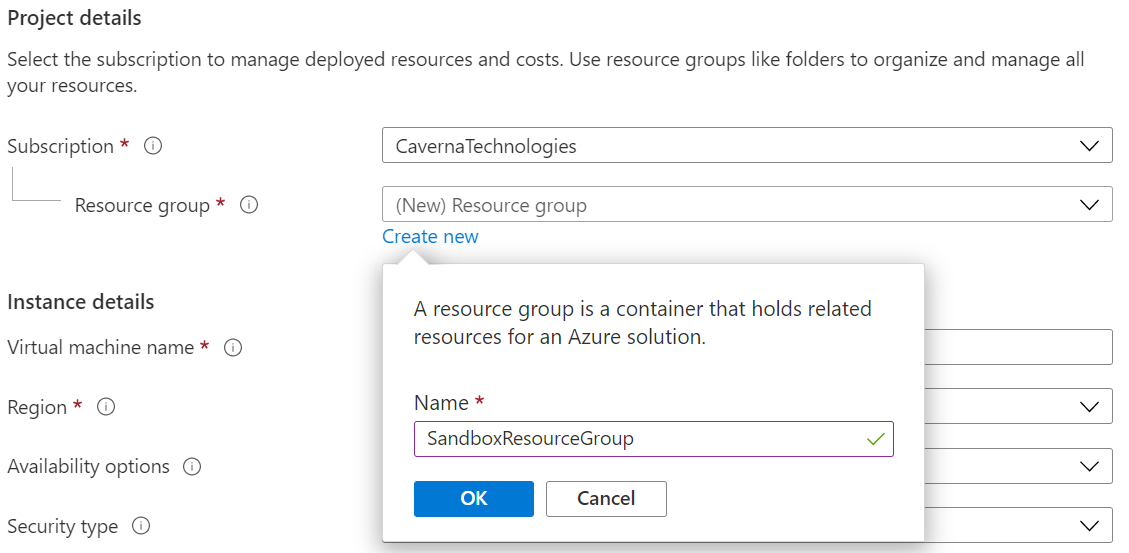
Figure 1-4: Create new resource group
Then click Ok so we can proceed with naming the virtual machine itself. We’ll be naming our virtual machine SandboxVM because it is both clear and concise. As I live in Philadelphia, I will be setting my virtual machine’s region to East US. However, it is best to set it to a region close to you for low latency.
From here, we will leave the next few settings at their default and move to Size. This is a crucial step. Only certain virtual machines on Azure support nested virtualization and it is required for using the Algorand Sandbox. In typical Microsoft fashion, there is limited information available on which virtual machines support nested virtualization. For this tutorial, I will be listing out the virtual machines that currently support nested virtualization. However, here is the one and only resource indicating nested virtualization support: https://azure.microsoft.com/en-us/blog/nested-virtualization-in-azure/ should you need to access it. The list of machines currently supporting nested virtualization can be seen in Figure 1-5.

Figure 1-5: Machine sizes supporting nested virtualization
We’ll be using D2s_v3 (also denoted as Standard_D2s_v3) because 8GB of RAM will come in handy with nested virtualization, however there is practically no difference between these choices. Any of these four will serve our needs flawlessly. (Hint: click See all sizes under the size option to view the full list)
The final step in creating our virtual machine will be deciding how we’d like to define our administrator account. As indicated in the requirements, we’ll be using our personal computer’s public SSH key to authenticate. I do this by selecting SSH public key as the authentication type, setting Username to my name, wes, setting SSH public key source as Use existing public key, and finally copying my personal SSH public key to the provided field. Please take note of the Username you used because it will be used later to connect to the virtual machine (exact spelling). If you’ve followed these steps, your administrator account settings should look similar to Figure 1-6.
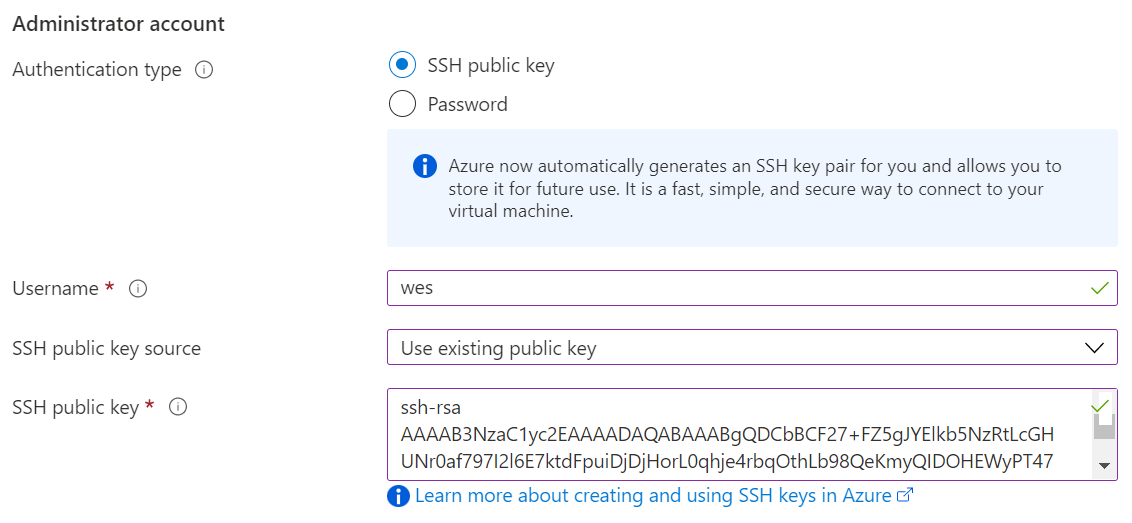
Figure 1-6: Administrator account
We’re now done with the initial setup of our virtual machine. For the remainder of the settings, we’ll be using all default options so there is no need to worry about them. There is plenty more that a virtual machine requires to run, but Azure does the heavy lifting for us. We are now ready to review the settings for our virtual machine. You may have noticed that Azure is warning you of an exposed SSH port (rightfully so!). However, this is a development environment so there is no need to worry. In a future tutorial, there will be guidance on protecting these resources within a virtual network through VPN access. For now though, you can go ahead and click Review and Create at the bottom left, as shown in Figure 1-7.
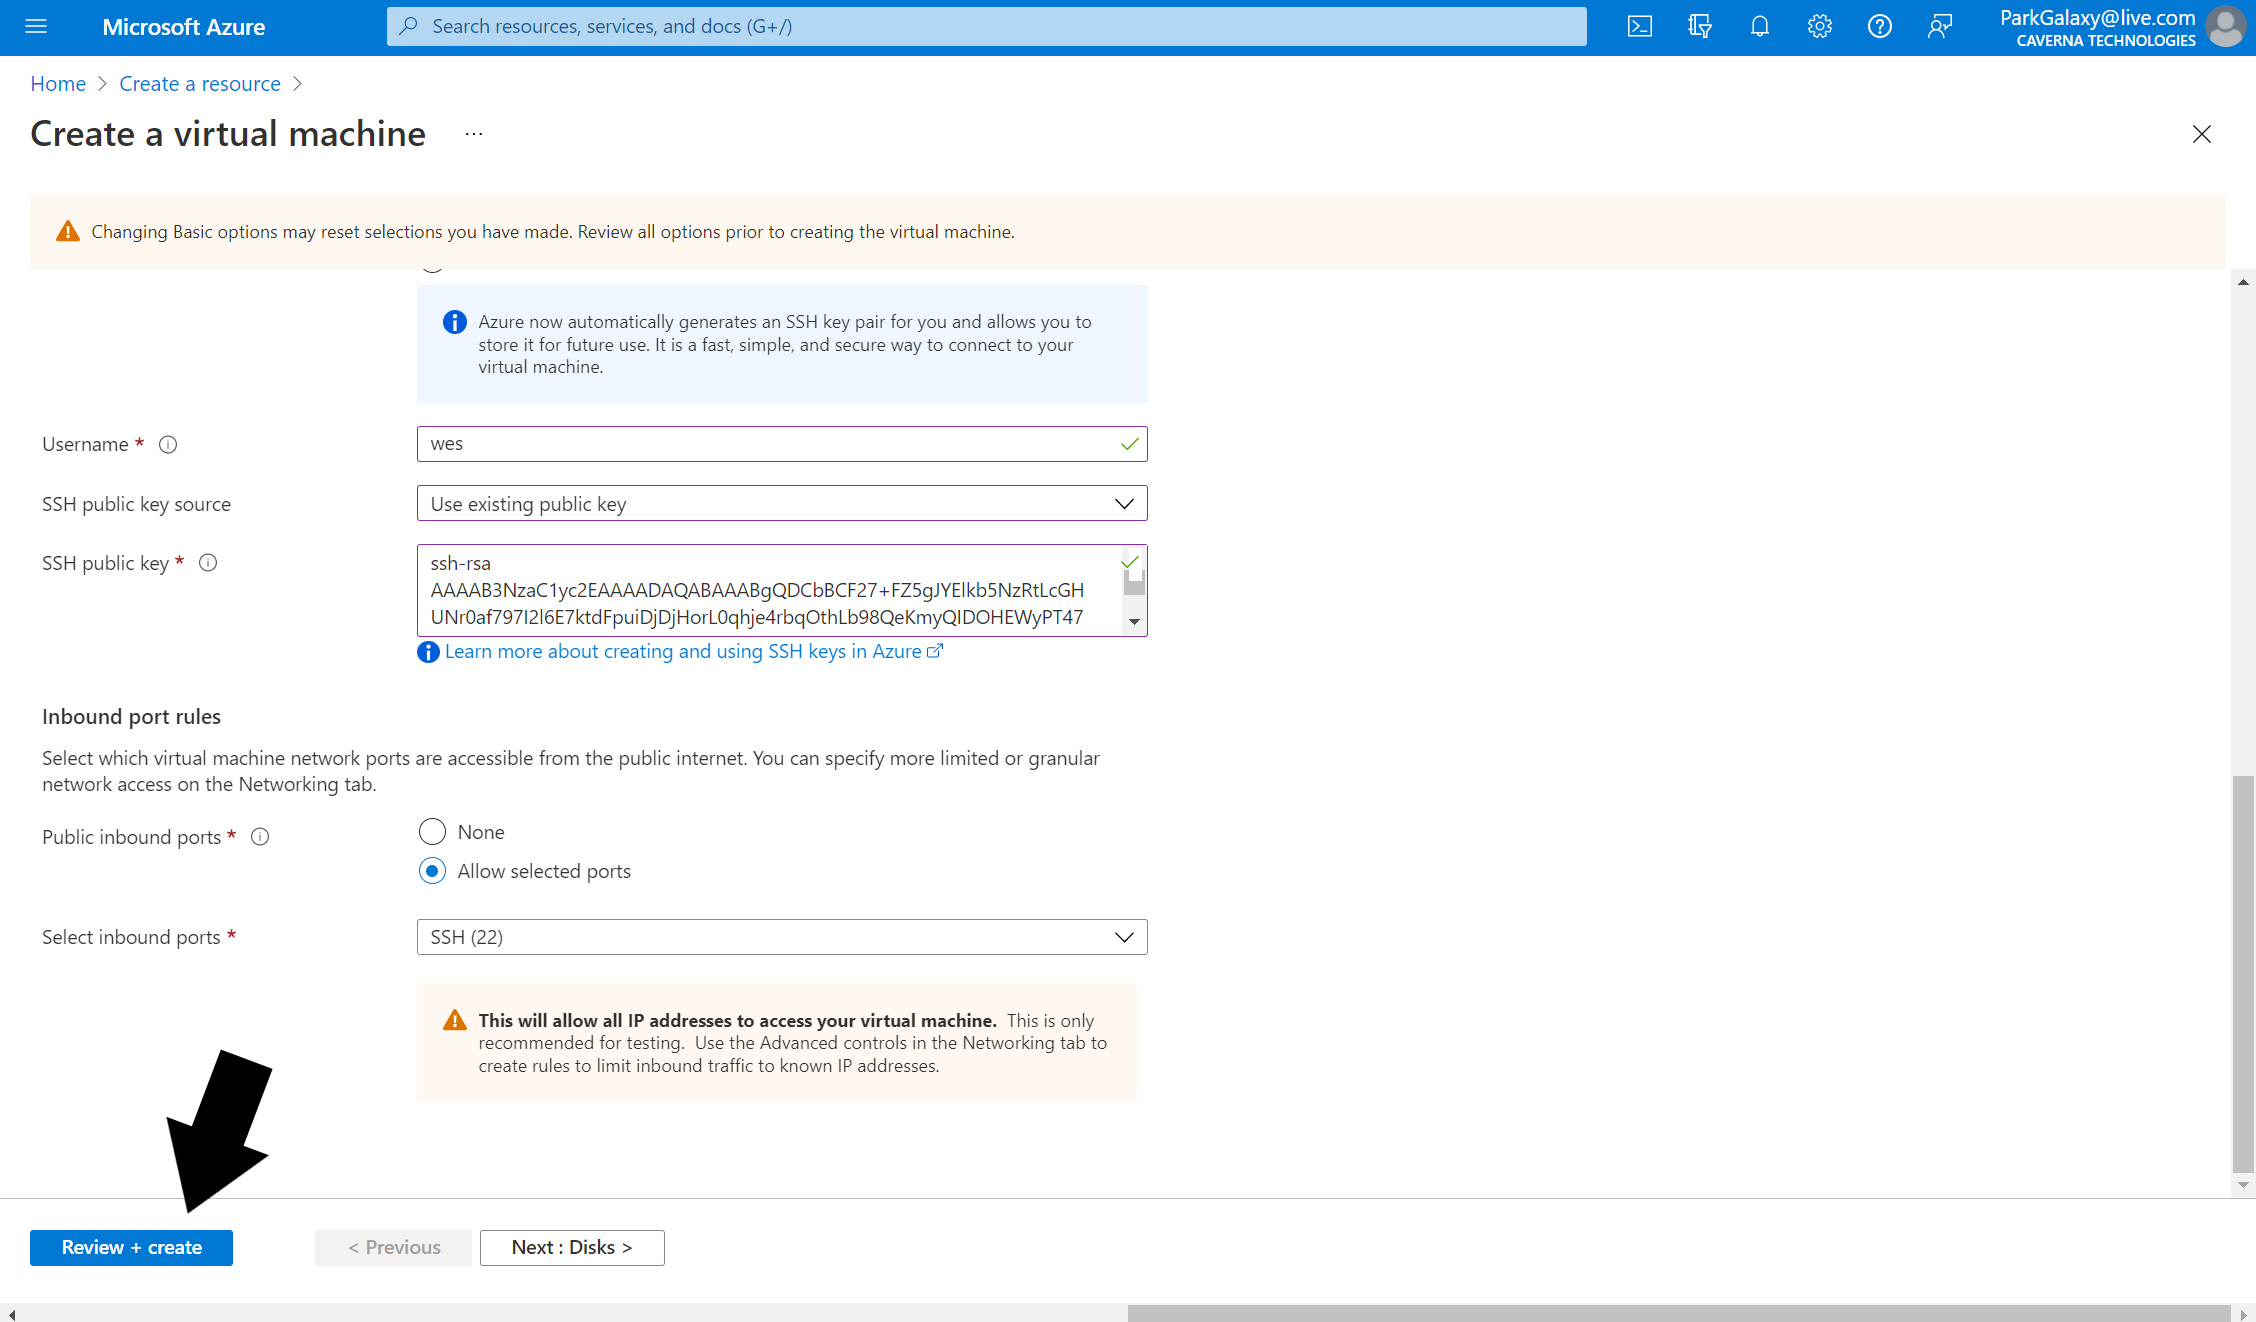
Figure 1-7: Review + create
You will be greeted by a screen where you can see virtual machine pricing per hour, set some contact details, and review your virtual machine configuration options. We didn’t change any settings outside of basic configuration, so just take a quick look and make sure your settings are mostly similar to the settings in Figure 1-8.

Figure 1-8: Basic options
On this screen, your Subscription will be different from mine. Your Region may be different if you set it to a different location close to you. Your Size may be different if you chose not to use the D2s_v3. Finally, your Username will likely be different unless your name is also wes.
Warning: Completion of the following step will immediately start incurring charges on your Azure subscription. Please understand the implications of this before continuing.
If everything looks to spec, go ahead and hit Create in the bottom left!
You’ll quickly move to a new screen where you can see the progress of your deployment. During this deployment, you won’t just be creating a virtual machine, you will also be creating the supporting infrastructure for it. This process will create six resources in total and they can be seen under the Deployment details tab.
- The virtual machine - this is the actual “machine” that your server will be running on. It will host all the Sandbox code. Small disclaimer: it isn’t a physical server, but rather an intelligently allocated group of resources in the cloud.
- A virtual network - the name is pretty self explanatory. This is a network that exists virtually but emulates a physical network (like your home wifi network). You are able to control the way these interact in a broad or fine grained way with the wider internet.
- A public ip address - this is how you will access your Sandbox virtual machine from across the internet.
- A network security group - this is how you control which traffic is allowed into and out of your Sandbox virtual machine.
- A network interface - this translates public internet traffic into virtual network traffic.
- A disk - this is where all the data will be stored inside your virtual machine.
Configure virtual machine network settings
Once the virtual machine is finished deploying, you can go through and see the resource, as represented in Figure 2-1.
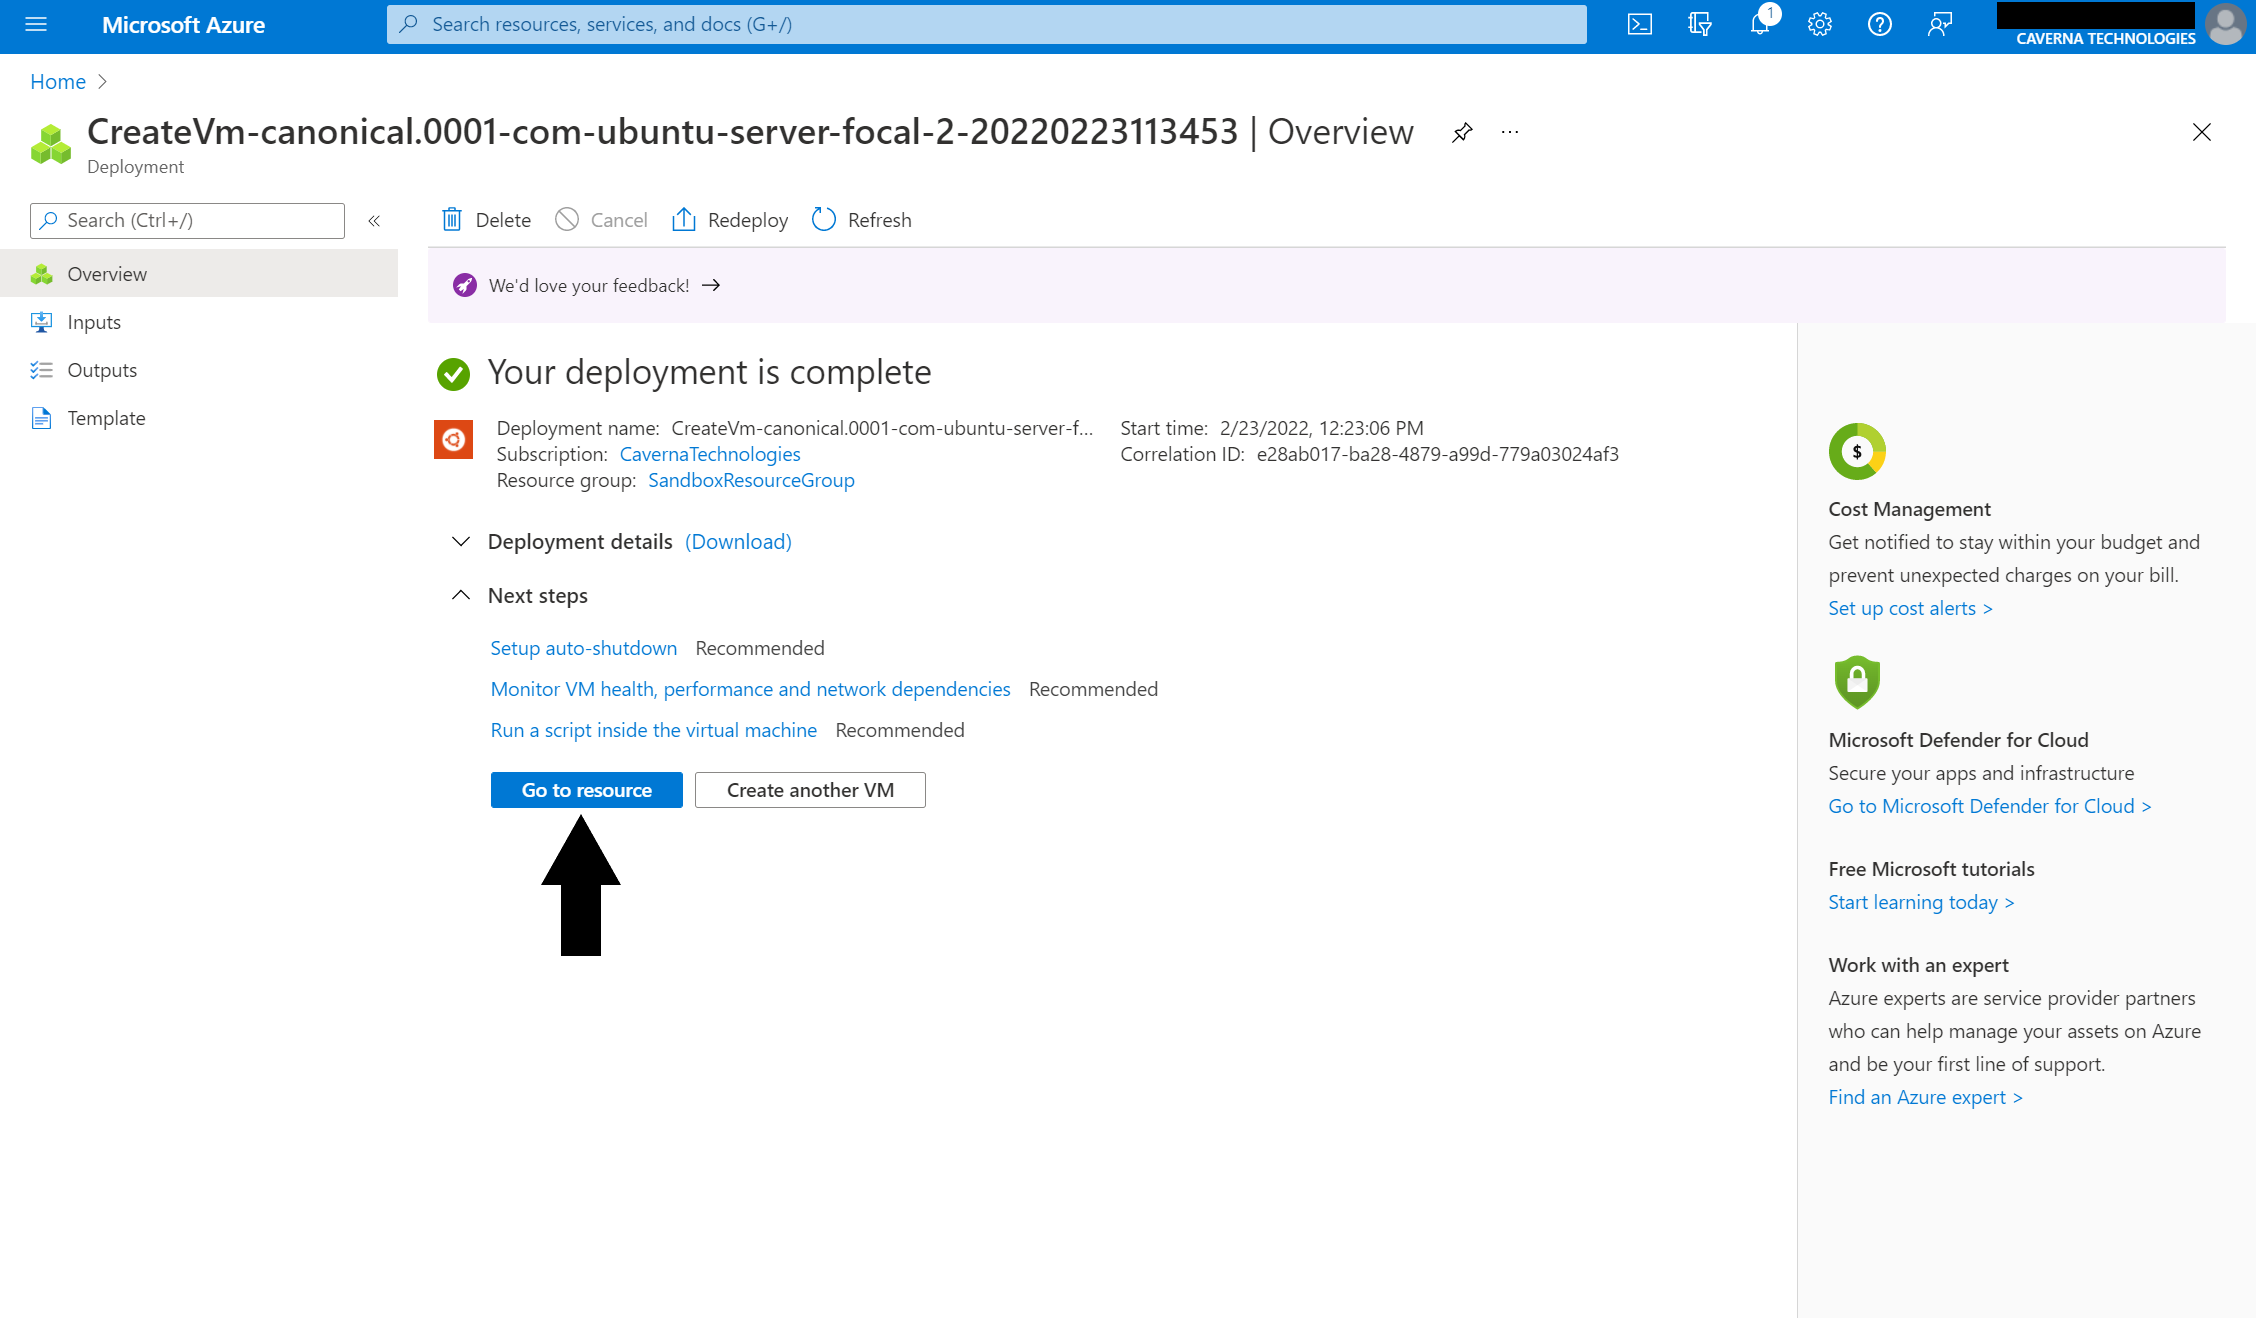
Figure 2-1: Go to resource
You will now arrive at the virtual machine’s overview page. There is a lot of very useful information here, but for now, we only need two things here. First, take note of your virtual machine’s Public IP address. You can write this down, save it in notepad, or just remember where to find it. We will use this later to connect. Secondly, we need to access the virtual machine’s Networking tab to open three ports. Both of these are highlighted in Figure 2-2
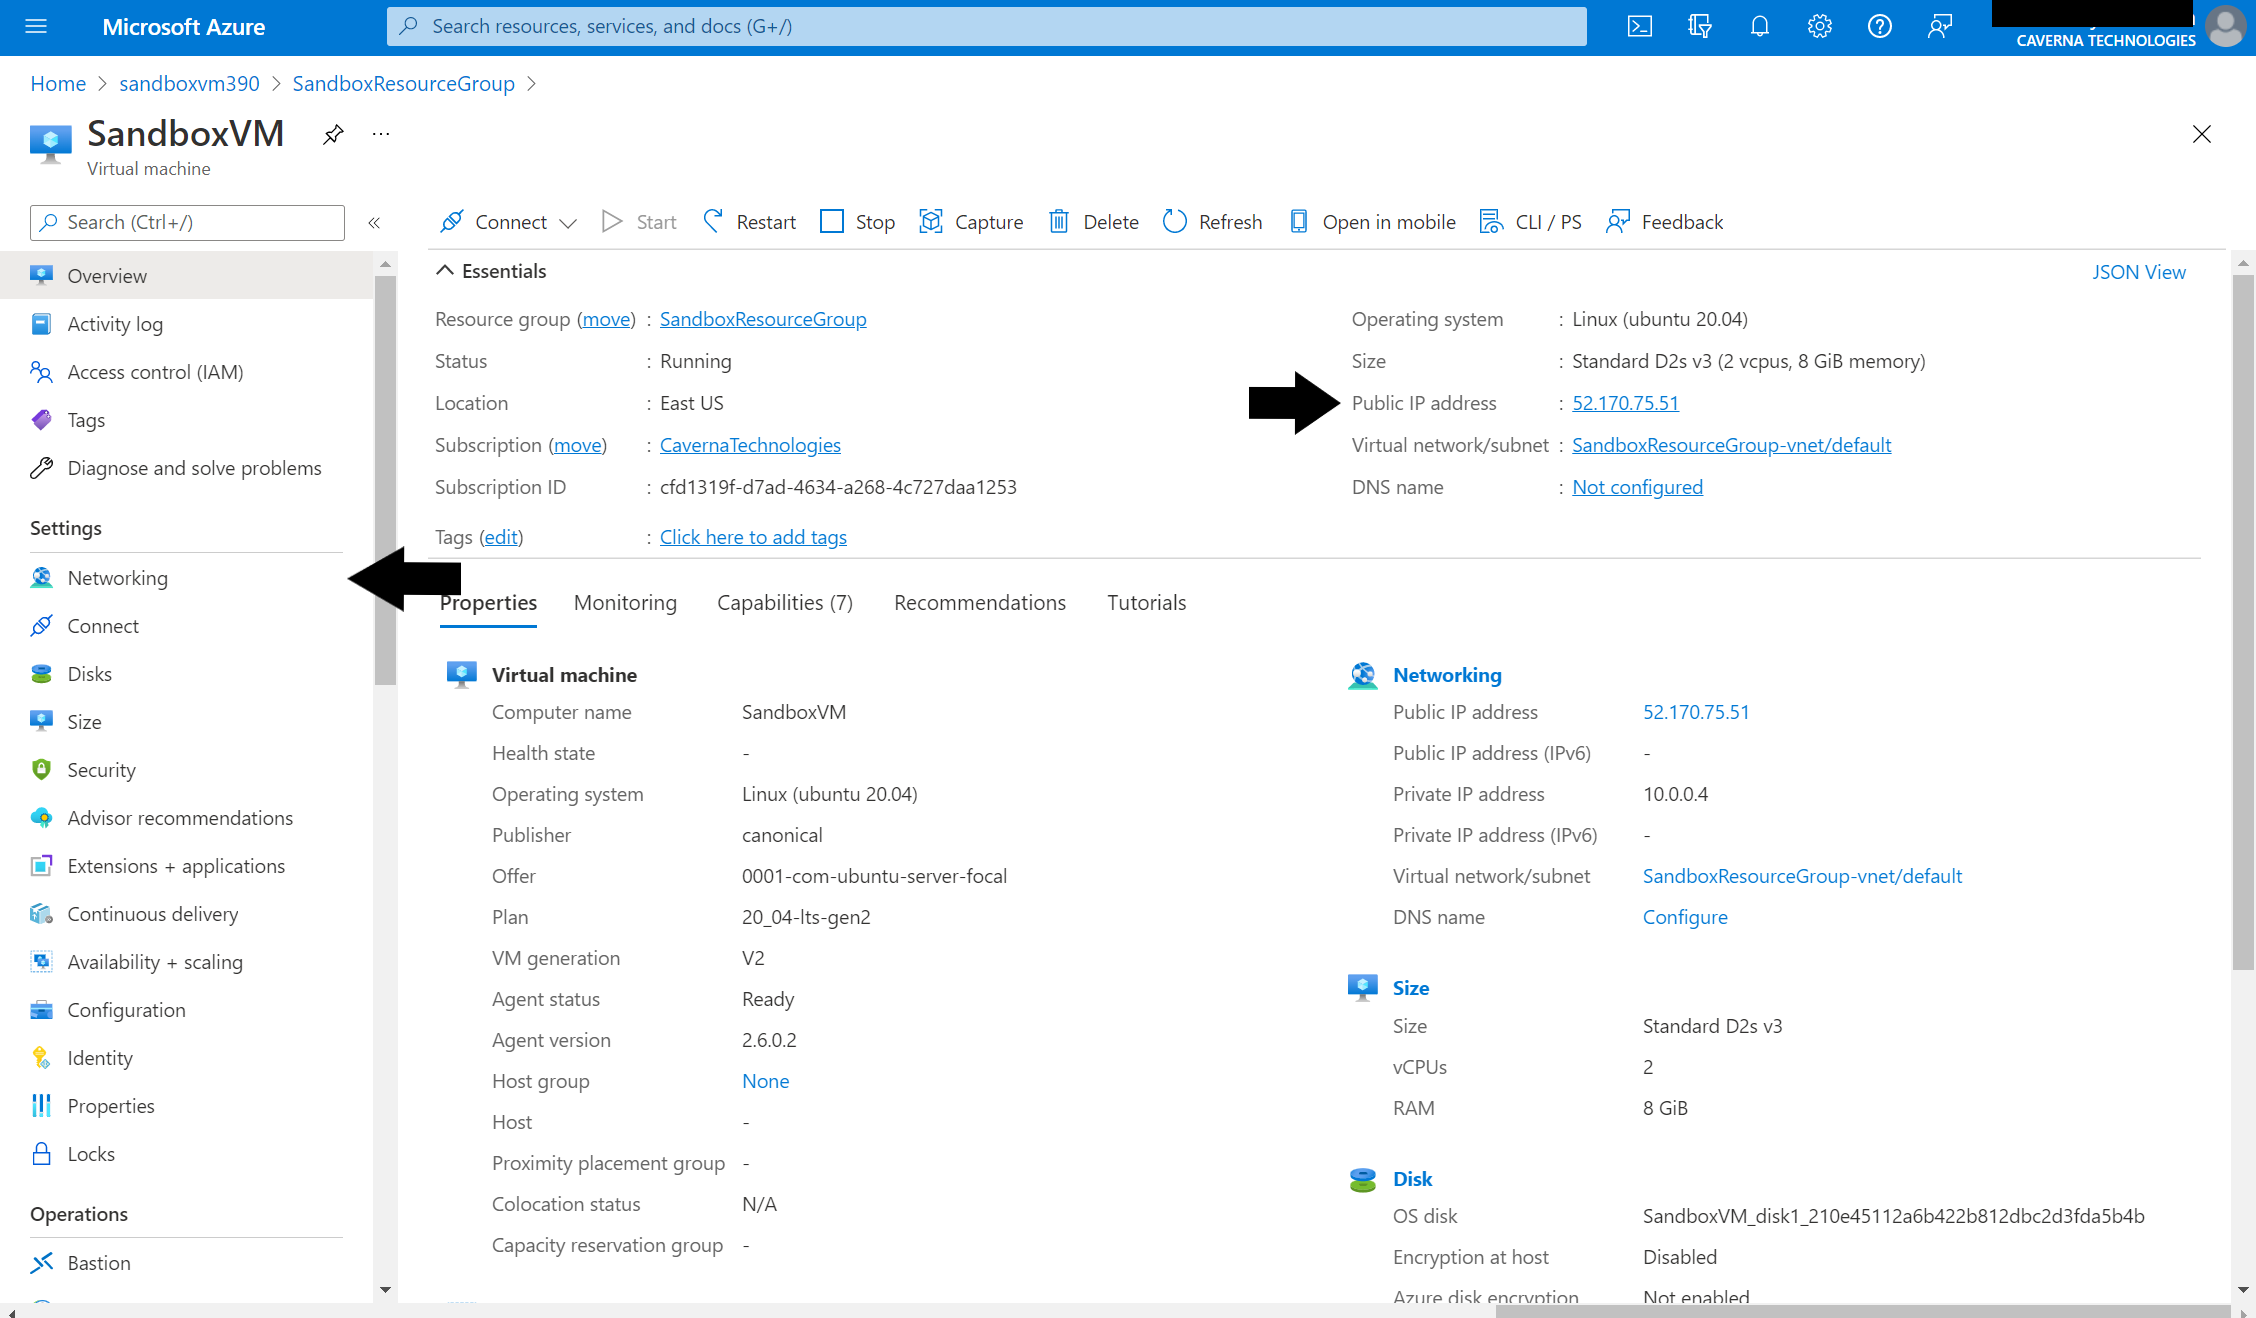
Figure 2-2: Public IP address and Networking tab
In the Networking configuration tab, we need to add a new inbound port rule, as shown in Figure 2-3.
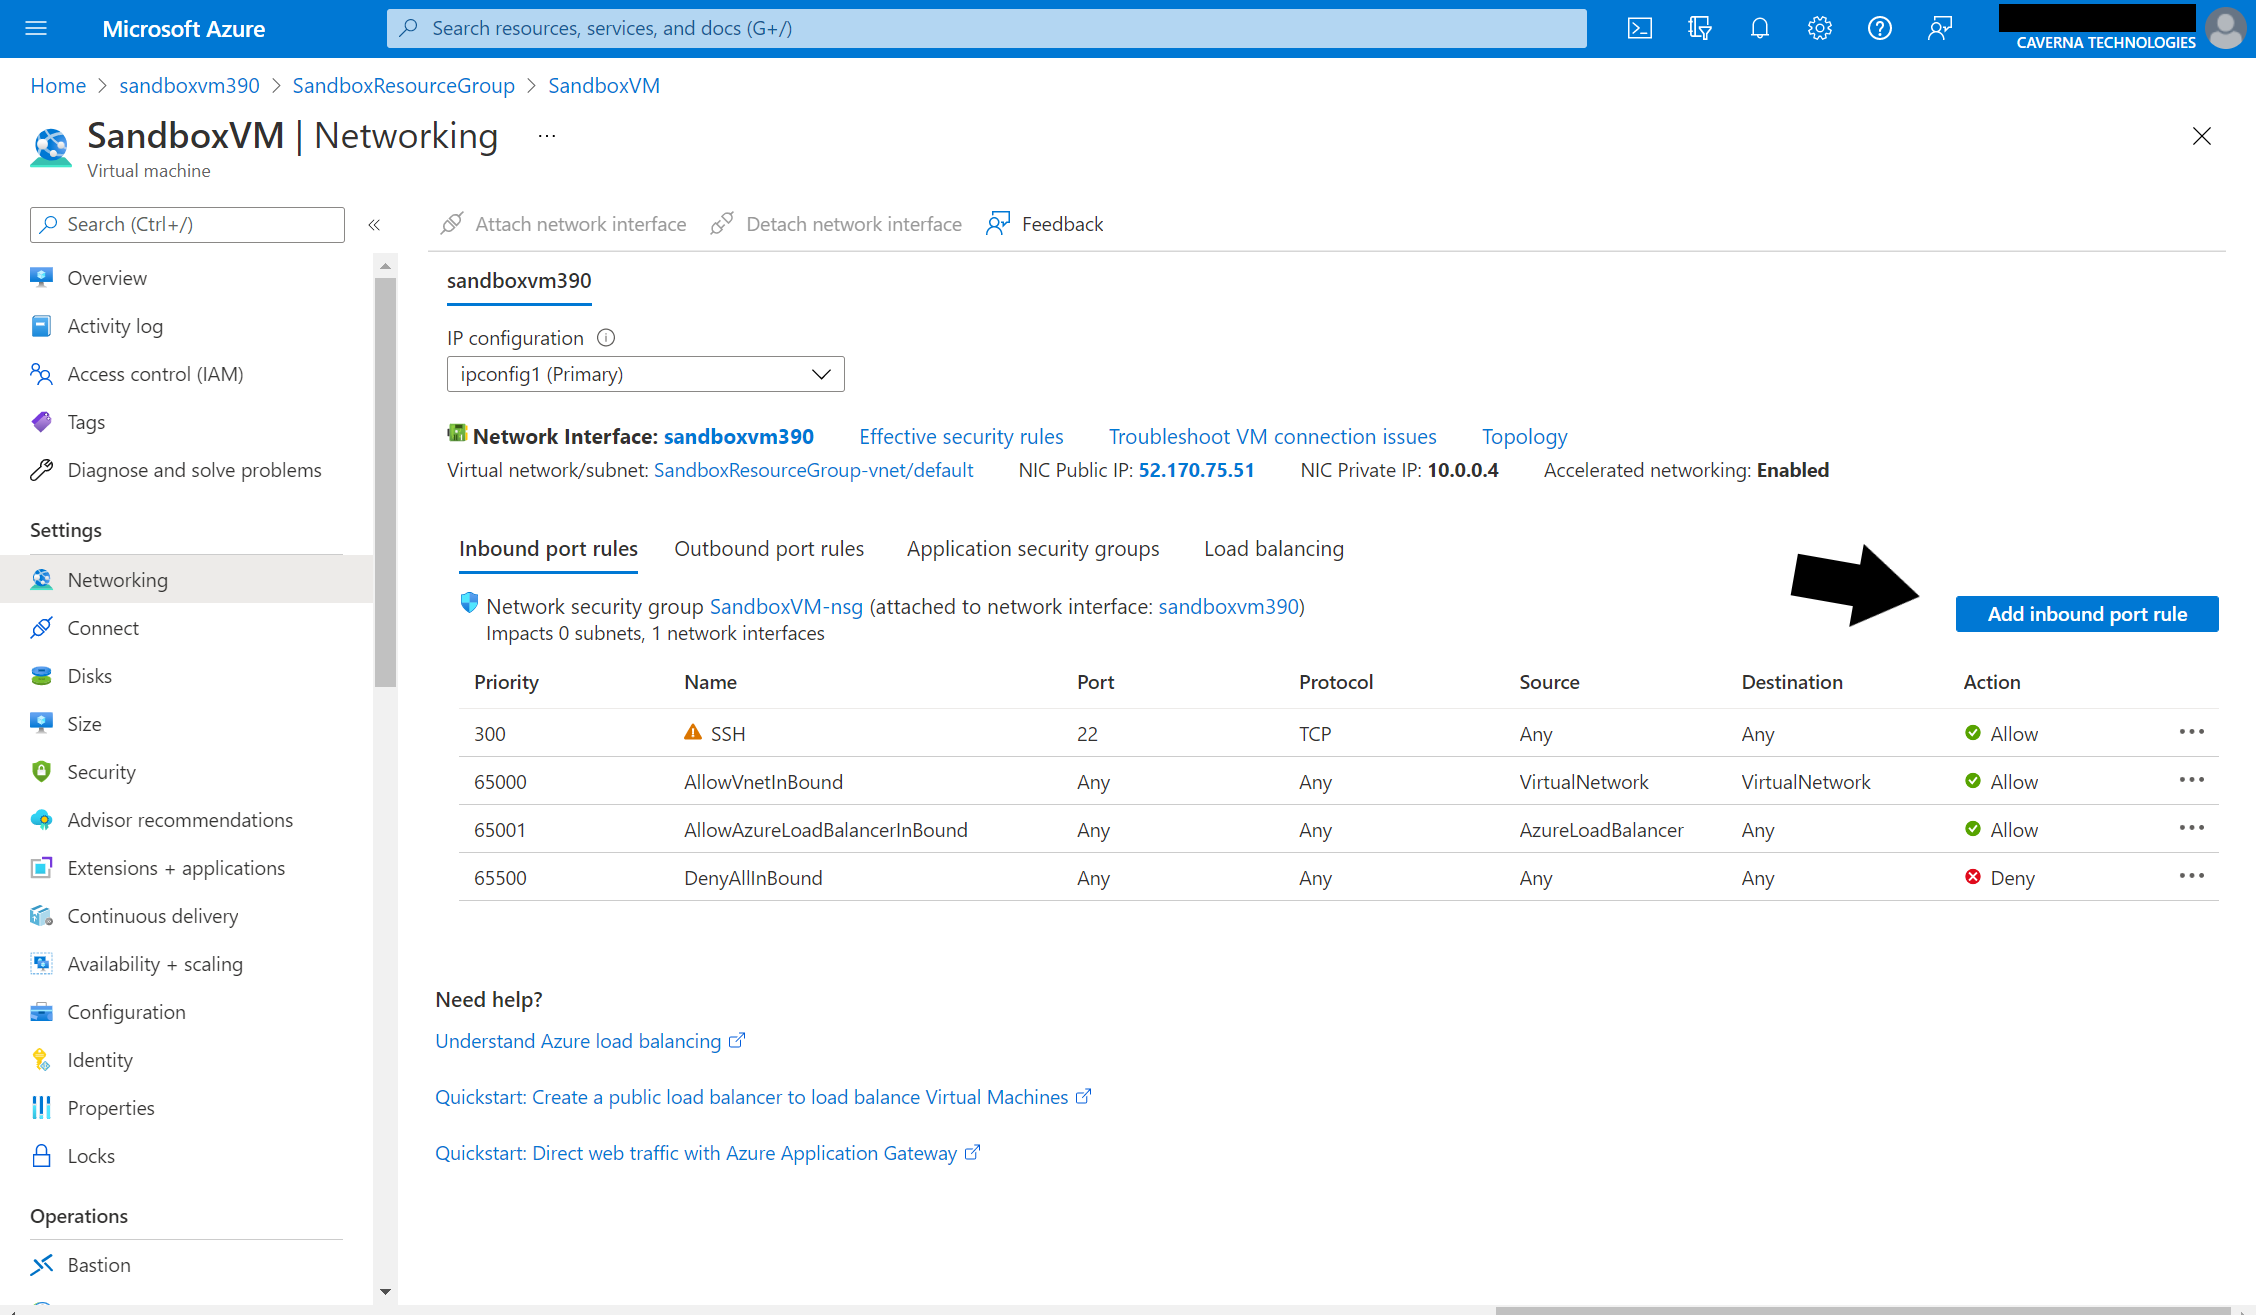
Figure 2-3: Add inbound port rule
You will then be met with a side window with a few options to set. For our case, we only need to edit two fields: Destination port ranges and Name. At the time of writing, the required ports for the Sandbox are 4001 for Algod, 4002 for Kmd, and 8980 for Indexer, but as these things have the tendency to change it can always be checked here: https://github.com/algorand/sandbox#usage. Your new inbound port rule should look similar to Figure 2-4. You can click Add if it all looks good.
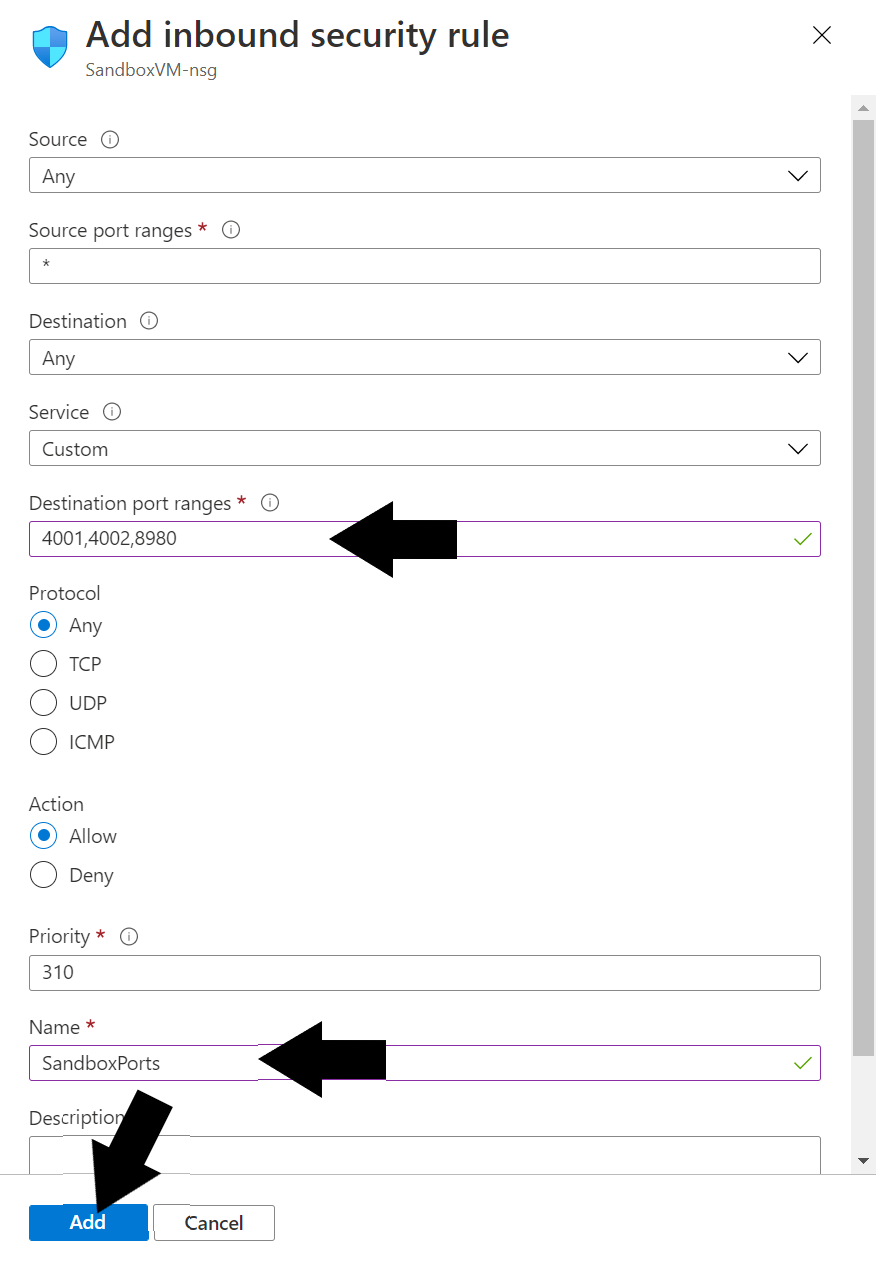
Figure 2-4: Add inbound security rule
Once, these security rules are added, we’re finally done configuring our virtual machine! We can now connect and start getting our Sandbox Environment set up.
Connecting to the virtual machine
We can finally connect to our new virtual machine. Remember when you wrote down that public IP address earlier? You’ll need that now. Do you also remember when you took note of your Username during setup? You need that now too. Once you found the sticky note those were written on, go to your terminal of choice with SSH capabilities. I will be using Windows Terminal for this, but it makes little difference.
You should be all set up to connect to your virtual machine by using the command ssh <username>@<public-ip address>. In my specific case I will use the command ssh [email protected], but yours will be specific to your username and virtual machine’s public IP address. When connecting, your ssh client will ask if you trust the endpoint, confirm this by typing y.
You are now connected to your virtual machine! From here we will install a few required resources that the required to run the Sandbox.
Installing Docker Engine
Without going into too much detail, Docker Engine is what allows the Sandbox to run multiple servers with ease. Docker is a very powerful tool and if you’d like to read more about it you can do so here: https://www.docker.com/ However, Docker knowledge is not required for using or running a Sandbox environment.
As these things have a tendency to change, here is the official guide on installing Docker Engine on Ubuntu: https://docs.docker.com/engine/install/ubuntu/. However, we will also be going through it here.
The first thing we must do is get connected to the Docker repository. This allows us to easily update and install Docker. Execute the following commands in order:
sudo apt-get update

sudo apt-get install ca-certificates curl gnupg lsb-release

curl -fsSL https://download.docker.com/linux/ubuntu/gpg | sudo gpg --dearmor -o /usr/share/keyrings/docker-archive-keyring.gpg

echo "deb [arch=$(dpkg --print-architecture) signed-by=/usr/share/keyrings/docker-archive-keyring.gpg] https://download.docker.com/linux/ubuntu $(lsb_release -cs) stable" | sudo tee /etc/apt/sources.list.d/docker.list > /dev/null
Now, we can install Docker Engine. This is the backbone of Docker.
sudo apt-get update
During the next command, it will ask you to approve the installation size. Our VM has more than enough storage capacity so type y to approve.
sudo apt-get install docker-ce docker-ce-cli containerd.io
We can now test our installation.
sudo docker run hello-world
You should get a greeting from Docker with some information about how it works! You may want to avoid having to use sudo while running commands, and we will tackle that a little later. First let’s get Docker Compose installed.
Installing Docker Compose
The official explanation of Docker Compose is “Compose is a tool for defining and running multi-container Docker applications.” Again, you do not need to understand how this tool works, but essentially this is the tool used to define the Sandbox and will be used to install all of the components conveniently.
As with other sections here is the official installation guide should you need it: https://docs.docker.com/compose/install/. Installing Docker Compose is very simple! Run the following two commands to install and give ourselves access.
sudo curl -L "https://github.com/docker/compose/releases/download/1.29.2/docker-compose-$(uname -s)-$(uname -m)" -o /usr/local/bin/docker-compose

sudo chmod +x /usr/local/bin/docker-compose
We can test our installation by running the following.
docker-compose --version
Adding ourselves to the Docker group
The only thing we must do now is add ourselves to the Docker group. This is required to execute Docker commands without admin privileges and Sandbox requires this to function properly.
Here is the official guide to change the group settings: https://docs.docker.com/engine/install/linux-postinstall/ should you need it.
First we will create the group. You may get an error saying the group already exists, that’s nothing to worry about. You can proceed to the next step.
sudo groupadd docker
Next we will add ourselves to that group.
sudo usermod -aG docker $USER
We will now reload our group permissions.
newgrp docker
Finally, we can test that we do not need sudo to run docker with a command from earlier.
docker run hello-world
You should see that same little greeting blurb! If everything has gone to plan, we are now ready to get our Sandbox up and running!
Installing Sandbox
The official Sandbox GitHub repo contains a lot of useful information when working with Sandbox, like usage. However, there are also other great tutorials on how to actually use your Sandbox, so I won’t be going into that.
https://github.com/algorand/sandbox
We must first download the Sandbox repo.
git clone https://github.com/algorand/sandbox.git
Now move into the sandbox directory and start the sandbox environment.
cd sandbox
./sandbox up
Since this is the first time launching, this process can take anywhere from 5-15 minutes! Please be patient! Once that command has completed, you have officially installed the Sandbox development environment. You can test it out with the following
./sandbox test
Next steps
- You can verify that your resource group is set up similarly to my own by visiting the GitHub repo associated with this guide. There will be instructions there for viewing and comparing your resource group’s template. There are also further instructions on being able to quickly deploy a similar environment.
- You can use the sandbox in its current form which is a closed system replica of the Algorand network. You can test out all sorts of things here without having the risk of working with Algorand mainnet. Here is a tutorial that can walk you through some of the nuances with Sandbox: https://developer.algorand.org/tutorials/exploring-the-algorand-sandbox/
- You can use the Sandbox to access betanet. This is where features get tested that will eventually be moved to the Algorand mainnet. Here is a great tutorial on how to do that: https://developer.algorand.org/tutorials/betanet-sandbox/
- Both of those tutorials are using the command line to access the Sandbox network, but we can also access it through the APIs that we exposed! The public IP address you were supposed to write down is going to come in handy again.
- You can access the API with your favorite programming language using the endpoints and tokens denoted in the Sandbox repo. At the time of writing these have the default values shown in Figure 3-1.
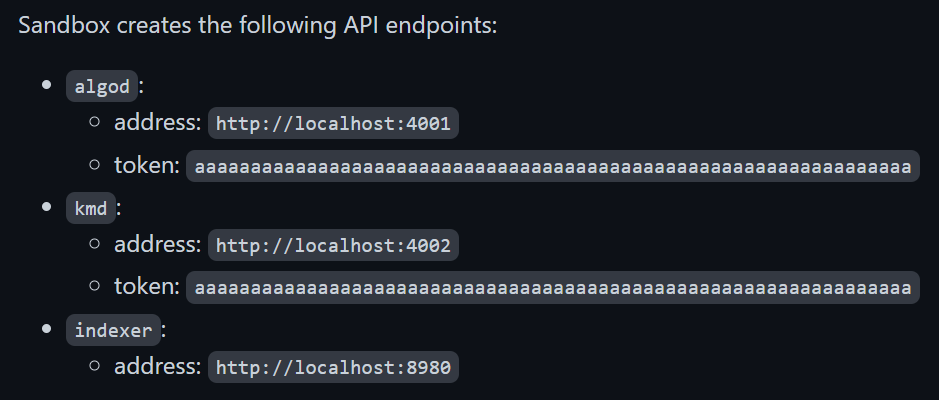
Figure 3-1: Sandbox endpoints
- To test this connection, open a new tab in the browser you are using to read this and type follow in the URL bar:
http://<public-ip>:4001/health. If you get a single message reading “null” that means it’s working! Even though it may not seem right, so long as you don’t get an error then the Algod client is in good health!
Tear down
So, you don’t want your SandboxVM anymore. Well, the tear down is quite easy, and you can always use the template provided in the GitHub repo to redeploy. Go to the SandboxResourceGroup. You may see the resource group on your home screen or you may have to open the resource group menu. These options are highlighted in Figure 4-1.
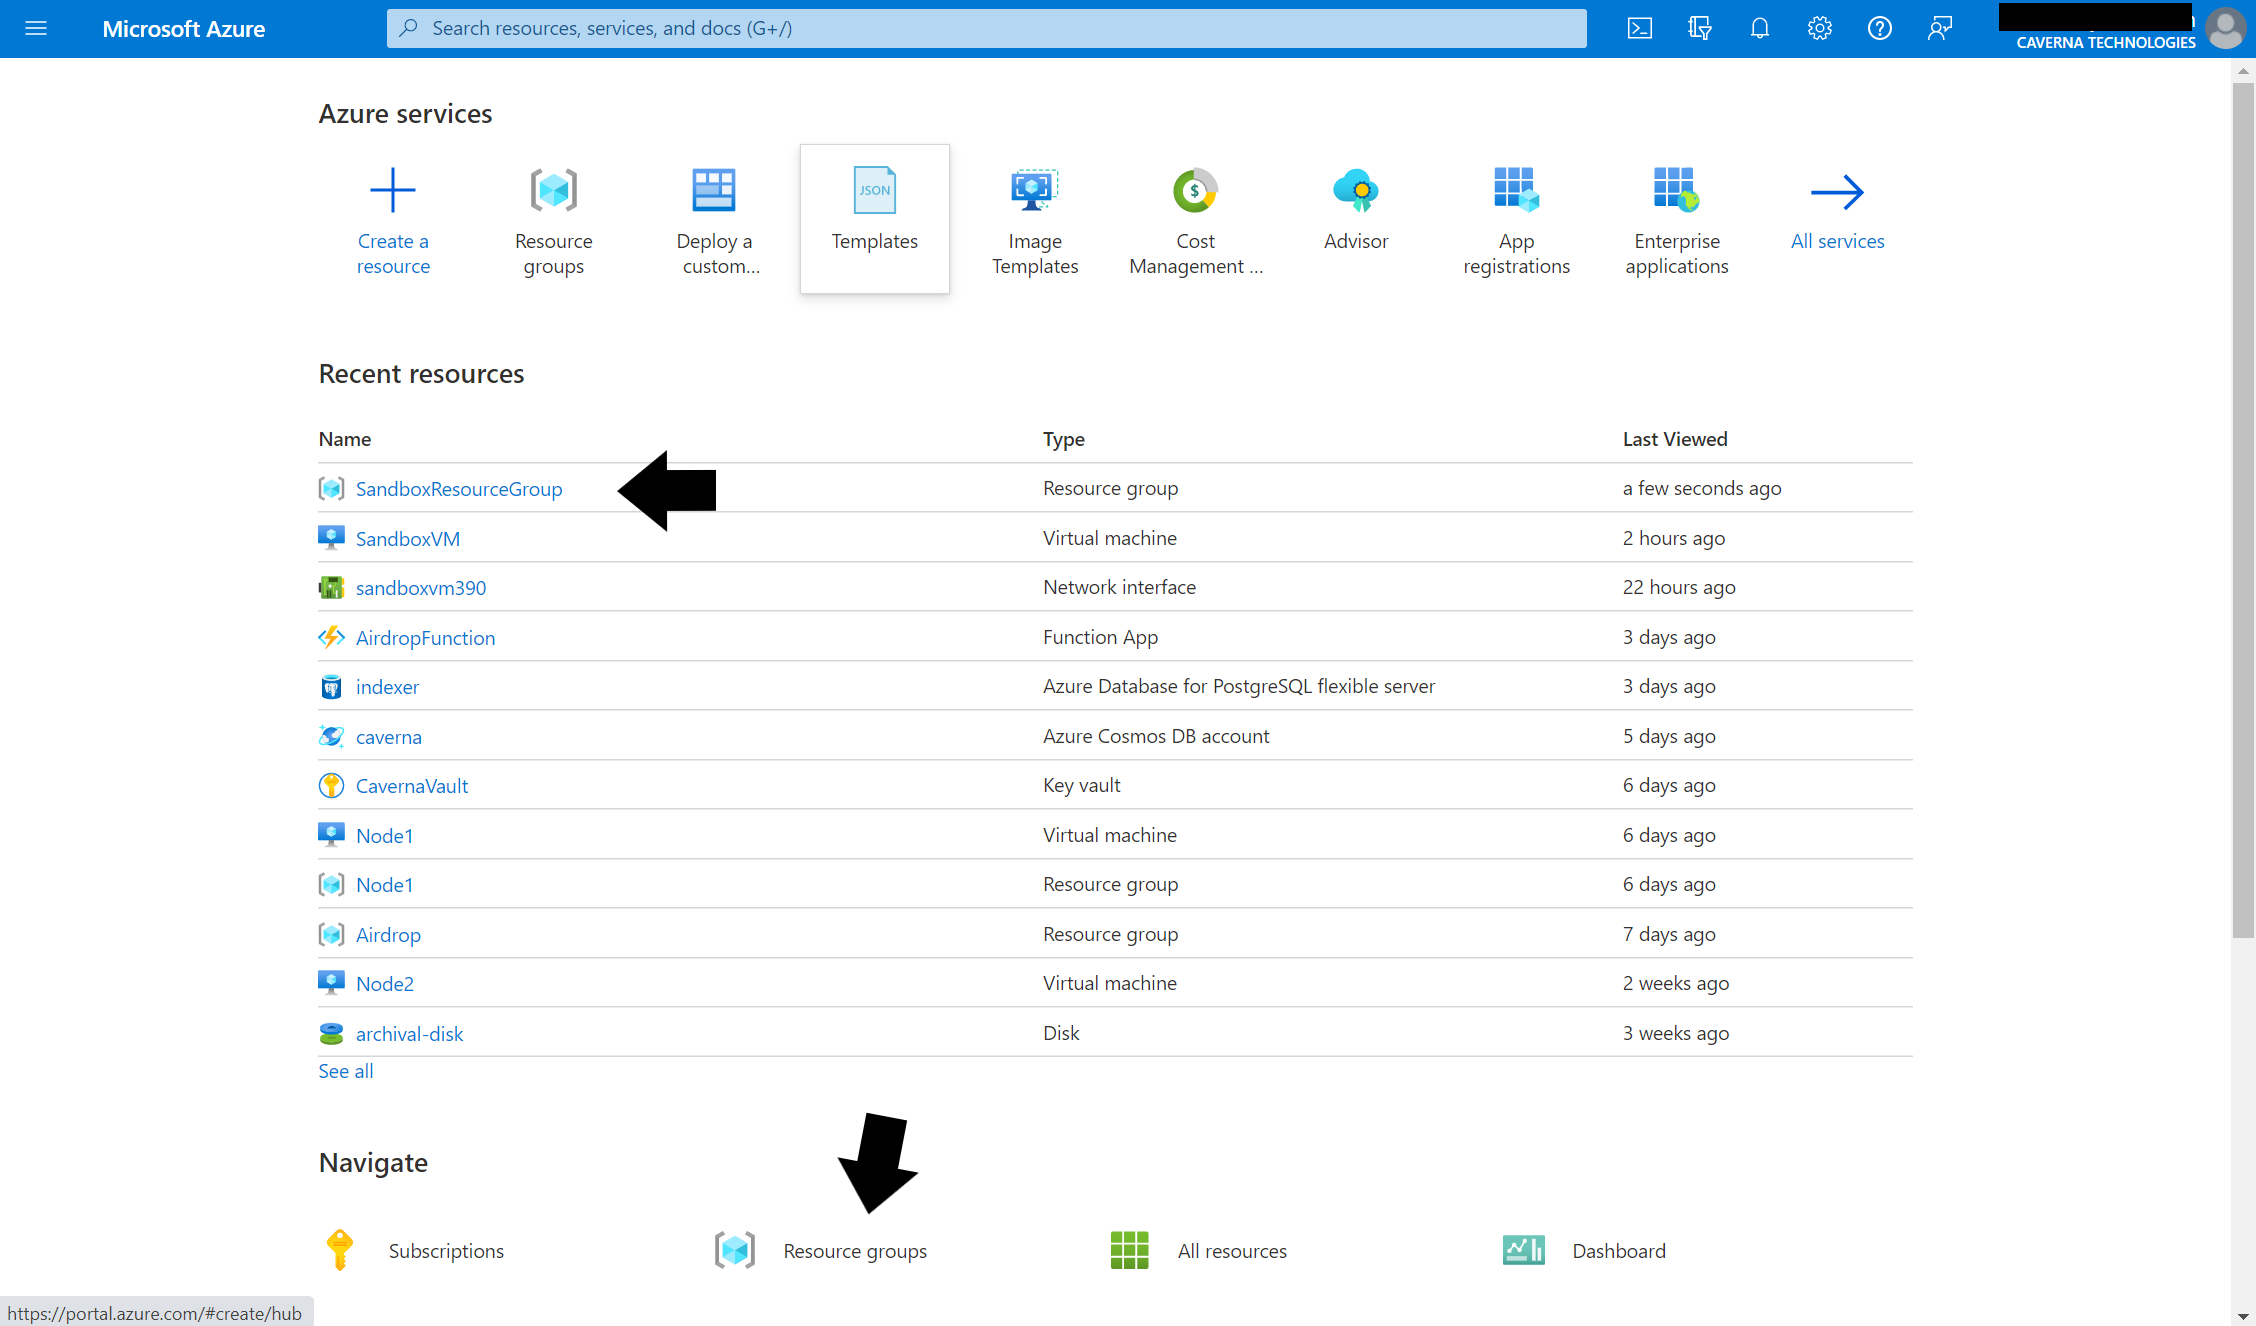
Figure 4-1: Finding SandboxResourceGroup
If you opened your resource groups, you will now see a list of them. Choose SandboxResourceGroup from the list as shown in Figure 4-2.
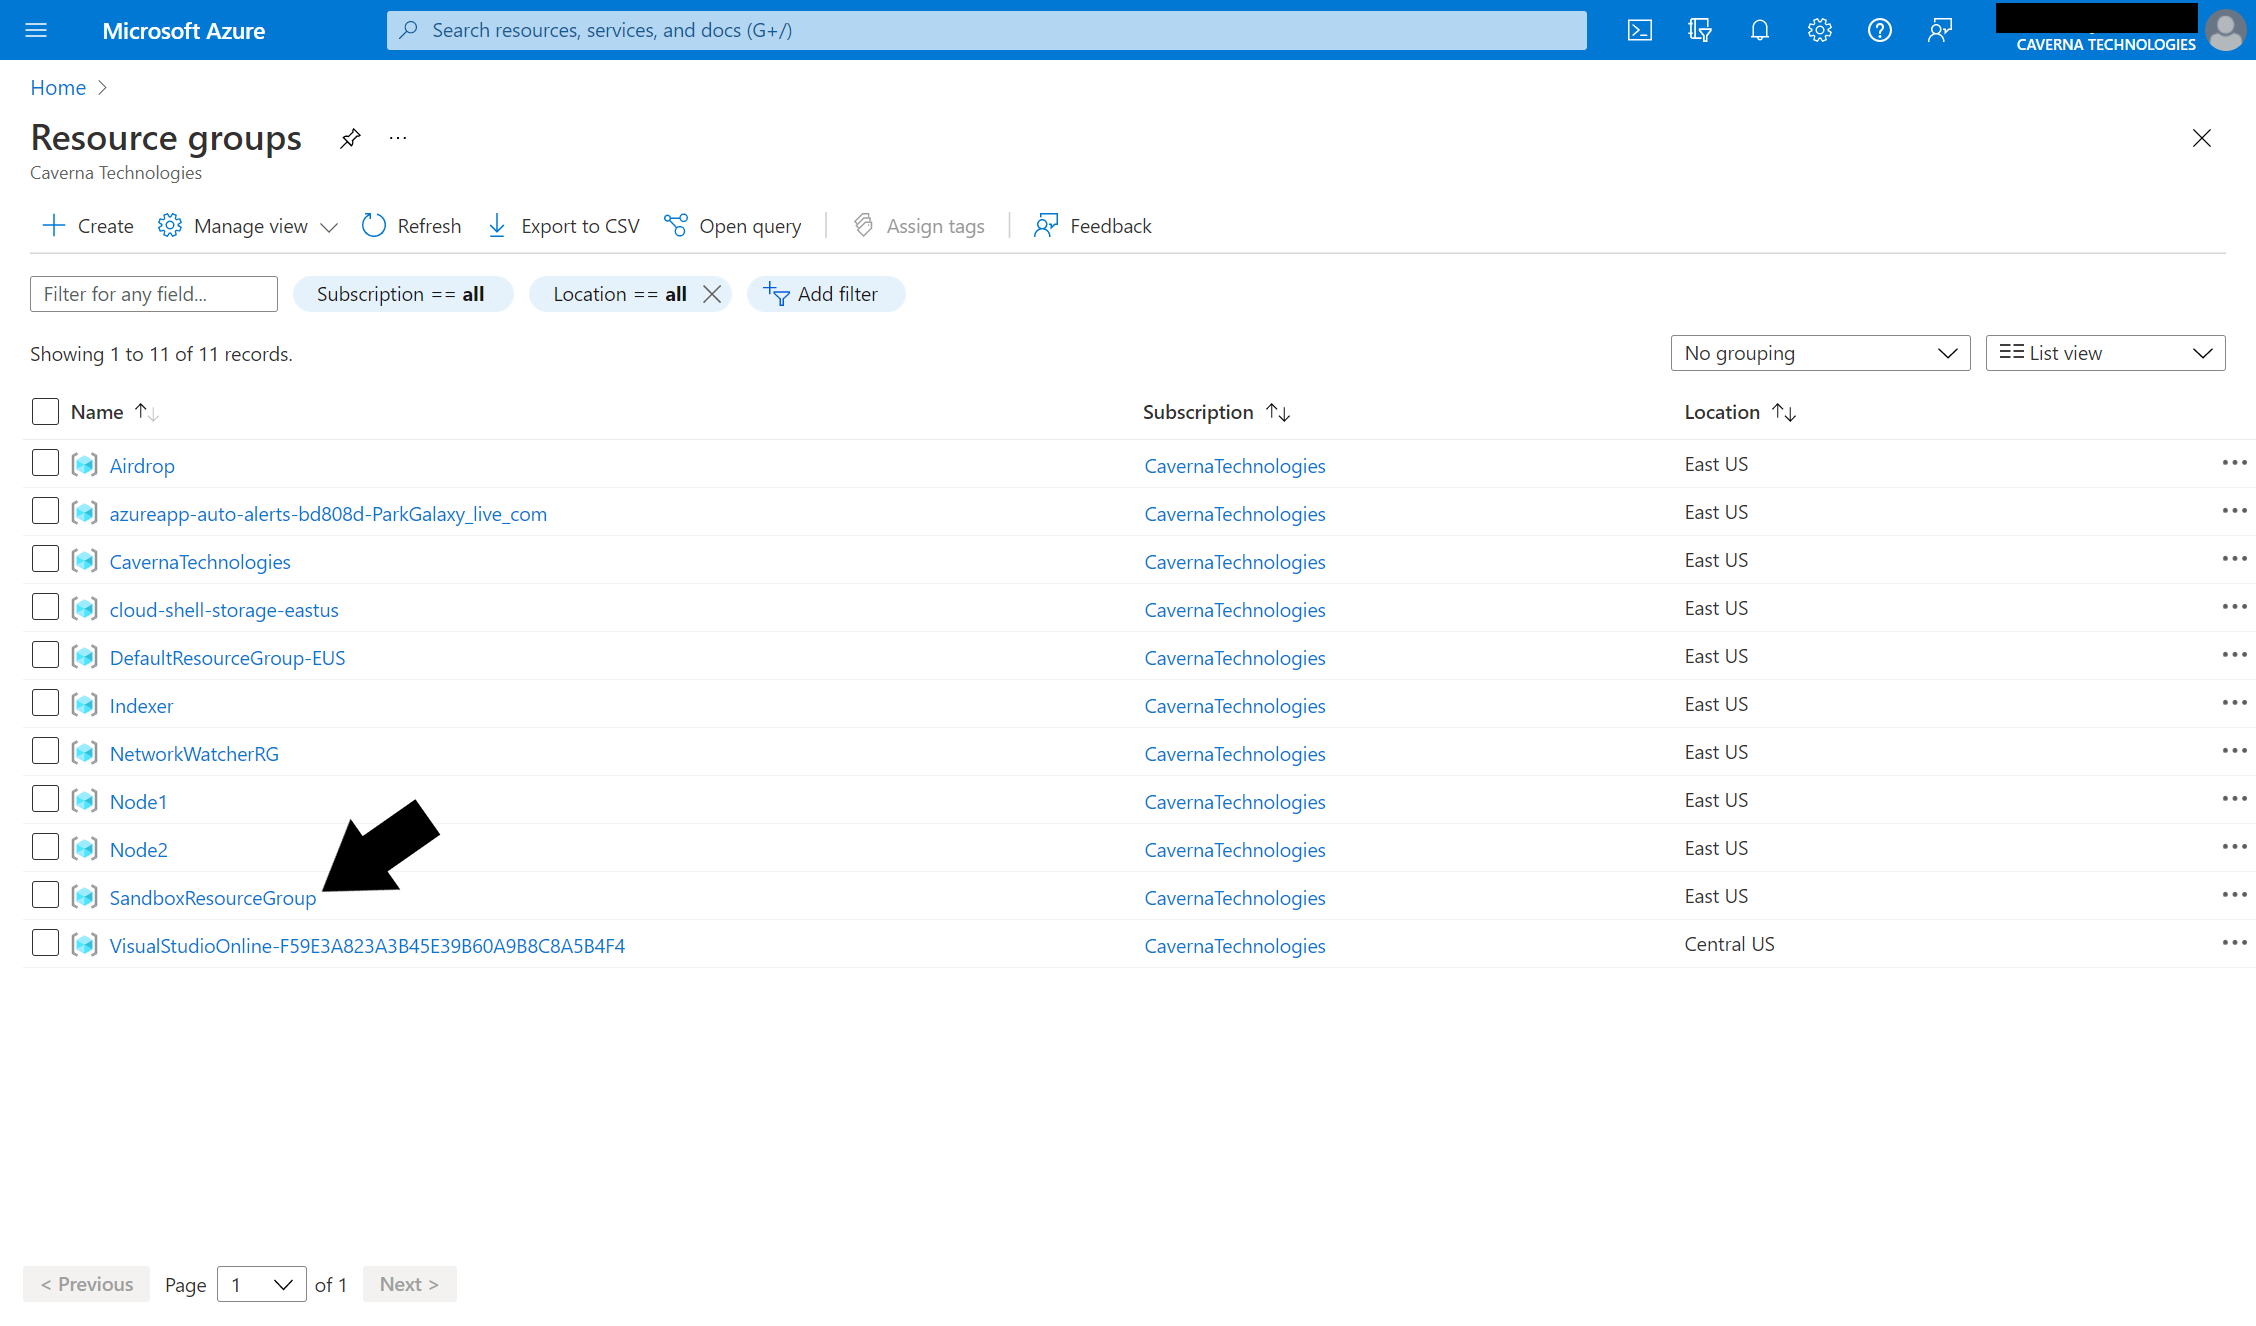
Figure 4-2: SandboxResourcegroup
Now that you see the resource group, you should see a button near the top to delete the group. Look to Figure 4-3 if you are having trouble finding it.
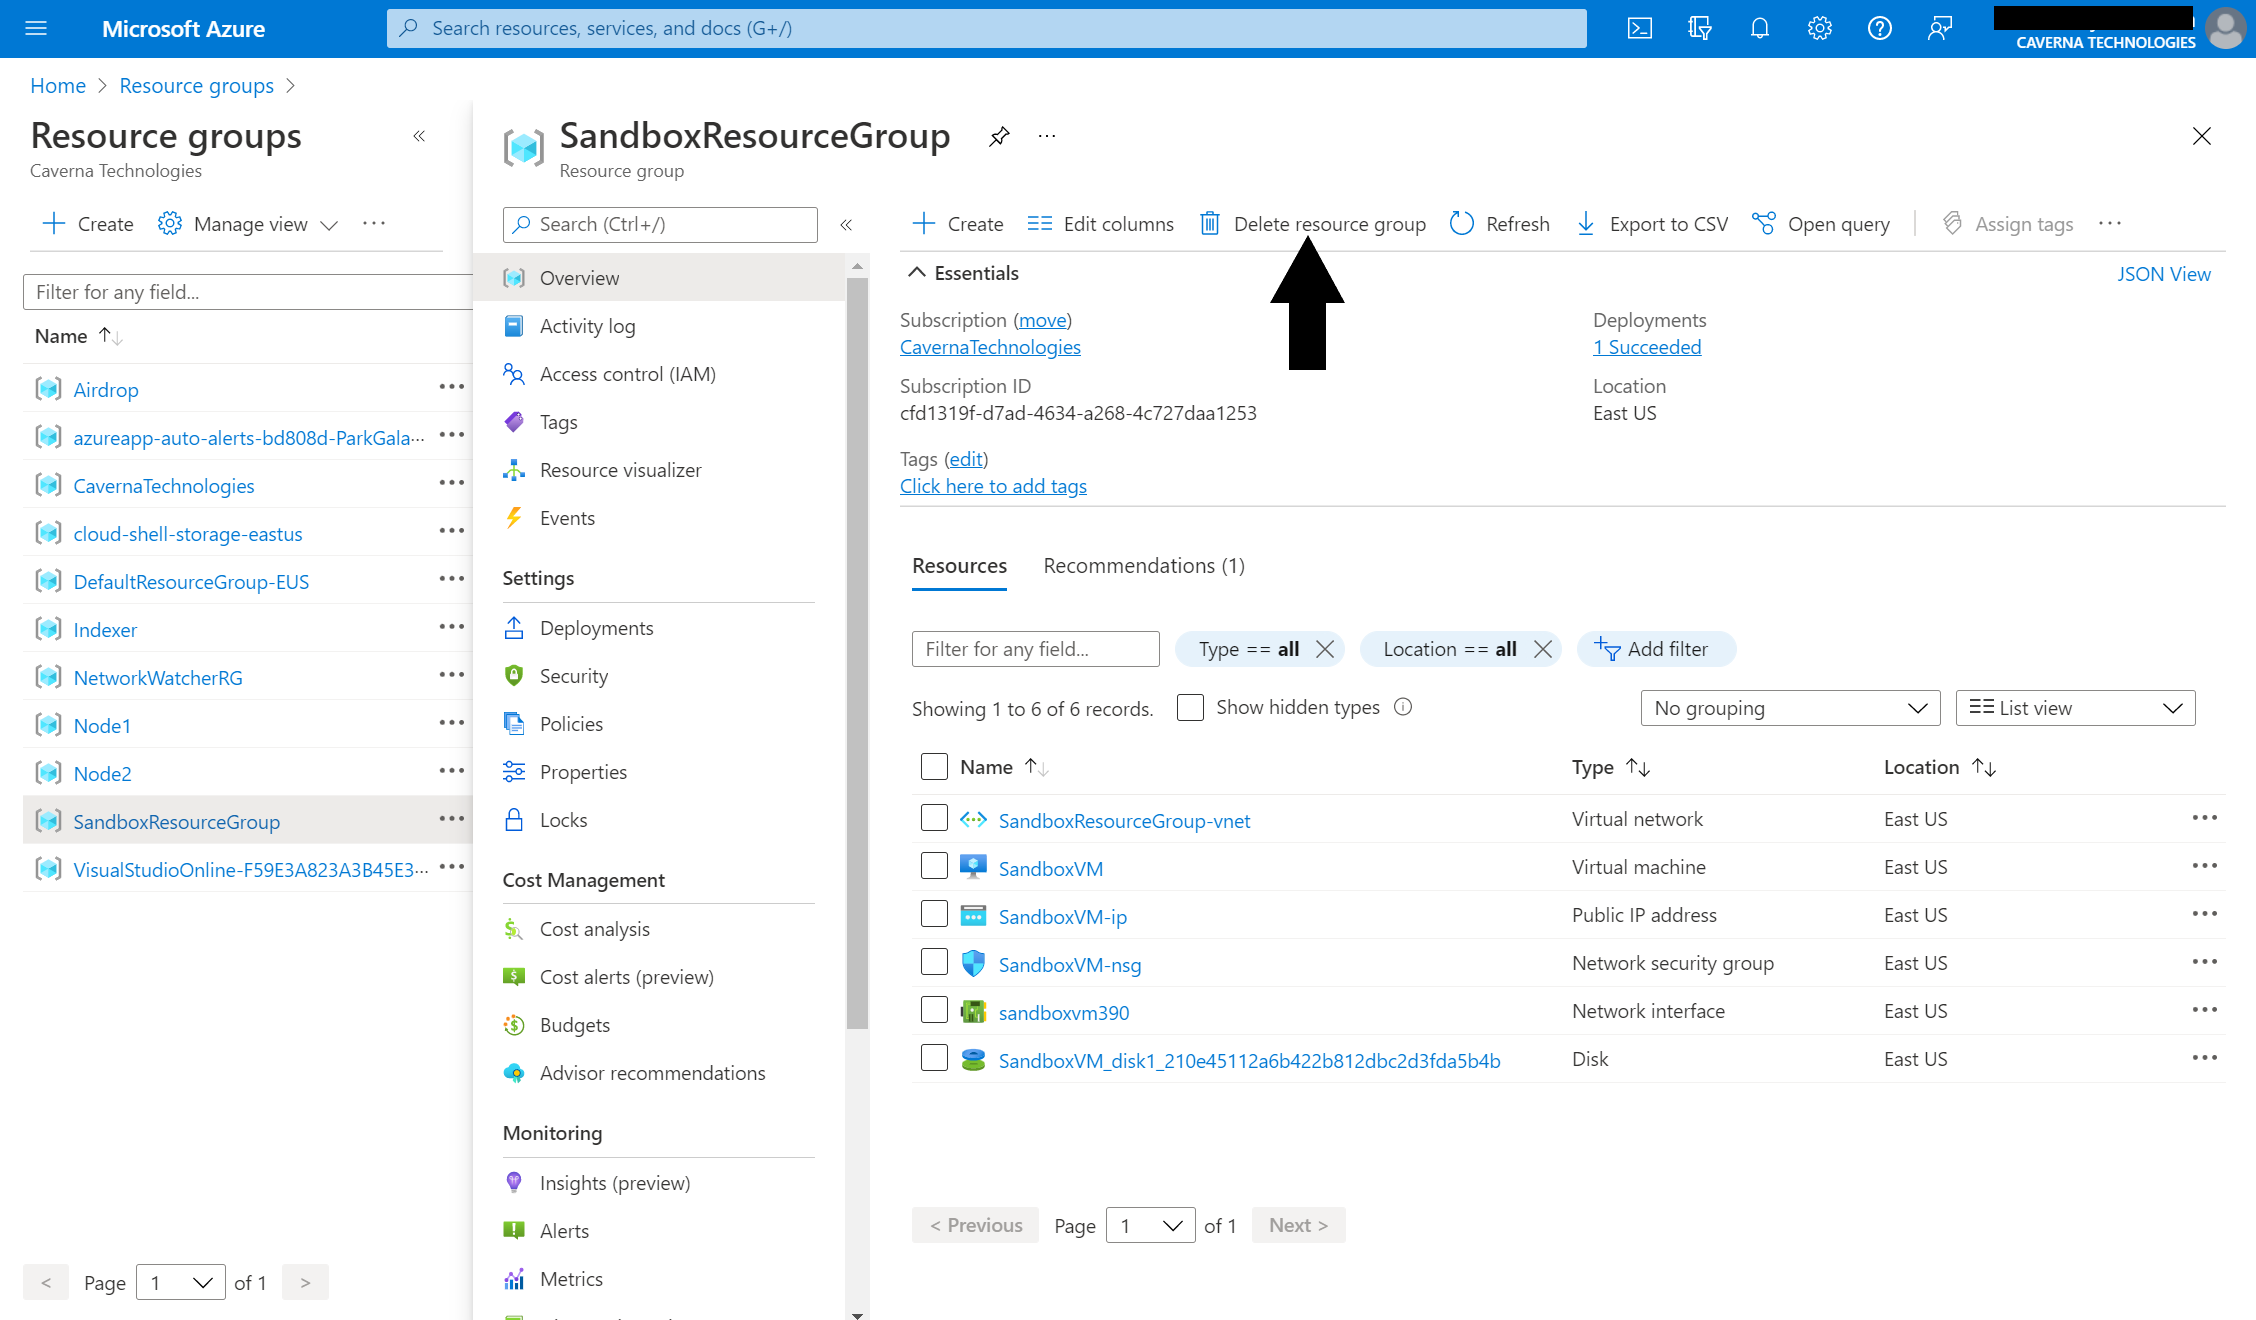
Figure 4-3: Delete resource group
You’ll now be asked to type the name of the resource group, then you can finally delete the group and all associated resources. These are shown in Figure 4-4 This process may take some time, but once it is completed you will no longer be incurring charges on your Azure subscription.
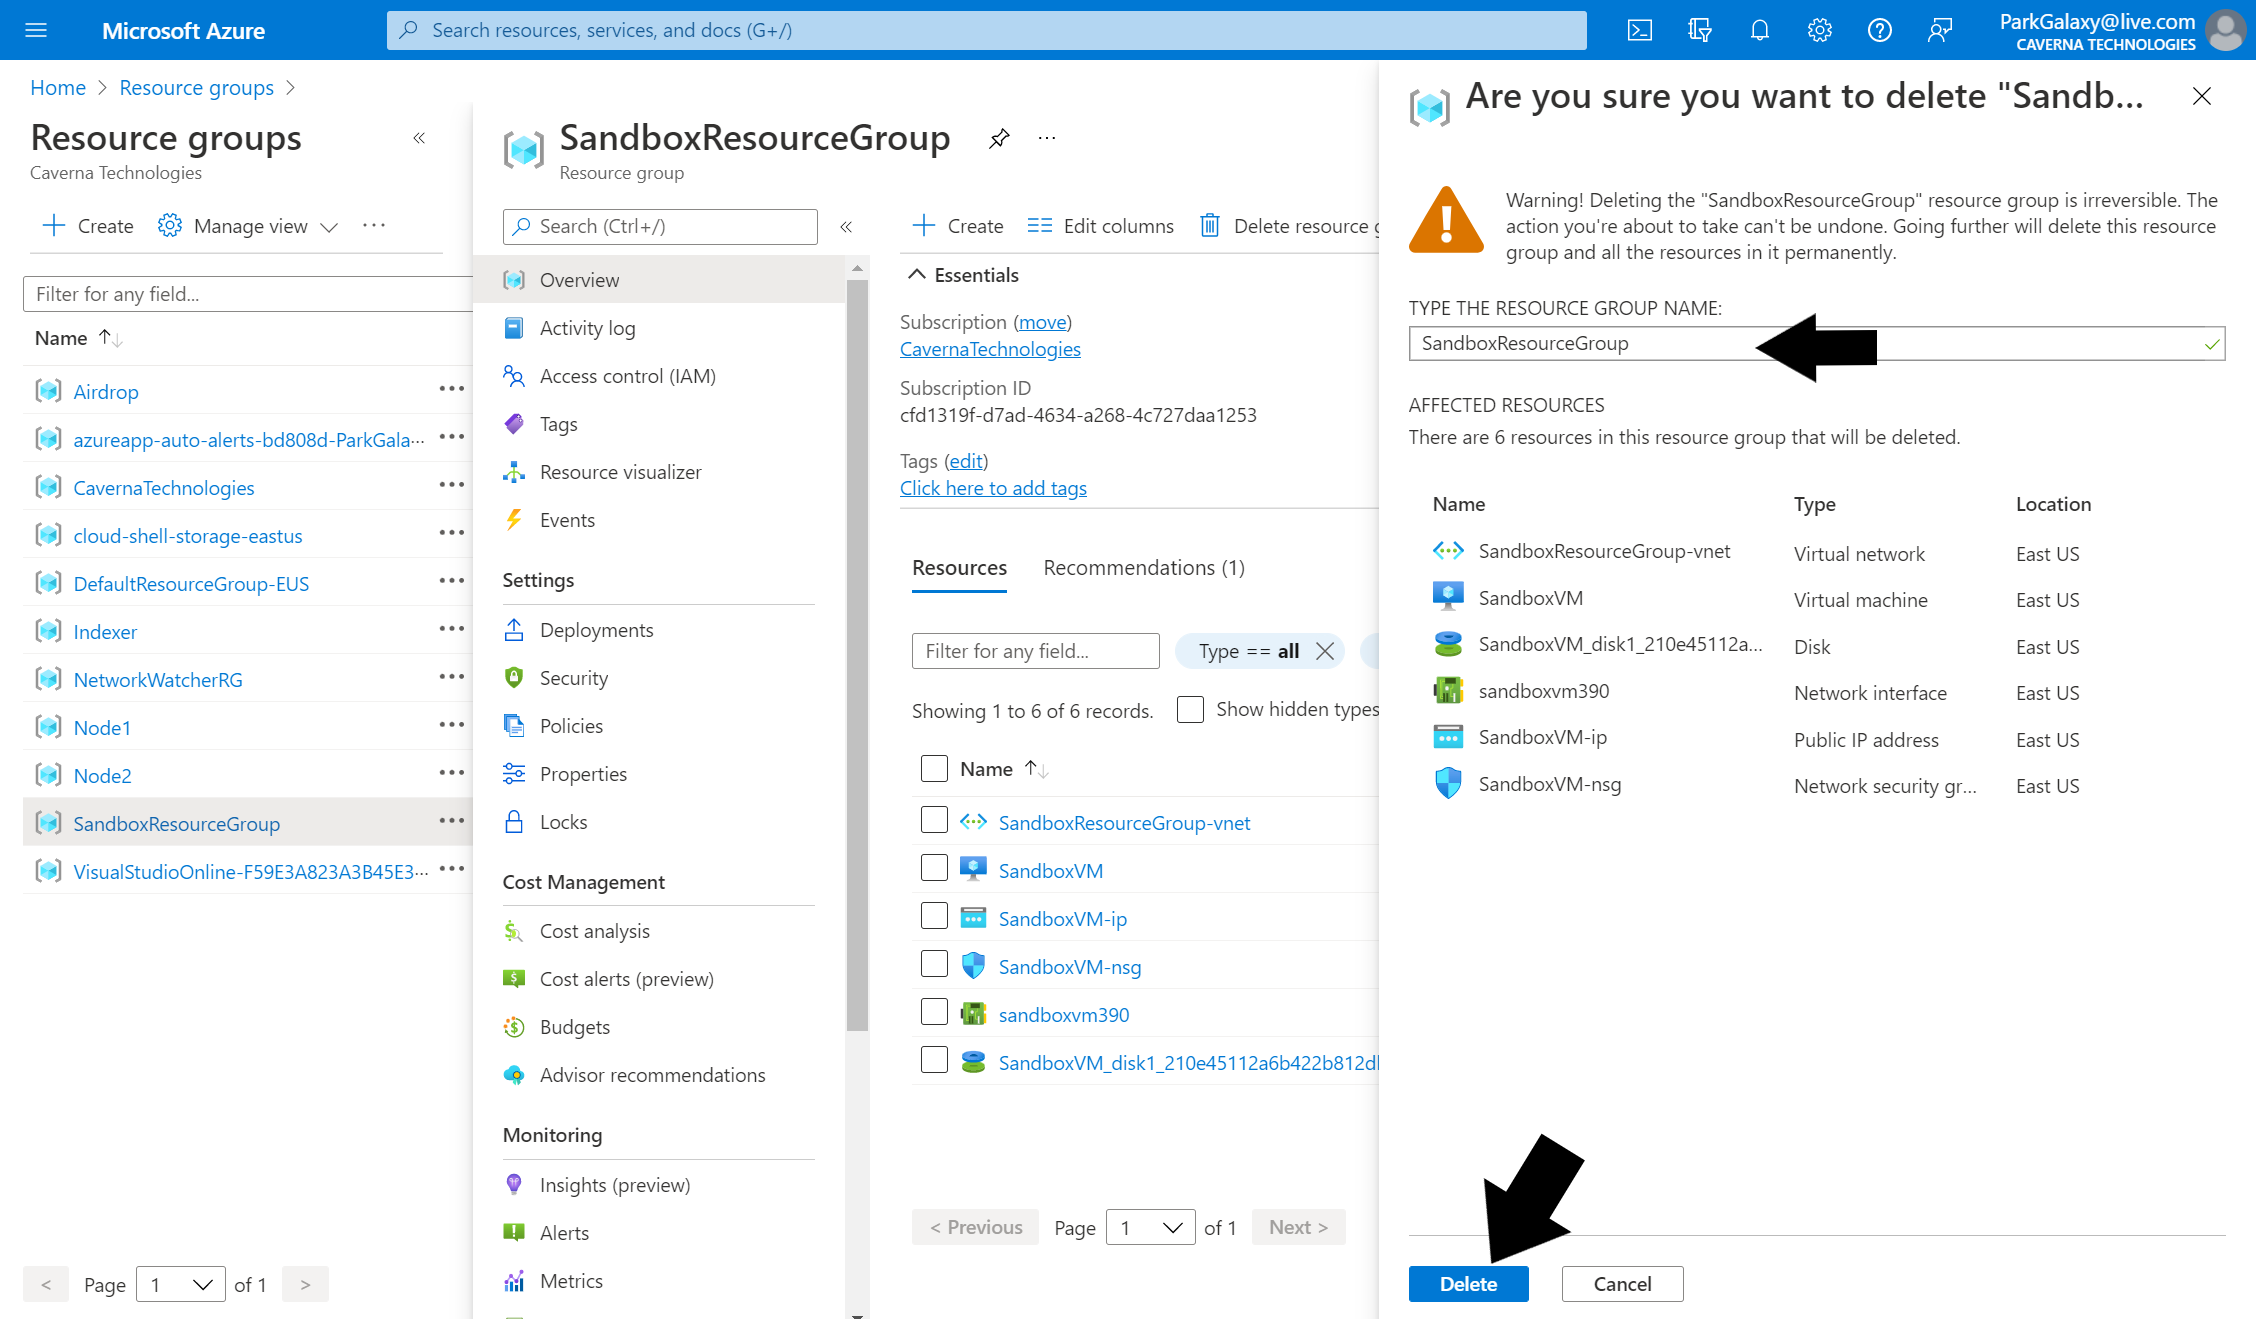
Figure 4-4: Resource group name and Delete
GitHub repository
https://github.com/CavernaTechnologies/Azure-Algorand-Sandbox-Linux
In this GitHub repo, you will find a few resources and instructions on how to use them. If you choose to deploy the virtual machine with a template you will still need to follow the steps to get Docker and Sandbox installed as these cannot be specified on the template level.