
Arduino on Algorand Blockchain

Overview
The Internet of Things is growing and getting more and more attention over time.
With a community of millions of users, Arduino is the most popular development board on the market.
In this solution, you will learn how to connect any Arduino to the Algorand Blockchain.
We will see how to build a simple IoT device that sends temperature measures to the Algorand Blockchain.
Requirements
Any Arduino
Any kind of Arduino will do the job. However the Arduino UNO is recommended to follow along.
A HC-05 Bluetooth Module
The HC-05 Bluetooth Module is a Serial Bluetooth Module for Arduino and other MCUs.
A Computer
It will be used to develop our IoT ecosystem and will act as the IoT Node.
An Algorand TestNet Wallet
It will be our entry point to perform the transactions on the Algorand Blockchain.
You can create an account uaing one of the wallets, or locally by following the Create an Account on TestNet using JavaScript tutorial.
A PureStake API key
This will allow us to connect and interact with the Algorand Blockchain.
To get a PureStake API key, you can follow steps 1 and 2 of the Getting Started with the PureStake API Service tutorial.
How it works

- The temperature value is measured by the sensor. Here we will not use any temperature sensor. For simplicity, the temperature value will be hard-coded within the Arduino firmware.
- The measure is sent via bluetooth to the IoT Node.
- The IoT Node receives the data and send it to the Algorand Blockchain.
Note
- Steps 1 - 2 are performed by the IoT Device (Arduino).
- Steps 3 by the IoT Node (Computer).
IoT Device
The IoT Device firmware is pretty straightforward.
To start off, get a copy of the firmware with this command:
git clone https://github.com/TedNIVAN/algorand-iot-device.git
Note
Make sure you have git installed.
Then open up the iot-device.ino file within the Arduino IDE.
#include <SoftwareSerial.h>

SoftwareSerial BTserial(10, 11);

void setup()
{
    BTserial.begin(9600);

    char data[] = "70";

    for (int i = 0; i < sizeof(data) - 1; i++)
    {
        BTserial.print(data[i] & 0xFF, DEC);
        BTserial.print(" "); //separator
    }

    BTserial.println("");
}

void loop()
{
}
Let’s have a look at the code now:
- First we establish the Bluetooth serial communication.
- We define the plain data that we want to send (here we want to send a 70°C value)
- Finally we send the data to the IoT Node.
Note
To add security, we could encrypt the data before sending it.
IoT Node
The IoT Node is responsible for collecting the data from the IoT Device.
To start off, get a copy of the algorand-iot-node with this command:
git clone https://github.com/TedNIVAN/algorand-iot-node.git
To set everything up follow these commands:
cd algorand-iot-node
npm i
Note
Make sure you have Node.js installed.
Now that we are all set, we can configure the IoT Node. To do so, open up the .env file.
Here we have to set up:
- The Bluetooth serial port and serial speed for connecting the IoT Node to the IoT Device.
You can find out the port on Mac or Linux with the following command:
ls /dev/cu.*
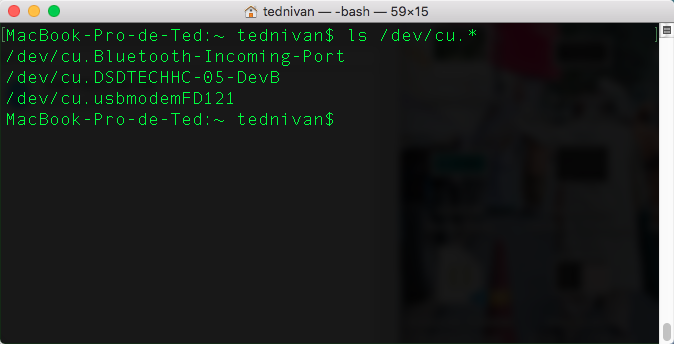
Here the port corresponding to the HC-05 Bluetooth Module is:
/dev/cu.DSDTECHHC-05-DevB2. Your PureStake testnet node and API key.
3. Your Algorand mnemonic phrase is used to recover your account to sign the transactions used in the example.
You should have a configuration close to that:
SERIAL_DEVICE=/dev/cu.DSDTECHHC-05-DevB
SERIAL_SPEED=9600

NODE="https://testnet-algorand.api.purestake.io/ps1"
APIKEY="af4Dyq6Pxb8c7I0ddWtJ********************"
MN="huge damp drum waste eager sail symptom census source ****************************************************"
Now let’s see what our code does.
Move to the app.js file.
const SerialPort = require('serialport');
const Readline = require('@serialport/parser-readline');
const algosdk = require('algosdk');

require('dotenv').config();

const mcu = process.env.SERIAL_DEVICE;
const serialPort = new SerialPort(mcu, { baudRate: JSON.parse(process.env.SERIAL_SPEED) });

const parser = new Readline();
serialPort.pipe(parser);

parser.on('data', temperature => {

    temperature = temperature.split(' ').map(Number);
    temperature = String.fromCharCode(temperature[0], temperature[1]);

    sendToAlgorandBlockchain(temperature);

});

sendToAlgorandBlockchain = (value) => {

    const baseServer = process.env.NODE;
    const port = "";
    const token = {
        'X-API-Key': process.env.APIKEY
    }

    const algodclient = new algosdk.Algod(token, baseServer, port);

    var mnemonic = process.env.MN;
    var account = algosdk.mnemonicToSecretKey(mnemonic);

    let note = algosdk.encodeObj(value);

    (async () => {

        let params = await algodclient.getTransactionParams();
        let endRound = params.lastRound + parseInt(1000);

        let txn = {
            "from": account.addr,
            "to": account.addr,
            "fee": 10,
            "amount": 0,
            "firstRound": params.lastRound,
            "lastRound": endRound,
            "genesisID": params.genesisID,
            "genesisHash": params.genesishashb64,
            "note": note,
        };

        const txHeaders = {
            'Content-Type': 'application/x-binary'
        }
        let signedTxn = algosdk.signTransaction(txn, account.sk);
        let tx = (await algodclient.sendRawTransaction(signedTxn.blob, txHeaders));
        console.log("Transaction : " + tx.txId);
    })().catch(e => {
        console.log(e);
    });

}
At top, we initialize the environment:
The bluetooth serial communication gets set up. Within the parser object, we listen to any bluetooth data event. The method gets triggered whenever new data is available. Once data is available, it is then converted from Ascii Codes to Characters. Finally, the plain temperature text measure is sent to the Algorand Blockchain via the sendToAlgorandBlockchain function.
The beautiful thing with the Algorand Blockchain is that you do not have to write any Smart Contract to store data to the Blockchain.
To do so, we will use the transaction note field. It has a capacity of up to 1kb in length.
All we need to do is to create a new transaction. Here, we set the receiver address to the sender address inside the txn object to keep it simple. As the purpose of this application is not to send money, we can leave the transaction amount to 0.
Alright, we are all good now! We can move on to the Testing section.
Testing
IoT Device side
-
First make sure that the Bluetooth module is connected as follow:

-
Flash the firmware to the Arduino.
Info
The schematic was created with Fritzing.
IoT Node side
Setting up the bluetooth:
- Enable the bluetooth communication on your computer.
- Pair your computer to the bluetooth HC-05 module (the pairing code should be
0000or1234depending on the module).


Now head over to the IoT Node code:
- Run:
node app.js - Click on the reset button of the Arduino to initiate a transaction.
- Copy the outputted transaction id:

Now we are going to visualize the transaction into a block explorer. To do so, head over to https://algoexplorer.io/ and paste the transaction id into the search field and select TESTNET on the right side before searching. Scroll down and click on the Message Pack tab.

Here we see that the transaction note with a value of 70 has been stored to the Algorand Blockchain.
You can also fetch the transaction note and display its content in a more elegant manner:

Here I will present how to visualize the transaction note into a web app.
To begin, get a copy of this repository:
git clone https://github.com/TedNIVAN/algorand-iot-client.git
- Open up the
index.jsfile. - Set your PureStake API key and your account address (generated from your mnemonic).
- Open up the
index.htmlfile and paste the transaction id to the input field. - Click on the Start button.
Video
This video shows how to set up the IoT Node.
Info
Please ignore the AES Encryption Algorithm part on the video.