
Building iOS Apps Using Swift Algorand SDK

Overview
This solution shows you how to develop an iOS app by utilising the Swift programming language. This is all thanks to the Swift Algorand SDK which has made Algorand more accessible to millions of native i0S and Swift developers all over the world.
Table Of Contents
- Setup
- Application Structure
- Node And Network Settings
- Accounts and Transactions
- Create and Fund Accounts
- Transactions
- Multisig Transaction
- ASA
- Atomic Transfer
- Algorand Smart Contract
- Rekey Transaction
- Indexer
- Conclusion
Setup
Make sure you have Xcode installed, preferably from the apple store, this tutorial uses Xcode 12.4 which is the latest at the time, you can then proceed to clone the project from this repo, after cloning it, all you need to do is open the project in Xcode by going to its root directory and opening the swift-algorand-sdk-ios-showcase.xcworkspace file in Xcode, wait for it to download the necessary dependencies, set the Build environment to iphone12 and click on the run button.
By default, you are connected to the Hackathon testnet node , this is so that the app can be tested smoothly without having to expose tokens or running a custom node.
Application Structure
If you opened the swift-algorand-sdk-ios-showcase.xcworkspace file in Xcode, you should have a file structure similar to the image below:
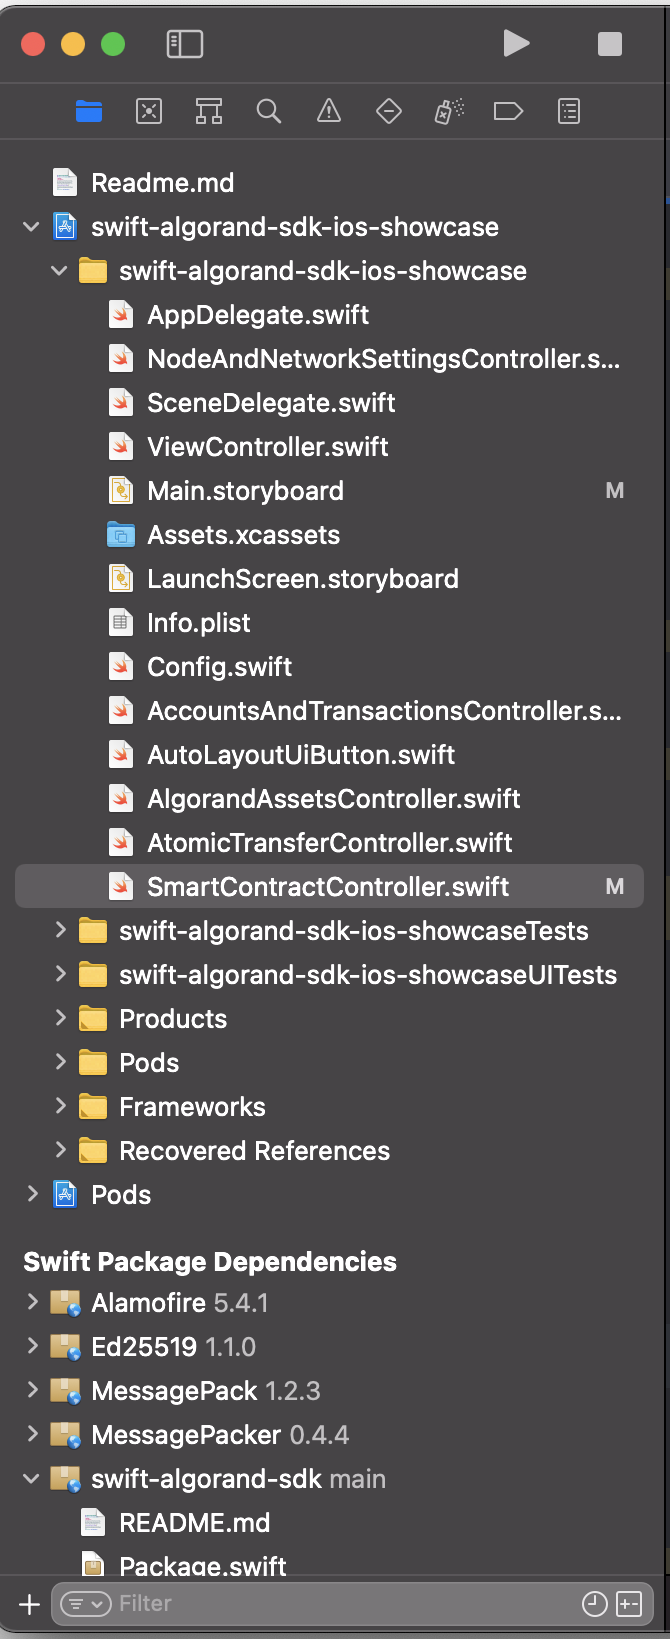
The files we will be working with are those in the swift-algorand-sdk-ios-showcase folder, I have toggled it down to reveal the files within it in the image above. The major purpose of the app is to show how to use the swift SDK so Architectural Patterns are not used for the purpose of simplicity.
The app has a main page which acts as the primary navigation and an image of it can be found below:
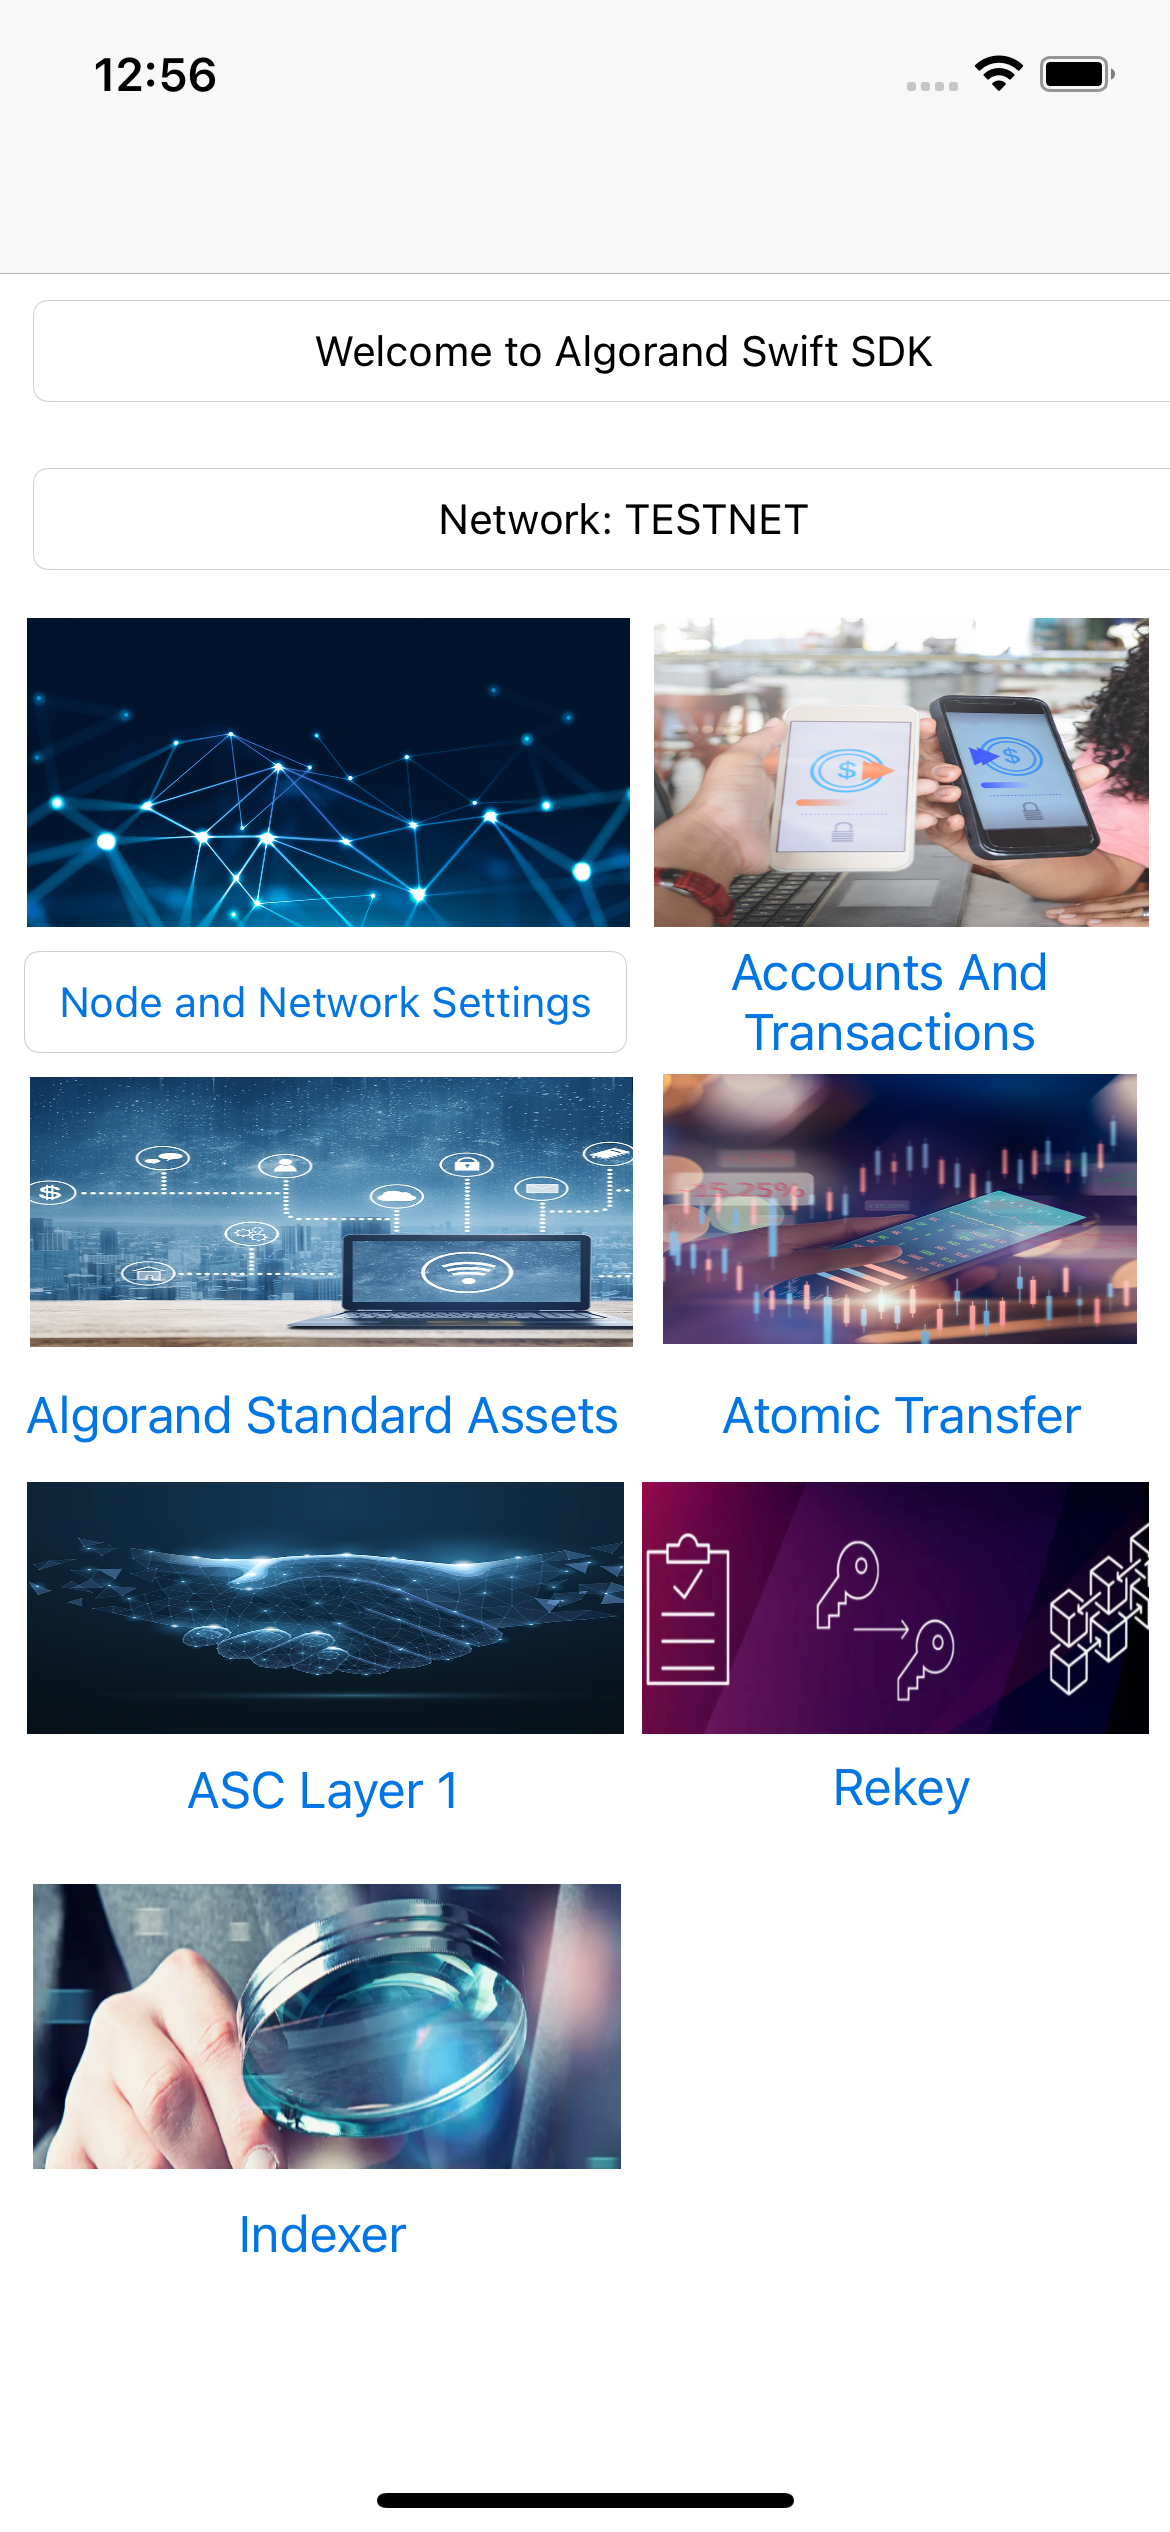
The page above is responsible for taking you to the respective pages that we write the bulk of the code in this app, each screen can be tested independently because of the provision of default values in the Config.swift file although these values are changed as you go through the app.
Node And Network Settings
The Node and Network settings screen allow you to select the network and node that the app will use for the configuration of the AlgodClient in other classes(Screens), which ends up changing the value of the static algodClient variable in the Config.swift file.
All the code for this page can be found in the NodeAndNetworkSettingsController.swift file.

Let’s look at the code that is run when purestake is clicked for example
@IBAction func selectPurestakeNode(_ sender: DLRadioButton) {
        Config.currentNode="Purestake"
        if(Config.currentNet==Config.TESTNET){
            var algodClient:AlgodClient=AlgodClient(host: Config.PURESTAKE_ALGOD_API_TESTNET_ADDRESS, port: Config.PURESTAKE_API_PORT, token: Config.PURESTAKE_API_KEY)
            algodClient.set(key: "X-API-Key")
            Config.algodClient=algodClient
        }else{
            var algodClient:AlgodClient=AlgodClient(host: Config.PURESTAKE_ALGOD_API_BETANET_ADDRESS, port: Config.PURESTAKE_API_PORT, token: Config.PURESTAKE_API_KEY)
            algodClient.set(key: "X-API-Key")
            Config.algodClient=algodClient
        }

    }
The code above is pretty simple, we simply set the currentNode value to Purestake. then we check next if the currentNet(Network) is testnet or mainnet then proceed to call the AlgodClient constructor with the right host address, port and token. You can go on to check the respective methods for connecting to Hackathon or a Custom Node
Note: Please make sure you have placed a value for the Config.PURESTAKE_API_KEY in the Config.swift file for this to work properly.
Accounts and Transactions
Please open the AccountsAndTransactionsController.swift file, you can click on the Get Block Button and you’ll see the loading indicator and after, you’ll see information on the Current Block in the scrollable text area.
![]()
The method responsible for the bulk of this can be found below
 @IBAction func getBlockInfo(_ sender: Any) {
        var algodClient=Config.algodClient
        showLoader()
        algodClient!.getStatus().execute(){nodeStatusResponse in
               if(nodeStatusResponse.isSuccessful){

                algodClient!.getBlock(round: nodeStatusResponse.data!.lastRound!).execute(){ blockResponse in

                    self.hideLoader()
                    if(blockResponse.isSuccessful){

                        self.informationLabel.text=blockResponse.data!.toJson()!.replacingOccurrences(of: "\\", with: "")
                    }else{
                        self.informationLabel.text=(blockResponse.errorDescription!)

                    }


                }


               }else{
                self.hideLoader()

                self.informationLabel.text=nodeStatusResponse.errorDescription
               }

           }
    }
The code above is pretty simple. We, first of all, initialize the algodClient, show a loader and then we proceed to get its status by calling the getStatus method, so we can get the last round and pass it to the query for getting the Block with the getBlock method. Finally, we check if there was an error and update textView and hide the loader
Create and Fund Accounts
You can decide to create Three accounts, Generate Account Button and you’ll see the option to fund an account or get its account balance,
if you choose the option to fund account, you’ll be taken to the respective dispenser page for testnet or betanet and automatically, the address for the respective account is copied to the clipboard so it can be pasted in the input field of the dispenser, after funding the account, you can click the Get account Balance button to confirm the amount in the account
![]()
![]()
the code to create account can be found below
    @IBAction func generateAccount1(_ sender: Any) {
        var account =  try! Account()
        self.informationLabel.text="Mnemonic: \(account.toMnemonic())\n Address: \(account.address.description)"
        Config.account1=account
        generateAccount1Button.setTitle("Account 1", for: .normal)
        account1FundsNeededButton.isHidden=false
        account1FundsNeededButton.setTitle("Funds Needed", for: .normal)
        account1GetAccountBalanceButton.isHidden=false
        account1GetAccountBalanceButton.setTitle("Get Account1 Balance", for: .normal)
    }
Feel free to check out the code for Checking Account Balance and Funding the account in the AccountsAndTransactionsController.swift file
Transactions
Now, we can proceed to allow the transfer of funds from account 1 to 2, the Transfer From Account 1 to 2 button should no longer be greyed out after generating account 1 and 2, you can click on it to transfer funds from account 1 to 2, after the funds have been transferred, you should be able to see the transaction id in the info text and if you clicked on Get Account2 Balance, you should see the account balance
  func transferFunds(sender:Account,receiverAddress:Address){
        showLoader()
        var trans =  Config.algodClient!.transactionParams().execute(){ paramResponse in
                    if(!(paramResponse.isSuccessful)){
                    print(paramResponse.errorDescription);
                        self.hideLoader()
                    return;
                }


            var tx = Transaction.paymentTransactionBuilder().setSender(sender.address)
                    .amount(1000000)
                    .receiver(receiverAddress)
                    .note("Swift Algo sdk is cool".bytes)
                    .suggestedParams(params: paramResponse.data!)
                    .build()

                    var signedTransaction=sender.signTransaction(tx: tx)

                    var encodedTrans:[Int8]=CustomEncoder.encodeToMsgPack(signedTransaction)


            Config.algodClient!.rawTransaction().rawtxn(rawtaxn: encodedTrans).execute(){
                       response in
                self.hideLoader()
                        if(response.isSuccessful){

                            self.informationLabel.text="\(response.data!.txId)"
                            UIPasteboard.general.string="\(response.data!.txId)"

                        }else{

                            self.informationLabel.text=response.errorDescription!
                            UIPasteboard.general.string=response.errorDescription!

                        }

                    }
            }

    }
The transferFunds function builds a transaction by calling the TransactionPaymentBuilder, and calling methods for amount, note, suggestedParams on it, it then signs the transaction using the account its function receives and sends a messagepack of the signed transaction to the Algorand network and updates the information label below with the transaction id if it was successful or with the error if it wasn’t
Multisig Transaction
You can click on the Create Multisig Address button, this will create a multisig address and place the multisig address on the clipboard so it can be pasted in the dispenser to fund the multisig address.
The code to fund the multisig address can be found below
  func createMultisigAddress(address1:Address,address2:Address,address3:Address){
        var ed25519i = Ed25519PublicKey(bytes:address1.bytes!)
        var ed25519ii=Ed25519PublicKey(bytes:address2.bytes!)
        var ed25519iii=Ed25519PublicKey(bytes:address3.bytes!)

        self.multisigAddress = try! MultisigAddress(version: 1, threshold: 2, publicKeys: [ed25519ii,ed25519i,ed25519iii])
        self.informationLabel.text=multisigAddress!.toString()
        UIPasteboard.general.string=multisigAddress!.toString()
    }
It simply gets the ed25519 public key for each address and passes an array of them to the MultisigAddress constructor to create the multisig address, it uses a version of 1 and a threshold of 2. The threshold represents the number of valid signers that must provide signatures for the transaction to be successful.
After funding the multisig address by recharging it in the explorer, you can go ahead to click on the Send From Multisig to Account 2 button and this should send 1 algo to account 2 displaying the transaction id in the info text at the bottom of the string, the transaction id is automatically copied to the clipboard so this can be inspected.
The code for this can be found below
func sendMultisigTransaction(account1:Account,account2:Account,receiverAddress:Address){
        showLoader()
        Config.algodClient!.transactionParams().execute(){ paramResponse in
            if(!(paramResponse.isSuccessful)){
                print(paramResponse.errorDescription);
                self.hideLoader()
                self.informationLabel.text="\(paramResponse.errorDescription!)"
                UIPasteboard.general.string="\(paramResponse.errorDescription!)"
                return;
            }

            var tx = Transaction.paymentTransactionBuilder()
                .setSender( try! self.multisigAddress!.toAddress())
                  .amount(1000000)
                .receiver(receiverAddress)
                .suggestedParams(params: paramResponse.data!)
                          .build();

            var IsignedTrans = try! account1.signMultisigTransaction(from: self.multisigAddress!, tx: tx)
            var signedTrans=try!account2.appendMultisigTransaction(from: self.multisigAddress!, signedTx: IsignedTrans)
            var signedTransmsgPack=CustomEncoder.convertToUInt8Array(input: CustomEncoder.encodeToMsgPack(signedTrans))
            var int8sT:[Int8] = CustomEncoder.encodeToMsgPack(signedTrans)
            var jsonEncoder=JSONEncoder()
            var txData=try! jsonEncoder.encode(signedTrans)
            var txString=String(data: txData, encoding: .utf8)

            Config.algodClient!.rawTransaction().rawtxn(rawtaxn: CustomEncoder.encodeToMsgPack(signedTrans)).execute(){
               response in
                self.hideLoader()
                if(response.isSuccessful){

                    self.informationLabel.text="\(response.data!.txId)"
                    UIPasteboard.general.string="\(response.data!.txId)"

                }else{
                    self.informationLabel.text=="\(response.errorDescription!)"
                    UIPasteboard.general.string="\(response.errorDescription!)"
                }

            }
        }


    }
The transaction is conducted using the multisig address as the sender and then signed by account1 and the SignedTransaction object is signed again by account2 using the appendMultisigTransaction method, and then the signed transaction returned is sent to the network. The transaction id is displayed in the information text field and also copied to the clipboard so it can be inspected in the explorer
ASA
Next, you can click on the Algorand Standard Assets , this will take you to the page below:
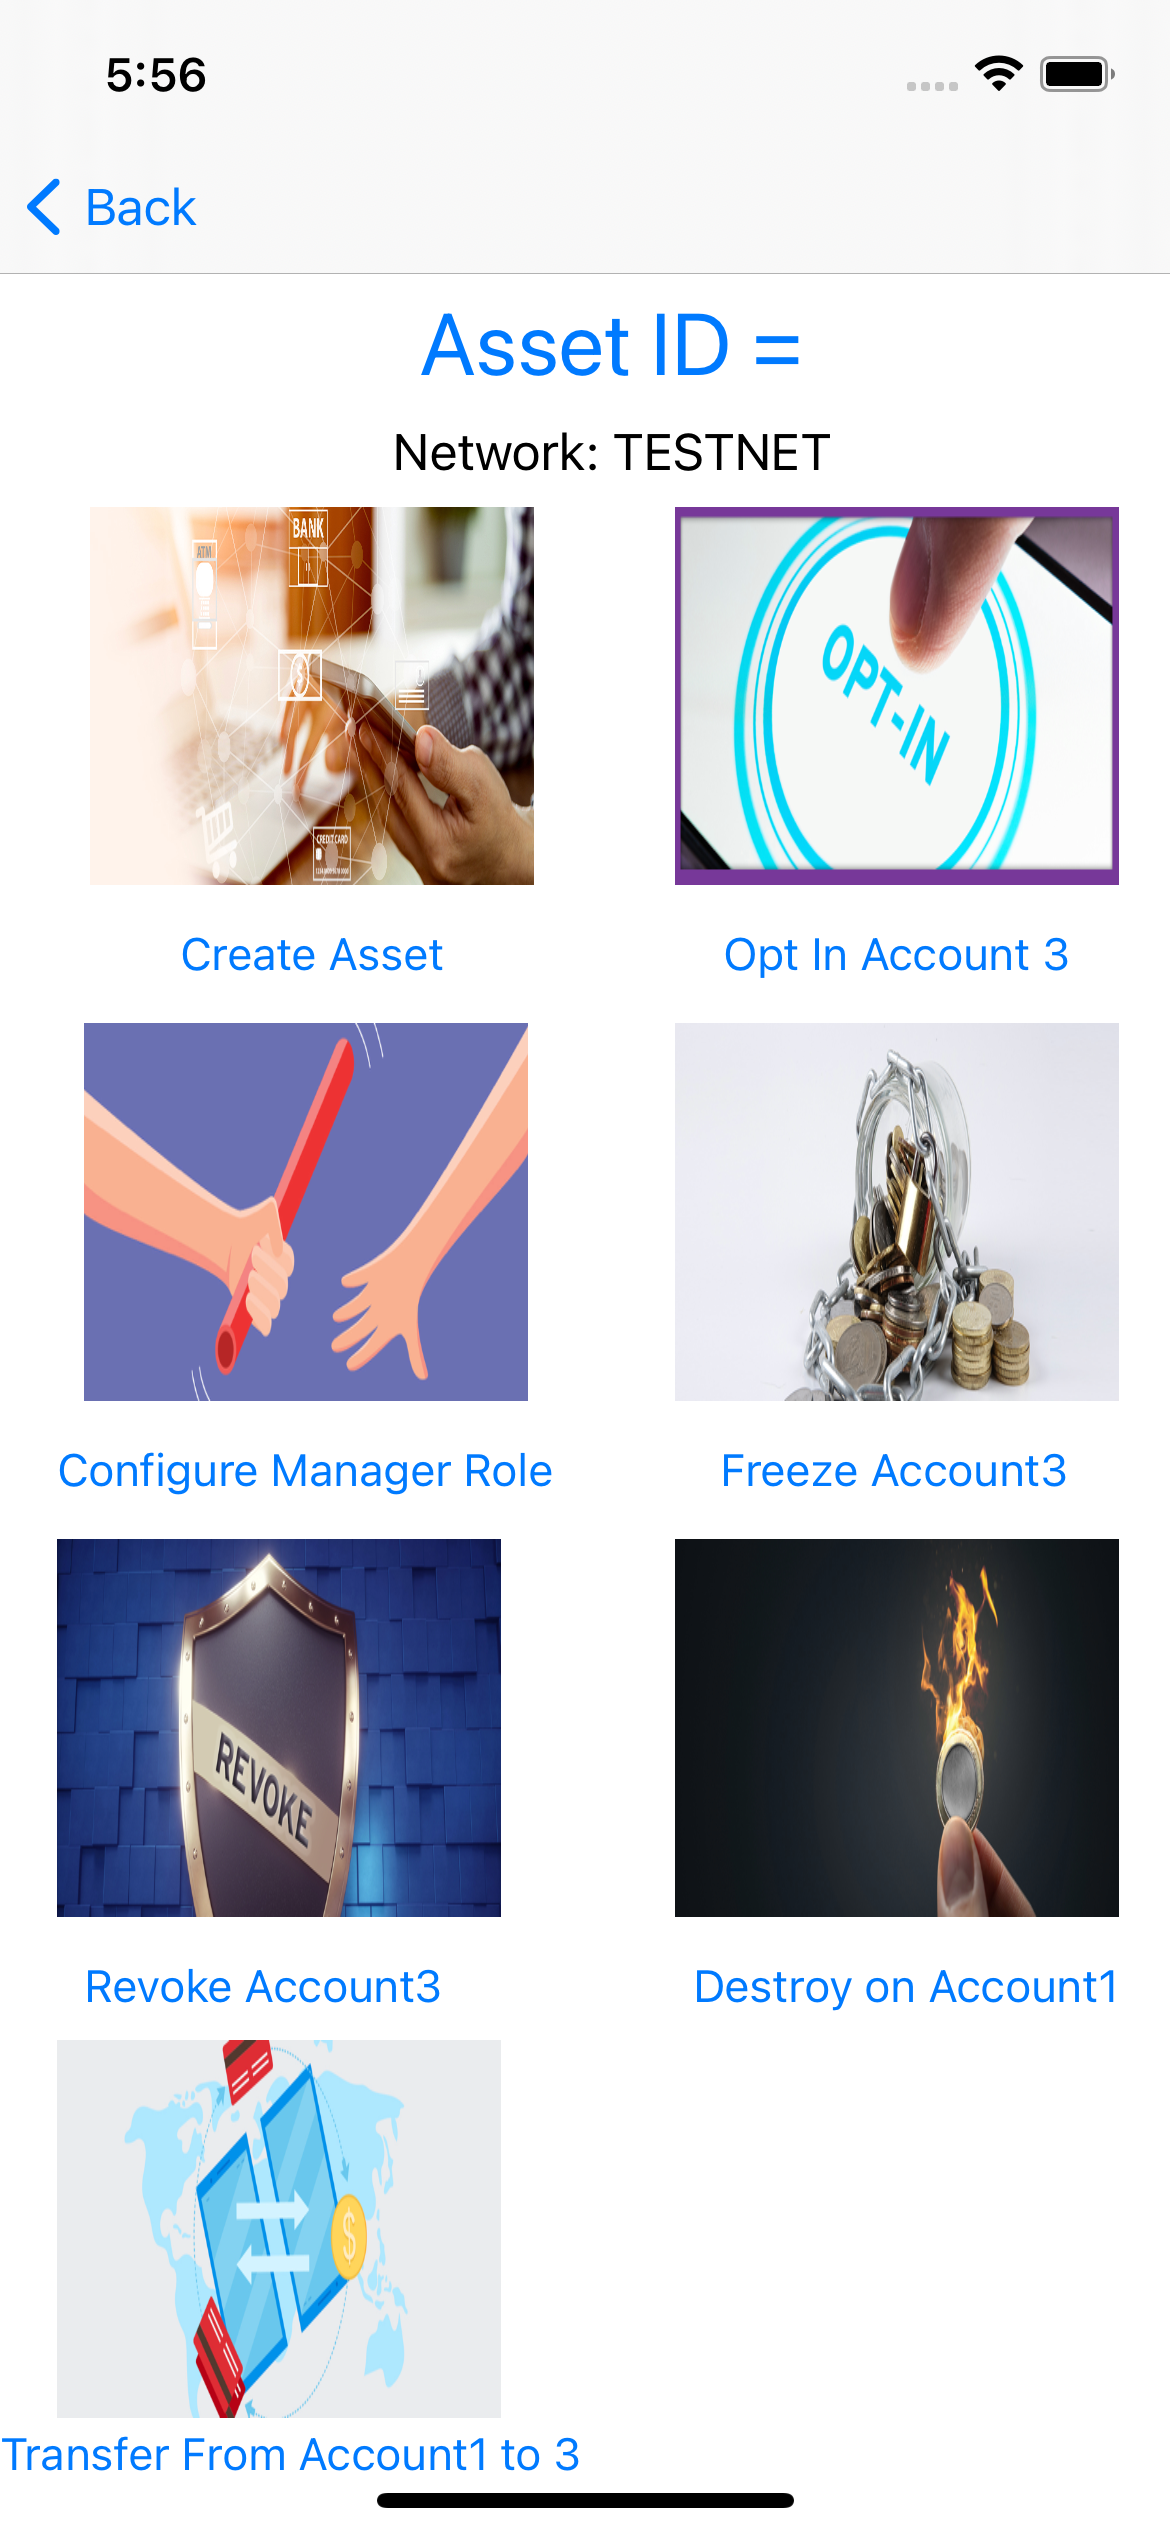
The order in which we will go through on this page is to click on Create Asset then Configure Manager Role then Opt-in Account3 then Transfer From Acccount1 to 3, then Freeze Account3 then Revoke Account3 then Destroy on Account1
Create Asset: You can click Create Asset and you should see the progress bar loading until the transaction completes, once the transaction completes, you should be able to see the Asset Id at the top and the transaction id at the bottom right of the screen like below:
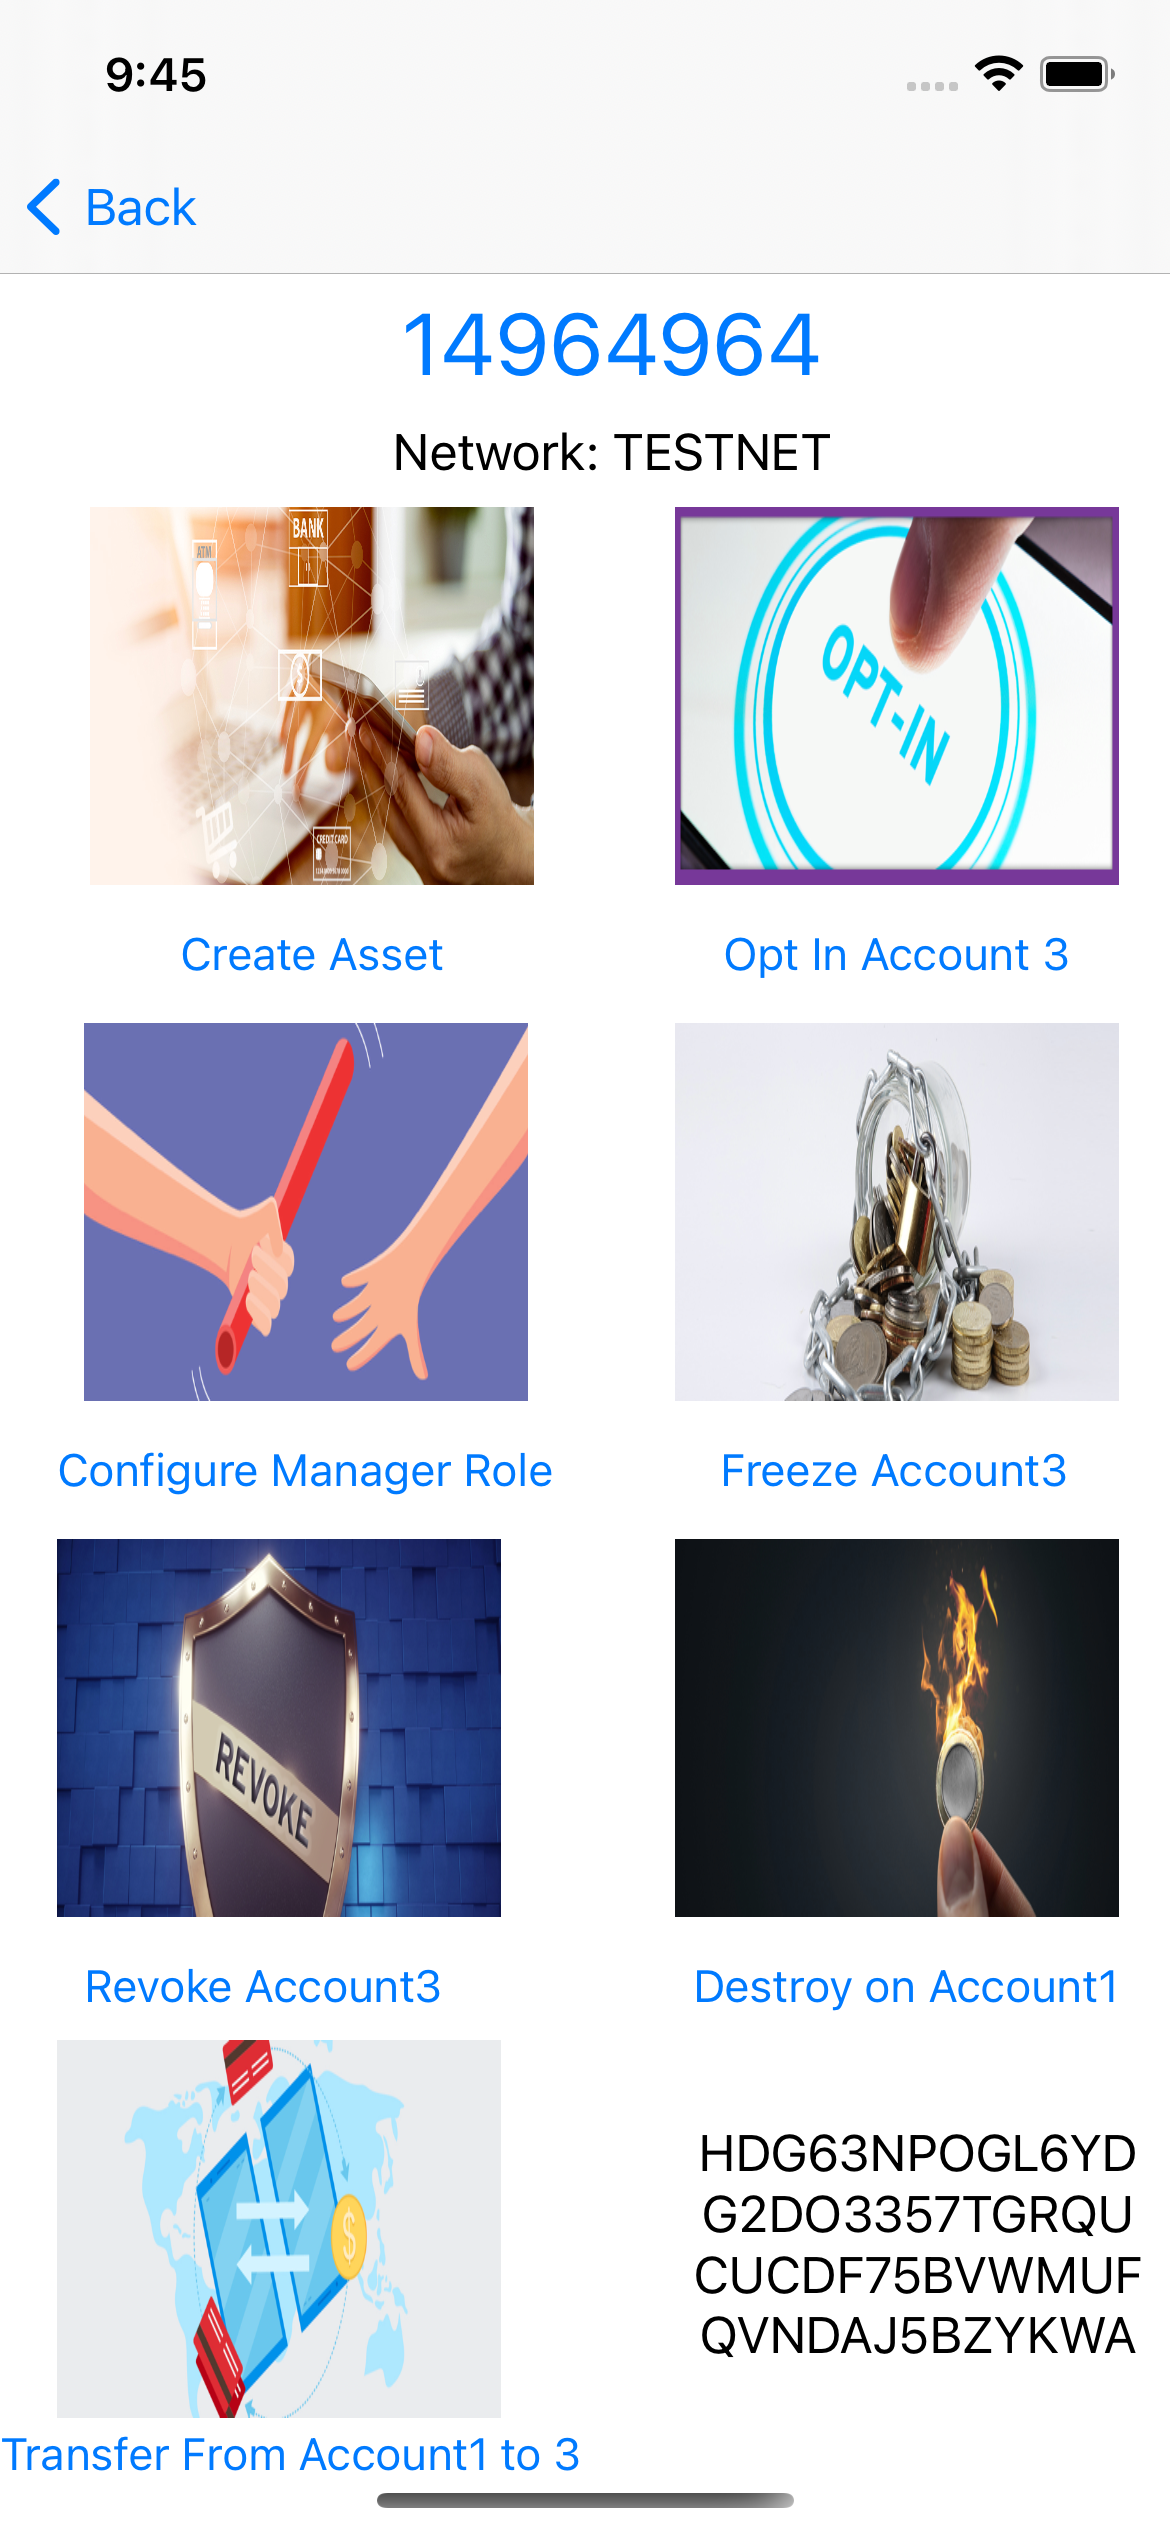
The code for this can be found in the AlgorandAssetsController.swift file, it is handled by the createASA function which can be found below:
 func createASA( algodClient:AlgodClient,creator:Account,assetTotal:Int64,assetDecimals:Int64,assetUnitName:String,assetName:String,url:String,manager:Address,reserve:Address,freeze:Address,clawback:Address,defaultFrozen:Bool,functionToCall:@escaping (Int64?)->Void){
        algodClient.transactionParams().execute(){paramResponse in
            if(!(paramResponse.isSuccessful)){
                print(paramResponse.errorDescription);
                return;
            }
     var tx = Transaction.assetCreateTransactionBuilder()
        .setSender(creator.getAddress())
                          .setAssetTotal(assetTotal: assetTotal)
                          .setAssetDecimals(assetDecimals:  assetDecimals)
                          .assetUnitName(assetUnitName: assetUnitName)
                          .assetName(assetName:  assetName)
                            .url(url: url)
                            .manager(manager: manager)
                            .reserve(reserve: reserve)
                            .freeze(freeze: freeze)
                          .defaultFrozen(defaultFrozen:  defaultFrozen)
                .clawback(clawback: clawback)
        .suggestedParams(params: paramResponse.data!).build()

            var signedTransaction=creator.signTransaction(tx: tx)
            var encodedTrans:[Int8]=CustomEncoder.encodeToMsgPack(signedTransaction)
            var dataToSend=Data(CustomEncoder.convertToUInt8Array(input: encodedTrans))

            algodClient.rawTransaction().rawtxn(rawtaxn: encodedTrans).execute(){
               response in
                if(response.isSuccessful){
                    print(response.data!.txId)
                    self.infoLabel.text=response.data!.txId
                    self.waitForTransaction(txId:response.data!.txId,funcToCall: functionToCall)

                }else{
                    print(response.errorDescription)
                    self.infoLabel.text=response.errorDescription
                }
            }

        }

    }
we simply create the transaction by calling in the assetCreateTransactionBuilder on the Transaction class, we pass in account2 as the creator, manager, reserve, clawback and freeze, we also pass in parameters for the assetTotal, unitName and defaultFrozen, we then sign the transaction with the creator and send it to the network, we wait for the transaction to be confirmed by calling the self.waitForTransaction method before proceeding.
    func waitForTransaction(txId:String, funcToCall: @escaping (Int64?)->Void) {
        var confirmedRound: Int64?=0
        var assetIndex:Int64?=0
        algodClient!.pendingTransactionInformation(txId:txId).execute(){
            pendingTransactionResponse in
                if(pendingTransactionResponse.isSuccessful){
                    confirmedRound=pendingTransactionResponse.data!.confirmedRound
                    assetIndex=pendingTransactionResponse.data!.assetIndex
                    if(confirmedRound != nil && confirmedRound! > 0){
                       funcToCall(assetIndex)
                    }else{
                        try!  self.waitForTransaction(txId: txId,funcToCall: funcToCall)
                    }
                }else{
                    print(pendingTransactionResponse.errorDescription!)
                    funcToCall(nil)
                }
    }
}
Configure Manager: Now, we can proceed to change the manager to Account1, this is done by calling the assetConfigureTransactionBuilder() and then calling then chaining other methods responsible for the necessary configuration, the code that does this can be found below, please note that you have to pass in the asset index of the already created asset and then sign the transaction by account2 (the present manager):
 func  changeAsaManager(algodClient:AlgodClient,previousManager:Account,assetIndex:Int64,manager:Address,reserve:Address,freeze:Address,clawback:Address,functionToCall:@escaping (String?)->Void){

        algodClient.transactionParams().execute(){paramResponse in
            if(!(paramResponse.isSuccessful)){
                print(paramResponse.errorDescription);
                return;
            }
            var tx = Transaction.assetConfigureTransactionBuilder().reserve(reserve: previousManager.address).freeze(freeze: previousManager.address).clawback(clawback: previousManager.address).assetIndex(assetIndex: assetIndex).setSender(previousManager.getAddress())
            .manager(manager: manager)
                .suggestedParams(params: paramResponse.data!)
                      .build();


            var signedTransaction=previousManager.signTransaction(tx: tx)

            var encodedTrans:[Int8]=CustomEncoder.encodeToMsgPack(signedTransaction)
            var dataToSend=Data(CustomEncoder.convertToUInt8Array(input: encodedTrans))
            algodClient.rawTransaction().rawtxn(rawtaxn: encodedTrans).execute(){
               response in
                if(response.isSuccessful){
                    functionToCall(response.data!.txId)

                }else{
                    functionToCall(response.errorDescription)
                }

            }

        }

    }
Opt-In: Now, we will proceed to opting in account3 to our created ASA, this sends 0 amount of the createc asset to account3, for this to work, account3 has to be the signer of this transaction, the code for this can be found below:
  func optInToAsa(algodClient:AlgodClient,acceptingAccount:Account,assetIndex:Int64,functionToCall:@escaping (String)->Void){

        algodClient.transactionParams().execute(){paramResponse in
            if(!(paramResponse.isSuccessful)){
                print(paramResponse.errorDescription);
                return;
            }
            var tx = Transaction.assetAcceptTransactionBuilder()
                .acceptingAccount(acceptingAccount: acceptingAccount.getAddress())
                .assetIndex(assetIndex: assetIndex)
                .suggestedParams(params: paramResponse.data!)
                .build();

            var txMessagePack:[Int8]=CustomEncoder.encodeToMsgPack(tx)
            var signedTrans=acceptingAccount.signTransaction(tx: tx)
            var encodedTx:[Int8]=CustomEncoder.encodeToMsgPack(signedTrans)
            algodClient.rawTransaction().rawtxn(rawtaxn: encodedTx).execute(){
               response in
                if(response.isSuccessful){
                    functionToCall(response.data!.txId)
                }else{
                    functionToCall(response.errorDescription!)
                }

            }}
    }
The function above simply receives the account, the assetIndex and the callBack, calls the assetAcceptTransactionBuilder on the Transaction class and chains the acceptingAccount and the assetIndex method while passing in their respective values and then calling the callBack with the transaction id.
Transfer Asset: We will transfer our 10 tokens of our asset from account2 to account3, this can be done by clicking on the Transfer to Account3 button. The code for this can be found below
 func transferAsa(algodClient:AlgodClient,sender:Account,receiver:Address,amount:Int64,assetIndex:Int64, functionToCall:@escaping (String)->Void){

        algodClient.transactionParams().execute(){paramResponse in
            if(!(paramResponse.isSuccessful)){
                print(paramResponse.errorDescription);
                return;
            }

            var tx = Transaction.assetTransferTransactionBuilder().setSender(sender.getAddress()).assetReceiver(assetReceiver:receiver)
                .assetAmount(assetAmount:amount).assetIndex(assetIndex:assetIndex).suggestedParams(params:paramResponse.data!).build();

            var signedTrans=sender.signTransaction(tx: tx)

            var encodedTx:[Int8]=CustomEncoder.encodeToMsgPack(signedTrans)
            algodClient.rawTransaction().rawtxn(rawtaxn: encodedTx).execute(){
               response in
                if(response.isSuccessful){
                    functionToCall(response.data!.txId)
                }else{
                    functionToCall(response.errorDescription!)
                }

            }
        }

    }
The function above calls the assetTransferTransactionBuilder method on the Transaction class and chains the necessary methods with the method call to transfer the asset, the sender signs the transaction and sends it to the network.
Freeze Asset: Next, we will see how to freeze an asset by clicking on the Freeze Asset button, we will freeze the assets in account3, the freeze transaction is created by calling assetFreezeTransactionBuilder on the Transaction class and chaining the freezeTarget which signifies the account to freeze and the freezeState which signifies if to freeze or unfreeze the account while passing in their respective parameters. The signer of this transaction has to be the manager which is account1
The code responsible for this can be found below:
    func freezeASA(algodClient:AlgodClient,freezeTarget:Address,manager:Account,assetIndex:Int64,freezeState:Bool, functionToCall:@escaping (String)->Void){

        algodClient.transactionParams().execute(){paramResponse in
            if(!(paramResponse.isSuccessful)){
                print(paramResponse.errorDescription);
                return;
            }

            var tx=Transaction.assetFreezeTransactionBuilder().setSender(manager.getAddress()).freezeTarget(freezeTarget:freezeTarget)
                .freezeState(freezeState:freezeState).assetIndex(assetIndex: assetIndex).suggestedParams(params: paramResponse.data!).build();
            var signedTrans=manager.signTransaction(tx: tx)
            var encodedTx:[Int8]=CustomEncoder.encodeToMsgPack(signedTrans)
            algodClient.rawTransaction().rawtxn(rawtaxn: encodedTx).execute(){
               response in
                if(response.isSuccessful){
                    functionToCall(response.data!.txId)
                }else{
                    functionToCall(response.errorDescription!)
                }

            }
        }
    }
Revoke Asset: We will now revoke the assets sent to account3 earlier, we do this by calling the assetClawbackTransactionBuilder method Transaction class and pass in the address of account3 to the chained assetClawbackFrom, method and the address of account1 to the chained assetReceiver method while chaining the remaining methods for assetAmount and assetIndex. The created transaction has to be signed by the manager which is account2, the code for this can be found below:
func revokeAsa(algodClient:AlgodClient,manager:Account,clawBackFromAddress:Address,clawBackToAddress:Address,assetAmount:Int64,assetIndex:Int64, functionToCall:@escaping (String)->Void){
        algodClient.transactionParams().execute(){paramResponse in
            if(!(paramResponse.isSuccessful)){
                print(paramResponse.errorDescription);
                return;
            }

            var tx = Transaction.assetClawbackTransactionBuilder().setSender(manager.getAddress())
                .assetClawbackFrom(assetClawbackFrom:clawBackFromAddress).assetReceiver(assetReceiver: clawBackToAddress).assetAmount(assetAmount: assetAmount)
                .assetIndex(assetIndex:assetIndex).suggestedParams(params: paramResponse.data!).build()
            var signedTrans=manager.signTransaction(tx: tx)
            var encodedTx:[Int8]=CustomEncoder.encodeToMsgPack(signedTrans)
            algodClient.rawTransaction().rawtxn(rawtaxn: encodedTx).execute(){
               response in
                if(response.isSuccessful){
                    functionToCall(response.data!.txId)
                }else{
                    functionToCall(response.errorDescription!)
                }

            }
        }
    }
Destroy Asset: We can now destroy the asset by clicking on the Destroy On Account1 For us to do this, the Creator of the asset has to have all the units of the asset in its account and also sign the transaction, the code for this can be found below:
    func destroyAsa(algodClient:AlgodClient,manager:Account,assetIndex:Int64,functionToCall:@escaping (String)->Void){
        algodClient.transactionParams().execute(){paramResponse in
            if(!(paramResponse.isSuccessful)){
                print(paramResponse.errorDescription);
                return;
            }
            var tx = Transaction.assetDestroyTransactionBuilder()
                .setSender(manager.getAddress())
                .assetIndex(assetIndex: assetIndex)
                .suggestedParams(params: paramResponse.data!)
                          .build();

            var signedTrans=manager.signTransaction(tx: tx)
            var encodedTx:[Int8]=CustomEncoder.encodeToMsgPack(signedTrans)
            algodClient.rawTransaction().rawtxn(rawtaxn: encodedTx).execute(){
               response in
                if(response.isSuccessful){
                    functionToCall(response.data!.txId)
                }else{
                    functionToCall(response.errorDescription!)
                }

            }}

    }
We simply call assetDestroyTransactionBuilder on the Transaction class while chaining the necessary methods on it and then proceed to sign the transaction with the creator account.
Atomic Transfer
Atomic transfers are used to send more than one transaction to the network at a time such that if any of the transactions fail, all the transactions fail, we will do this by sending 10 and 15 algo respectively to account1 and account2 from account3
![]()
The code responsible for this can be found below
func createtransactions(sender:Account,receiver1:Address,receiver2:Address,algodClient:AlgodClient,functionToCall: @escaping (String)->Void){
        algodClient.transactionParams().execute(){ paramResponse in
           if(!(paramResponse.isSuccessful)){
           print(paramResponse.errorDescription);
           return;
       }
            var tx1 = Transaction.paymentTransactionBuilder().setSender(sender.address)
             .amount(10000000)
             .receiver(receiver1)
             .note("Swift Algo sdk is cool".bytes)
             .suggestedParams(params: paramResponse.data!)
             .build()

            var tx2 = Transaction.paymentTransactionBuilder().setSender(sender.getAddress())
              .amount(11000000)
              .receiver(receiver2)
              .note("Swift Algo sdk is cool".bytes)
              .suggestedParams(params: paramResponse.data!)
              .build()
            var transactions=[tx1,tx2]
            var gid = try! TxGroup.computeGroupID(txns: transactions)
            var signedTransactions:[SignedTransaction?]=Array(repeating: nil, count: transactions.count)
            for i in 0..<transactions.count{
                transactions[i].assignGroupID(gid: gid)
                signedTransactions[i]=sender.signTransaction(tx: transactions[i])
            }
            self.makeAtomicTransfer(signedTransactions: signedTransactions, algodClient: algodClient,functionToCall: functionToCall)

        }
    }
We simply create the two payment transactions in the function above and comput their Group Id, this is what identifies both transactions as belonging to the same group when sent to the network
we then sign both transactions and send them to the makeAtomicTransfer function.
public func makeAtomicTransfer(signedTransactions:[SignedTransaction?],algodClient:AlgodClient,functionToCall: @escaping (String)->Void){
        var encodedTrans:[Int8]=Array()
        for i in 0..<signedTransactions.count{
            encodedTrans = encodedTrans+CustomEncoder.encodeToMsgPack(signedTransactions[i])
        }


                algodClient.rawTransaction().rawtxn(rawtaxn: encodedTrans).execute(){
                   response in
                    if(response.isSuccessful){
                        functionToCall(response.data!.txId)
                    }else{
                        functionToCall(response.errorDescription!)
                    }

                }
    }
the makeAtomicTransfer function simply computes the messagepack of both signed transactions and sends them to the network. the waitForTransactions method is used to wait till the transaction has been confirmed by the network.
Algorand Smart Contract
Algorand Smart Contracts (ASC1) are small programs written in an assembly-like language that can be used as a replacement for signatures within a transaction. The language of Algorand Smart Contracts is named Transaction Execution Approval Language or TEAL.
We will use the Split Template to see how this works. Templates are prebuilt TEAL programs that allow parameters to be injected into them from the SDKs that configure the contract.
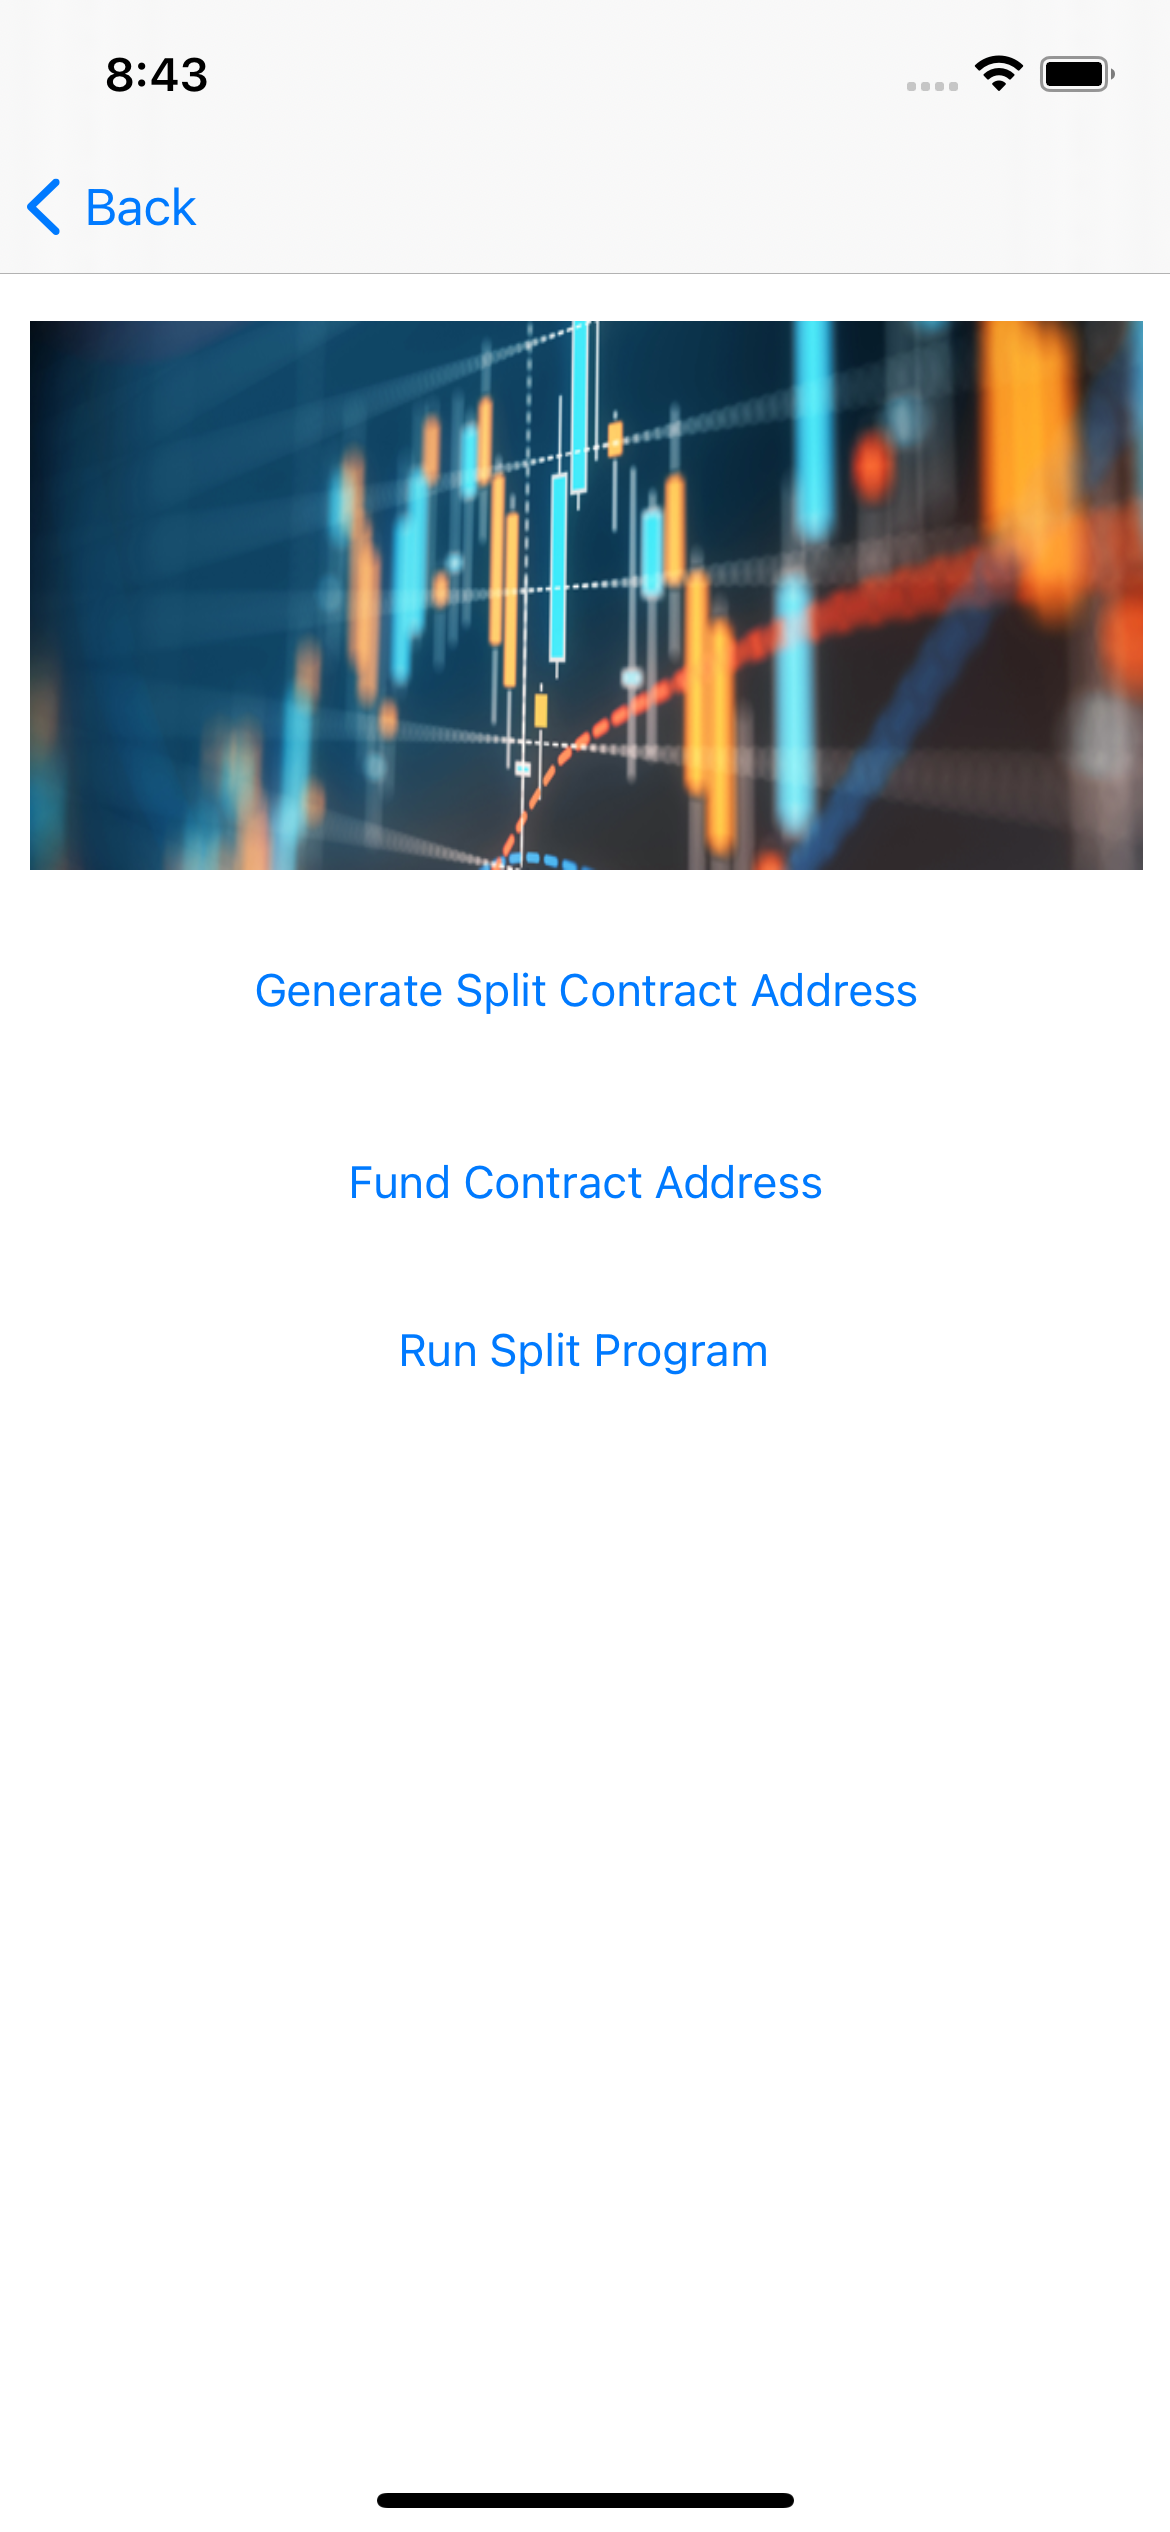
The code for the screen above can be found in SmartContractController.swift file, you can click on the Generate Split Contract Address Button, this will generate a Split contract address having account1 as the owner and account2 as receiver1 and account3 as receiver2, the address is automatically copied to the clipboard and is shown in a text at the bottom of the screen.
Clicking on the Fund Account will take you to the appropriate dispenser allowing you to fund the contract address.
The code for Generating the split address can be found below
 @IBAction func generateSplitContractAddress(_ sender: Any) {
        var owner =  Config.account1!.getAddress()
        var receiver1 =  Config.account2!.getAddress()
        var receiver2 =  Config.account3!.getAddress()
                   // Addition Inputs to the Template
            var expiryRound = 5000000;
            var maxFee = 2000;
            var minPay = 3000;
            var ratn = 3;
            var ratd = 7;


             split=try! Split.MakeSplit(owner: owner, receiver1: receiver1, receiver2: receiver2, rat1: ratn, rat2: ratd, expiryRound: expiryRound, minPay: minPay, maxFee: maxFee)
        print(split!.address.description)
        infoLabel.text="Contract Address: \(split!.address.description)"
    }
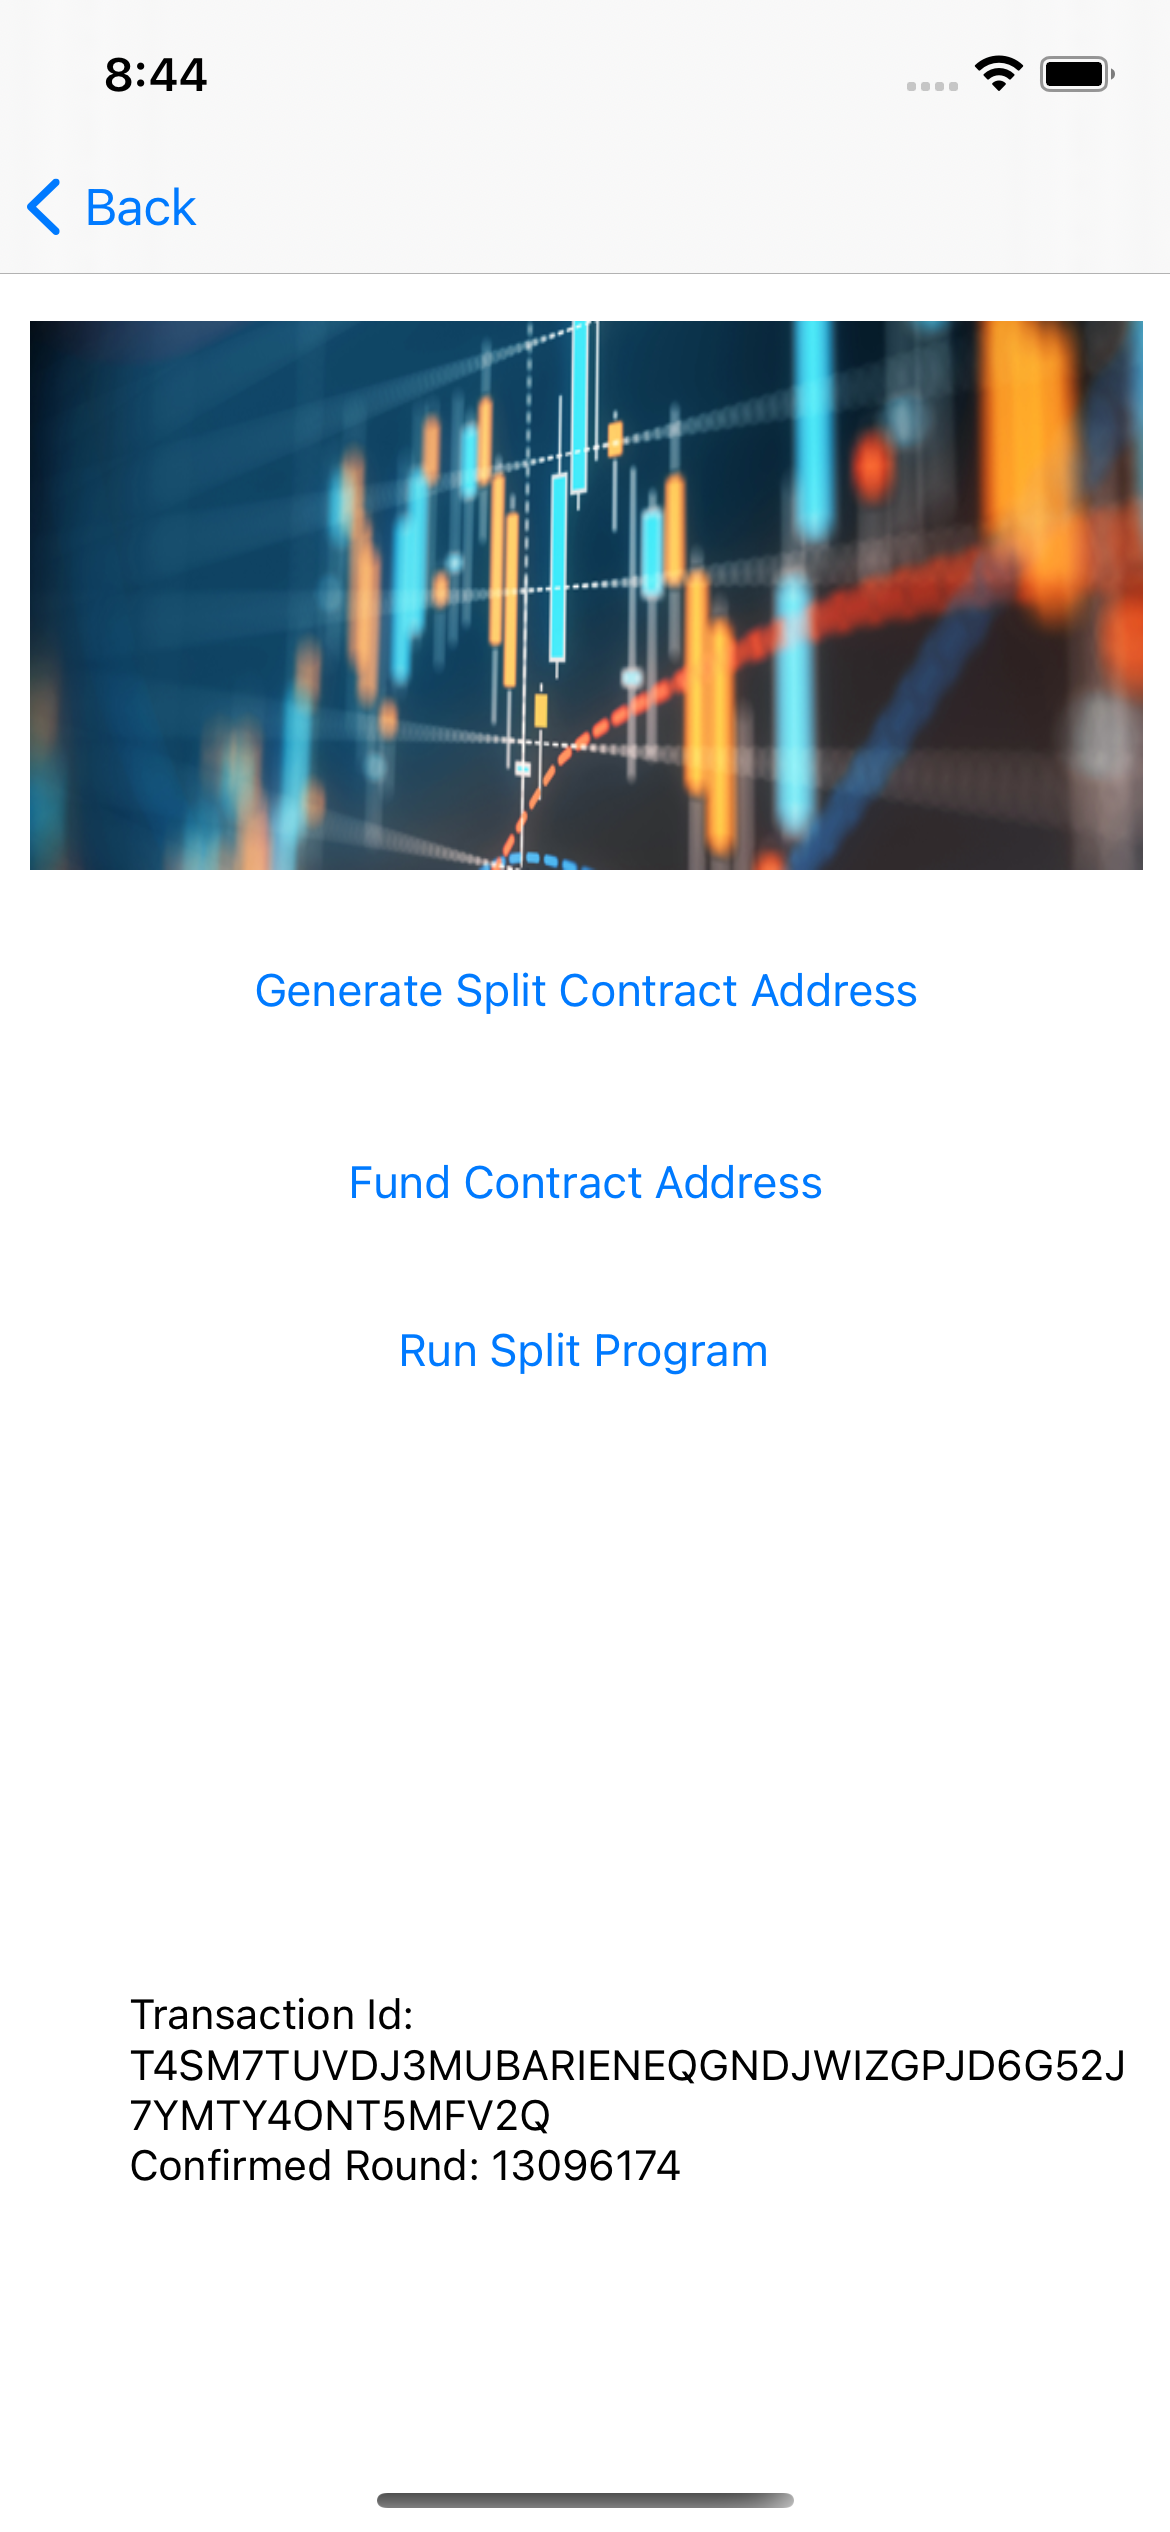
Clicking on the Run Split Program button to run the split program runs the program by passing in the amount to the contract, creating the respective transactions for the program and sending it as an atomic transaction to the network, and waiting for the transaction to be confirmed.It further shows the transaction id and the confirmed round in a text at the bottom of the screen.
The code responsible for this can be found below:
func runSplitProgram(algodClient:AlgodClient) throws{
        showLoader()
        if let split=self.split{
        var contractProgram=split.program

            algodClient.transactionParams().execute(){ paramResponse in
                if(!(paramResponse.isSuccessful)){
                print(paramResponse.errorDescription);
                    self.hideLoader()
                return;
                }
                var loadedContract =  ContractTemplate(prog: contractProgram);
                      var transactions = try! Split.GetSplitTransactions(
                        contract: loadedContract,
                        amount: 50000,
                        firstValid:paramResponse.data!.lastRound!,
                        lastValid: paramResponse.data!.lastRound!+500,
                        feePerByte: 1,
                        genesisHash: Digest(paramResponse.data!.genesisHash));
                algodClient.rawTransaction().rawtxn(rawtaxn: transactions).execute(){
                   response in
                    if(response.isSuccessful){
                        print(response.data!.txId)
                        self.infoLabel.text="Transaction Id: \(response.data!.txId)"
                        UIPasteboard.general.string=response.data!.txId
                        self.waitForTransaction(algodClient: algodClient, txId: response.data!.txId){confirmedRound in
                            self.infoLabel.text="Transaction Id: \(response.data!.txId) \nConfirmed Round: \(confirmedRound!)  "
                            self.hideLoader()
                        }
                    }else{
                        print(response.errorDescription)
                        self.infoLabel.text=response.errorDescription!
                        self.hideLoader()
                    }
            }
            }
        }
    }
Rekey Transaction
Rekeying is a powerful protocol feature which enables an Algorand account holder to maintain a static public address while dynamically rotating the authoritative private spending key(s). This is accomplished by issuing a “rekey-to transaction” which sets the authorized address field within the account object. Future transaction authorization using the account’s public address must be provided by the spending key(s) associated with the authorized address which may be a single key address, MultiSig address or LogicSig program address. Code can be found in Rekey.xml.cs in the folloeing events.
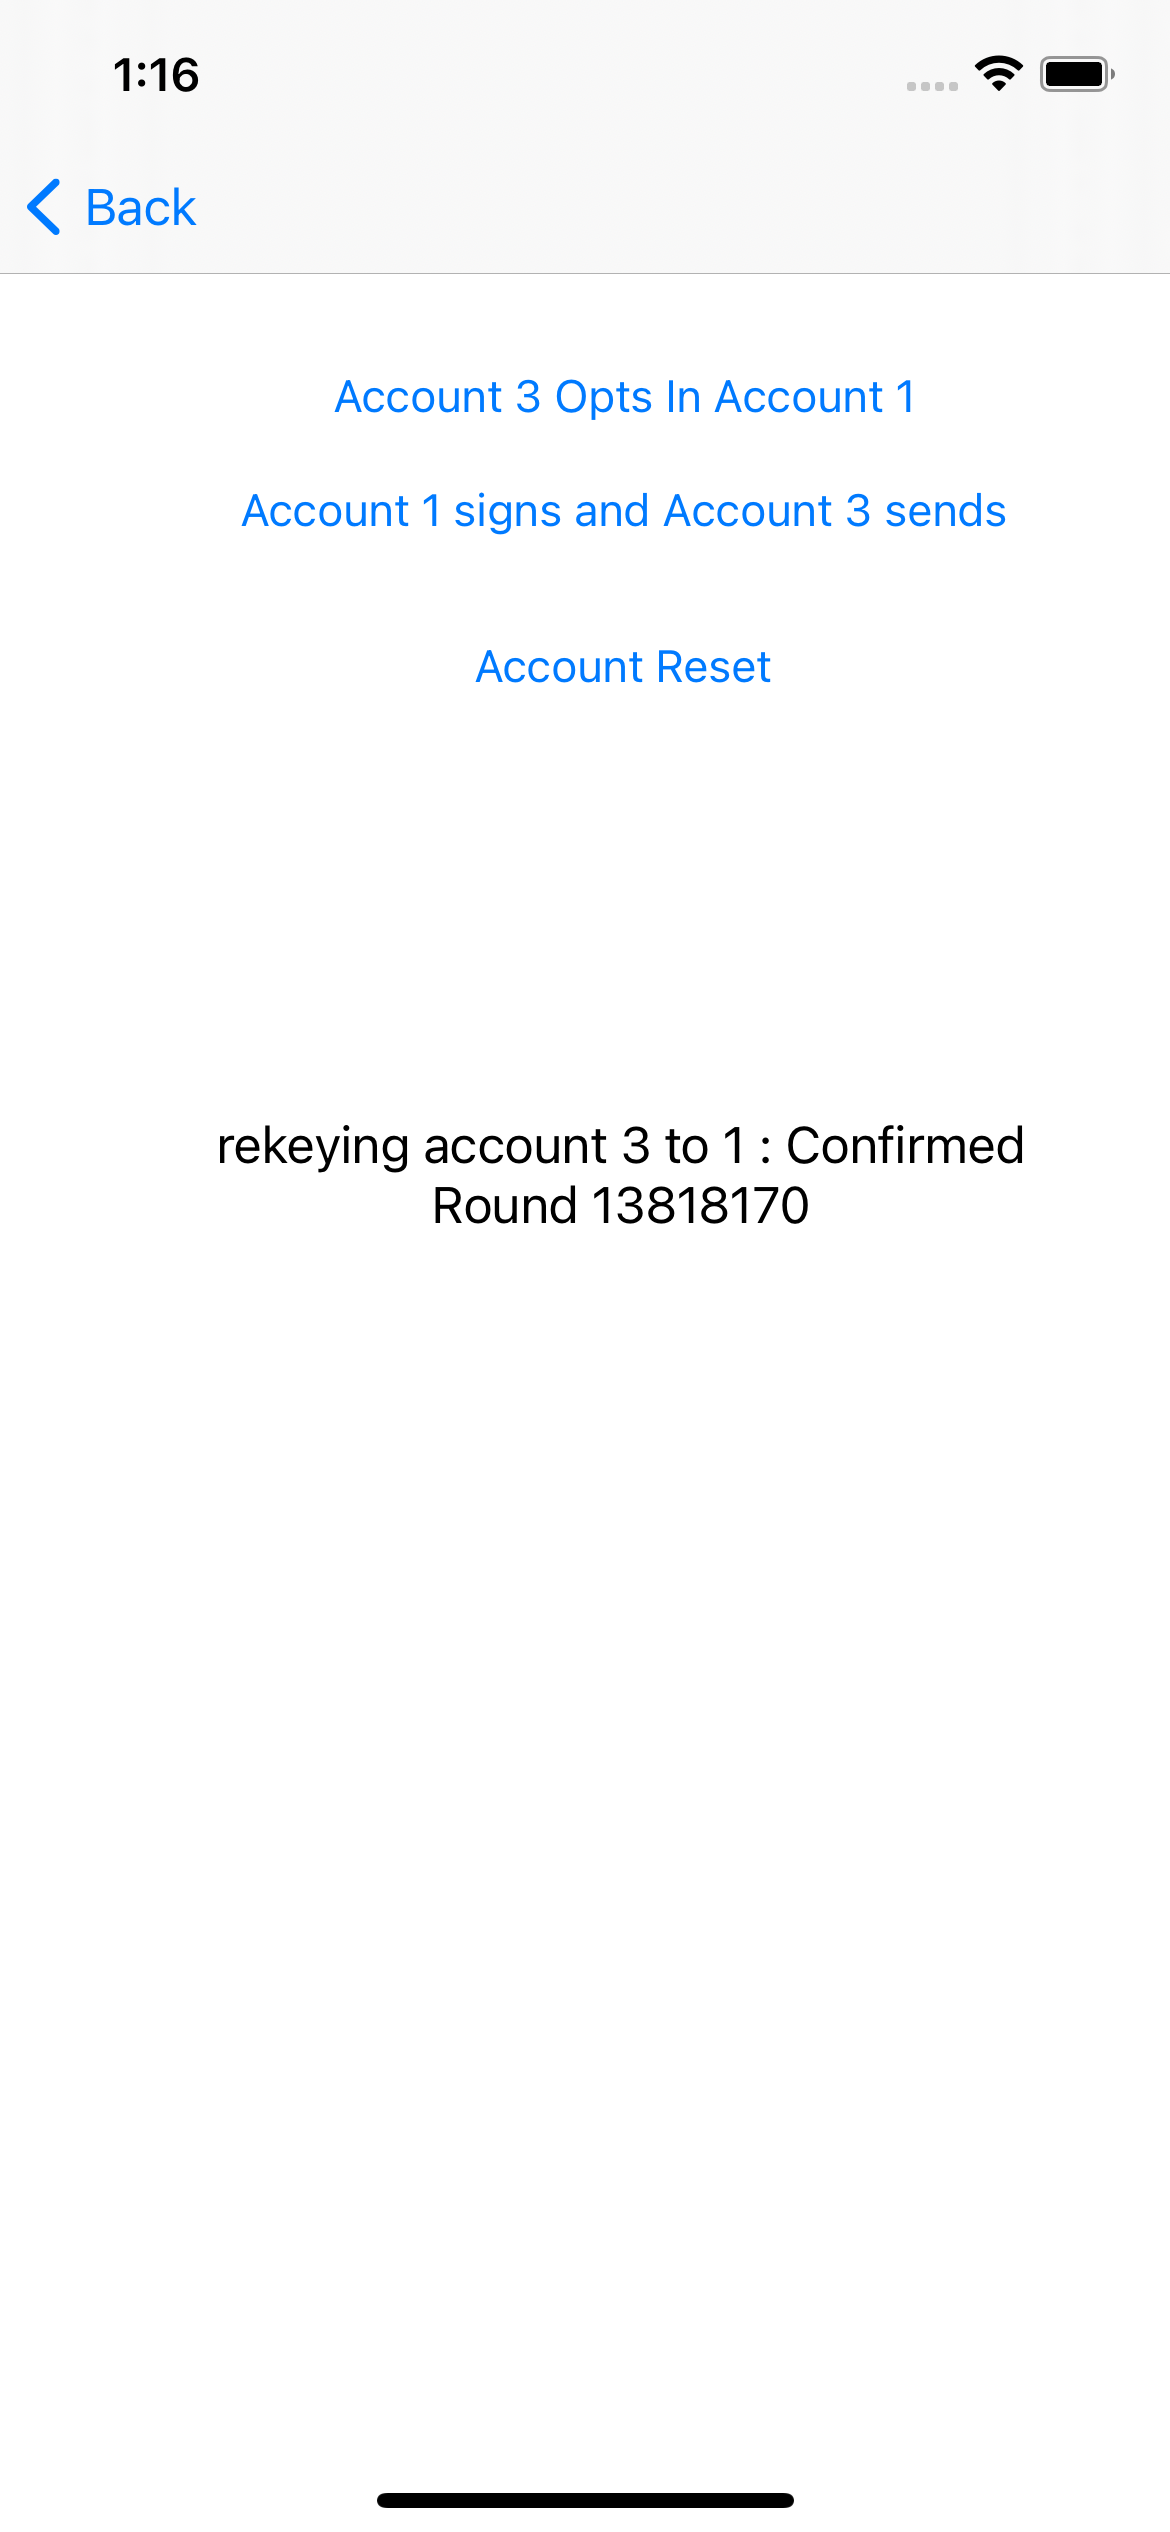
The RekeyViewController file contains the code for the page above, it gives us access to three buttons, which allow’s the rekeying of account3 to account1, perform a transaction from account3 with account1 being the signer, reset the rekey transactio so that account3 can sign it’s transactions once again.
Lets look at the code responsible for this:
1. Rekey accout 3 to 1
  @IBAction func rekeyAccount3toAccount1(_ sender: Any) {
        showLoader()
        var info = ""
        infoLabel.text = "rekeying account 3 to 1 : Confirmed Round ..."

        var account3Address = Config.account3?.address
        var account1Address = Config.account1?.address
        Config.algodClient!.transactionParams().execute(){ paramResponse in
            if(!(paramResponse.isSuccessful)){
            print(paramResponse.errorDescription);
                self.hideLoader()
                self.infoLabel.text = "rekeying account 3 to 1 error: \(paramResponse.errorMessage)"
            return;
        }


            var tx = try! Transaction.paymentTransactionBuilder().setSender(account3Address!)
                .receiver(account3Address!)
            .amount(0)
            .note("Swift Algo rekey transaction".bytes)
            .suggestedParams(params: paramResponse.data!)
            .rekey(rekeyTo: account1Address!)
            .build()


            var signedTransaction = Config.account3!.signTransaction(tx: tx)

            var encodedTrans:[Int8]=CustomEncoder.encodeToMsgPack(signedTransaction)


            Config.algodClient!.rawTransaction().rawtxn(rawtaxn: encodedTrans).execute(){
               response in
                if(response.isSuccessful){
                    print(response.data!.txId)
                    UIPasteboard.general.string="\(response.data!.txId)"
                    self.waitForTransaction(algodClient: Config.algodClient!, txId: response.data!.txId){ confirmedRound in
                        self.hideLoader()
                        print("Confirmed Round : \(confirmedRound)")

                        if let confRound = confirmedRound{
                            self.infoLabel.text = "rekeying account 3 to 1 : Confirmed Round \(confRound)"
                        }

                    }
                }else{
                    self.hideLoader()
                    print(response.errorDescription)
                    self.infoLabel.text = "rekeying account 3 to 1 error: \(response.errorMessage)"
                    print("Failed")
                }

            }
        }
    }
All that does the magic in the code above is for account3’s address to be the sender of the transaction while account1’s address is the rekeyTo Value of the transaction and then the transaction is signed by account3.
- Make Transaction with rekeyed account
  @IBAction func makeTransactionWithRekeyedAccount(_ sender: Any) {

        infoLabel.text = "Making transaction with rekeyed account : Confirmed Round ..."

        showLoader()
        var account3Address = Config.account3?.address
        var account1Address = Config.account1?.address
        Config.algodClient!.transactionParams().execute(){ paramResponse in
            if(!(paramResponse.isSuccessful)){
            print(paramResponse.errorDescription);
                self.hideLoader()
                self.infoLabel.text = "Making transaction with rekeyed accounterror: \(paramResponse.errorMessage)"
            return;
        }


            var tx = try! Transaction.paymentTransactionBuilder().setSender(account3Address!)
                .receiver(account1Address!)
            .amount(1000000)
            .note("Swift Algo send transaction after rekey".bytes)
            .suggestedParams(params: paramResponse.data!)
            .build()


            var signedTransaction = Config.account1!.signTransaction(tx: tx)

            var encodedTrans:[Int8]=CustomEncoder.encodeToMsgPack(signedTransaction)


            Config.algodClient!.rawTransaction().rawtxn(rawtaxn: encodedTrans).execute(){
               response in
                if(response.isSuccessful){
                    print(response.data!.txId)
                    UIPasteboard.general.string="\(response.data!.txId)"
                    self.waitForTransaction(algodClient: Config.algodClient!, txId: response.data!.txId){ confirmedRound in
                        print("Confirmed Round : \(confirmedRound)")
                        if let confRound = confirmedRound{
                            self.infoLabel.text = "Making transaction with rekeyed account : Confirmed Round \(confRound)"
                        }

                        self.hideLoader()
                    }
                }else{
                    self.hideLoader()
                    print(response.errorDescription)
                    self.infoLabel.text = "Making transaction with rekeyed accounterror: \(response.errorMessage)"
                    print("Failed")
                }

            }
        }

    }
For the code above, the mahjor things to note is that account3’s address is still the sender of the transaction but the transaction is signed by account1 since account3 was rekeyed to account1
3.Reset Transaction
  @IBAction func resetAccounts(_ sender: Any) {

        infoLabel.text = "Resetting rekeyed account : Confirmed Round ..."


        showLoader()
        var account3Address = Config.account3?.address
        var account1Address = Config.account1?.address

        print(account3Address?.description)
        Config.algodClient!.transactionParams().execute(){ paramResponse in
            if(!(paramResponse.isSuccessful)){
            print(paramResponse.errorDescription);
                self.infoLabel.text = "Resetting rekeyed account error : \(paramResponse.errorMessage)"
                self.hideLoader()
            return;
        }


            var tx = try! Transaction.paymentTransactionBuilder().setSender(account3Address!)
                .receiver(account3Address!)
                .amount(0)
                .note("Swift Algo reset rekey transaction".bytes)
                .suggestedParams(params: paramResponse.data!)
                .rekey(rekeyTo: account3Address!)
                .build()


            var signedTransaction = Config.account1!.signTransaction(tx: tx)

            var encodedTrans:[Int8]=CustomEncoder.encodeToMsgPack(signedTransaction)


            Config.algodClient!.rawTransaction().rawtxn(rawtaxn: encodedTrans).execute(){
               response in
                if(response.isSuccessful){
                    print(response.data!.txId)
                    UIPasteboard.general.string="\(response.data!.txId)"
                    self.waitForTransaction(algodClient: Config.algodClient!, txId: response.data!.txId){ confirmedRound in
                        print("Confirmed Round : \(confirmedRound)")
                        if let confRound = confirmedRound{
                            self.infoLabel.text = "Resetting rekeyed account : Confirmed Round: \(confRound)"
                        }
                        self.hideLoader()
                    }
                }else{
                    print(response.errorDescription)
                    print("Failed")
                    self.infoLabel.text = "Resetting rekeyed account error : \(response.errorMessage)"
                    self.hideLoader()
                }

            }
        }
    }
Lastly, we reset the rekey, same process with rekeying but we make account3 the rekeyTo address now and then sign the transaction with account1.
For more information on rekeying, feel free to check out this tutorial here
Indexer
The Algorand Indexer is a feature that enables searching the blockchain for transactions, assets, accounts, and blocks with various criteria. The following code for various queries can be found in IndexerViewController.swift file in the following event handlers. There are many examples and filters on index searches, these are just a few below. Details can be found here.
The code to instanciate the Indexer Deamon looks similar to this below. Here we are using Purestake API Indexer service.
indexerClient=IndexerClient(host: Config.PURESTAKE_INDEXER_API_ADDRESS, port: Config.PURESTAKE_API_PORT, token: Config.PURESTAKE_API_KEY)
indexerClient!.set(key:"X-API-Key")
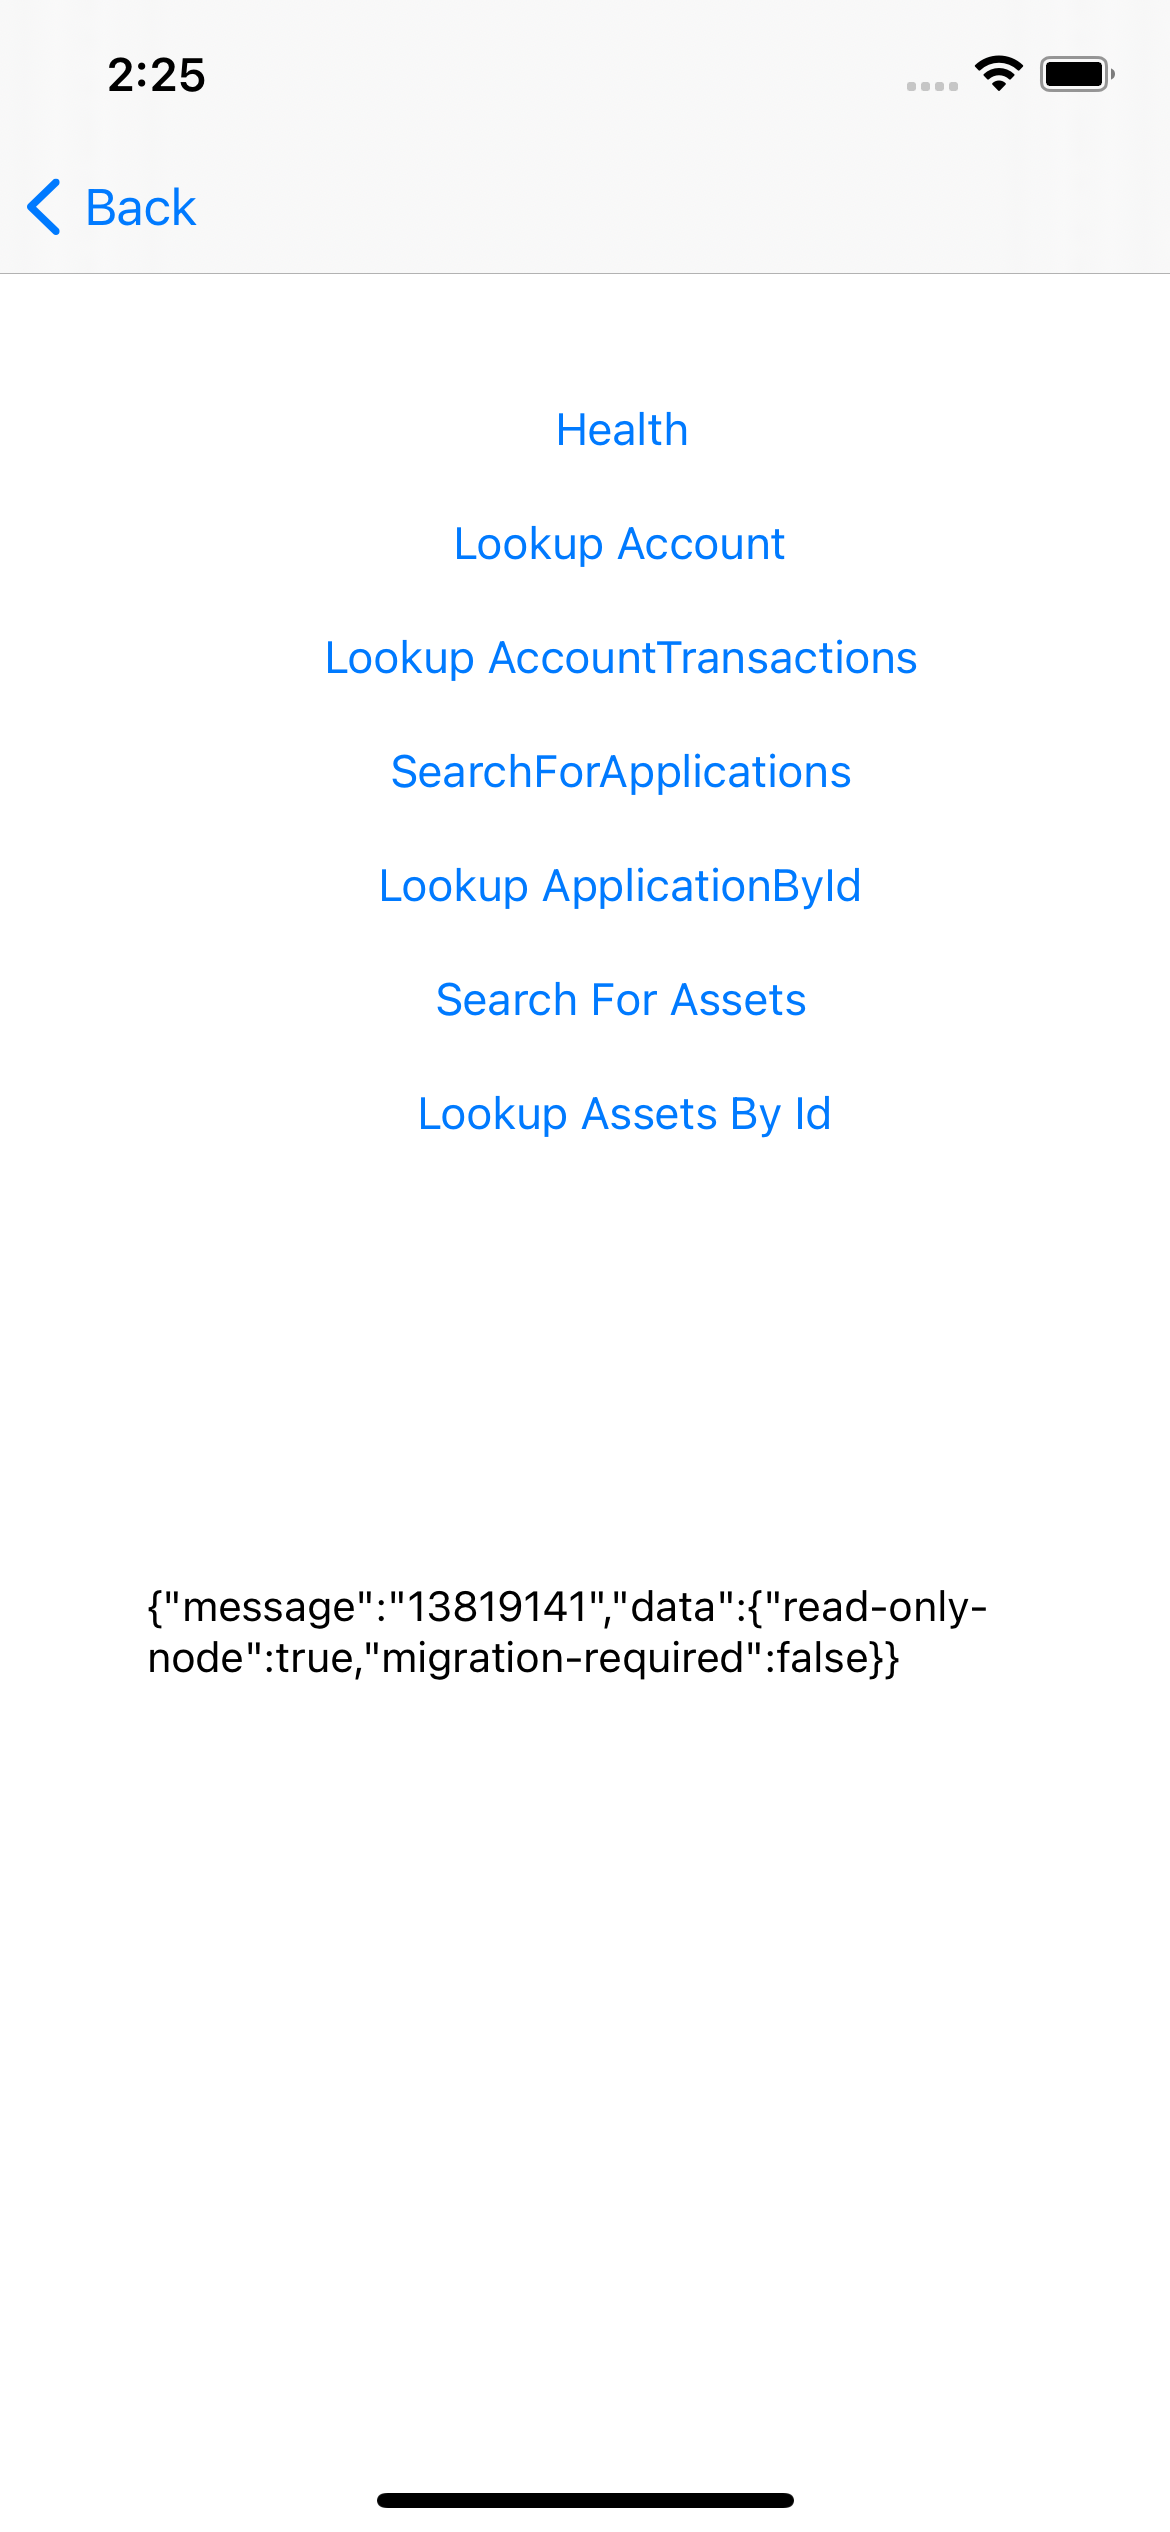
Health
   @IBAction func lookUpHealthInfo(_ sender: Any) {
        indexerClient!.makeHealthCheck().execute(){ response in
                if response.isSuccessful{
                    print(response.data!.toJson()!)
                    self.infoText.text = response.data!.toJson()!
                }else{
                    print(response.errorDescription)
                }
    }
    }
Output should look similar to
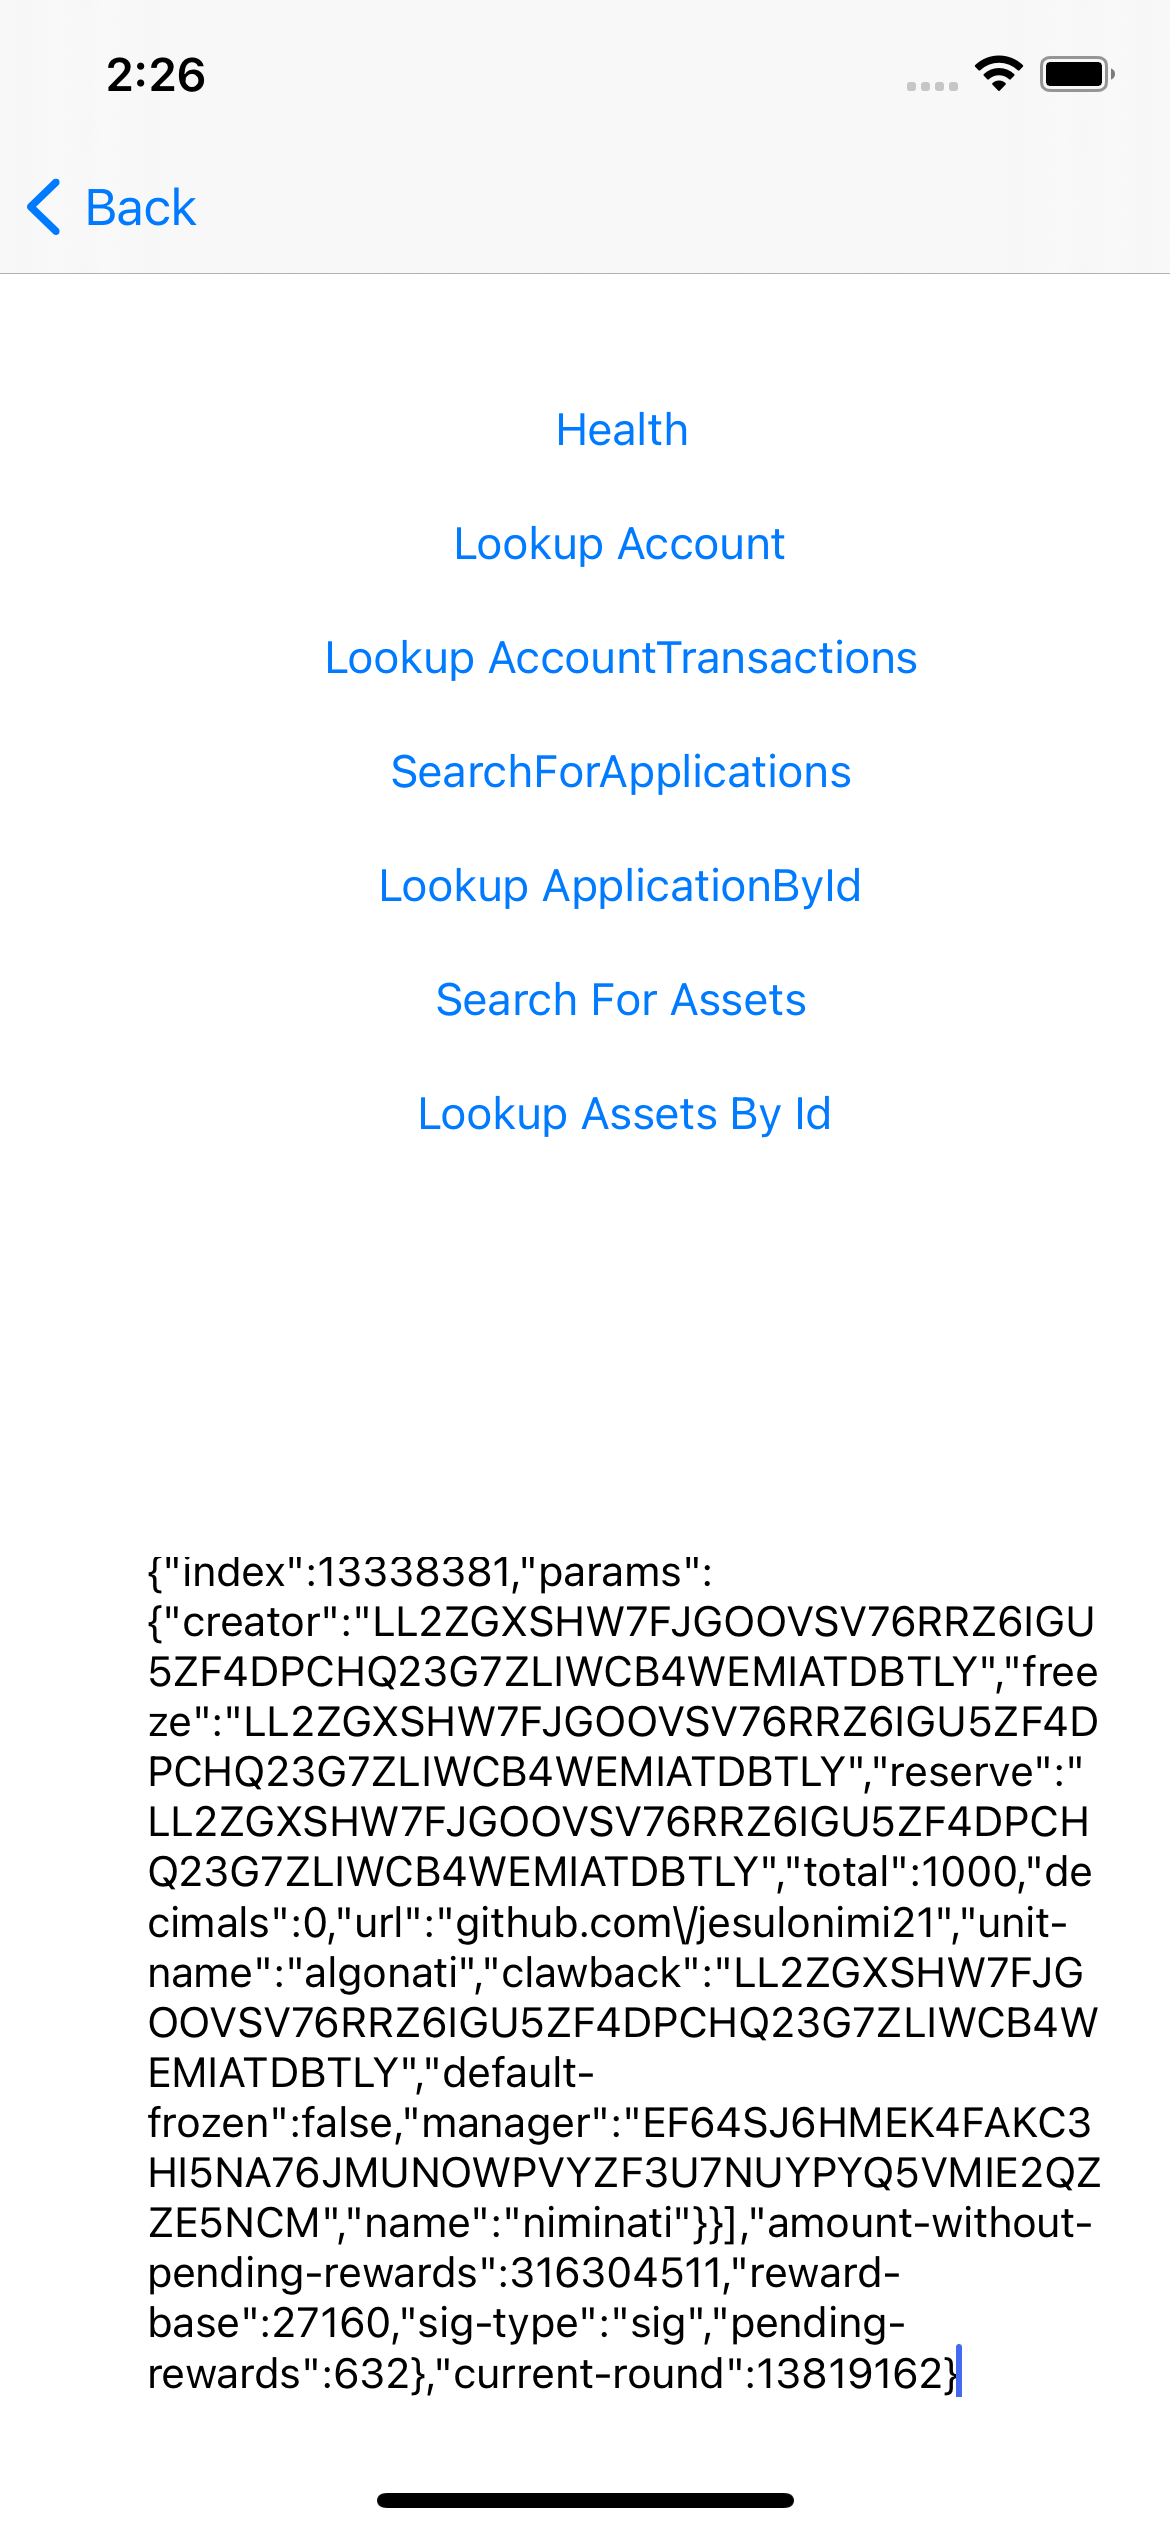
Lookup Account by ID
 @IBAction func lookUPAccountInfo(_ sender: Any) {
        indexerClient!.lookUpAccountById(address: "LL2ZGXSHW7FJGOOVSV76RRZ6IGU5ZF4DPCHQ23G7ZLIWCB4WEMIATDBTLY").execute(){response in

                if response.isSuccessful{
                        print("success")
                    print(response.data!.toJson()!)
                    self.infoText.text = response.data!.toJson()!
                }else{
                    print(response.errorDescription)
                }
    }
    }
Output should look similar to
Lookup Account Transactions
indexerClient!.lookUpAccountTransactions(address: "LL2ZGXSHW7FJGOOVSV76RRZ6IGU5ZF4DPCHQ23G7ZLIWCB4WEMIATDBTLY").execute(){response in
                if response.isSuccessful{
                        print("success")
                    print(response.data!.toJson()!)
                    self.infoText.text = response.data!.toJson()!
                }else{
                    print(response.errorDescription)
                }
            }
Output should look similar to
![]()
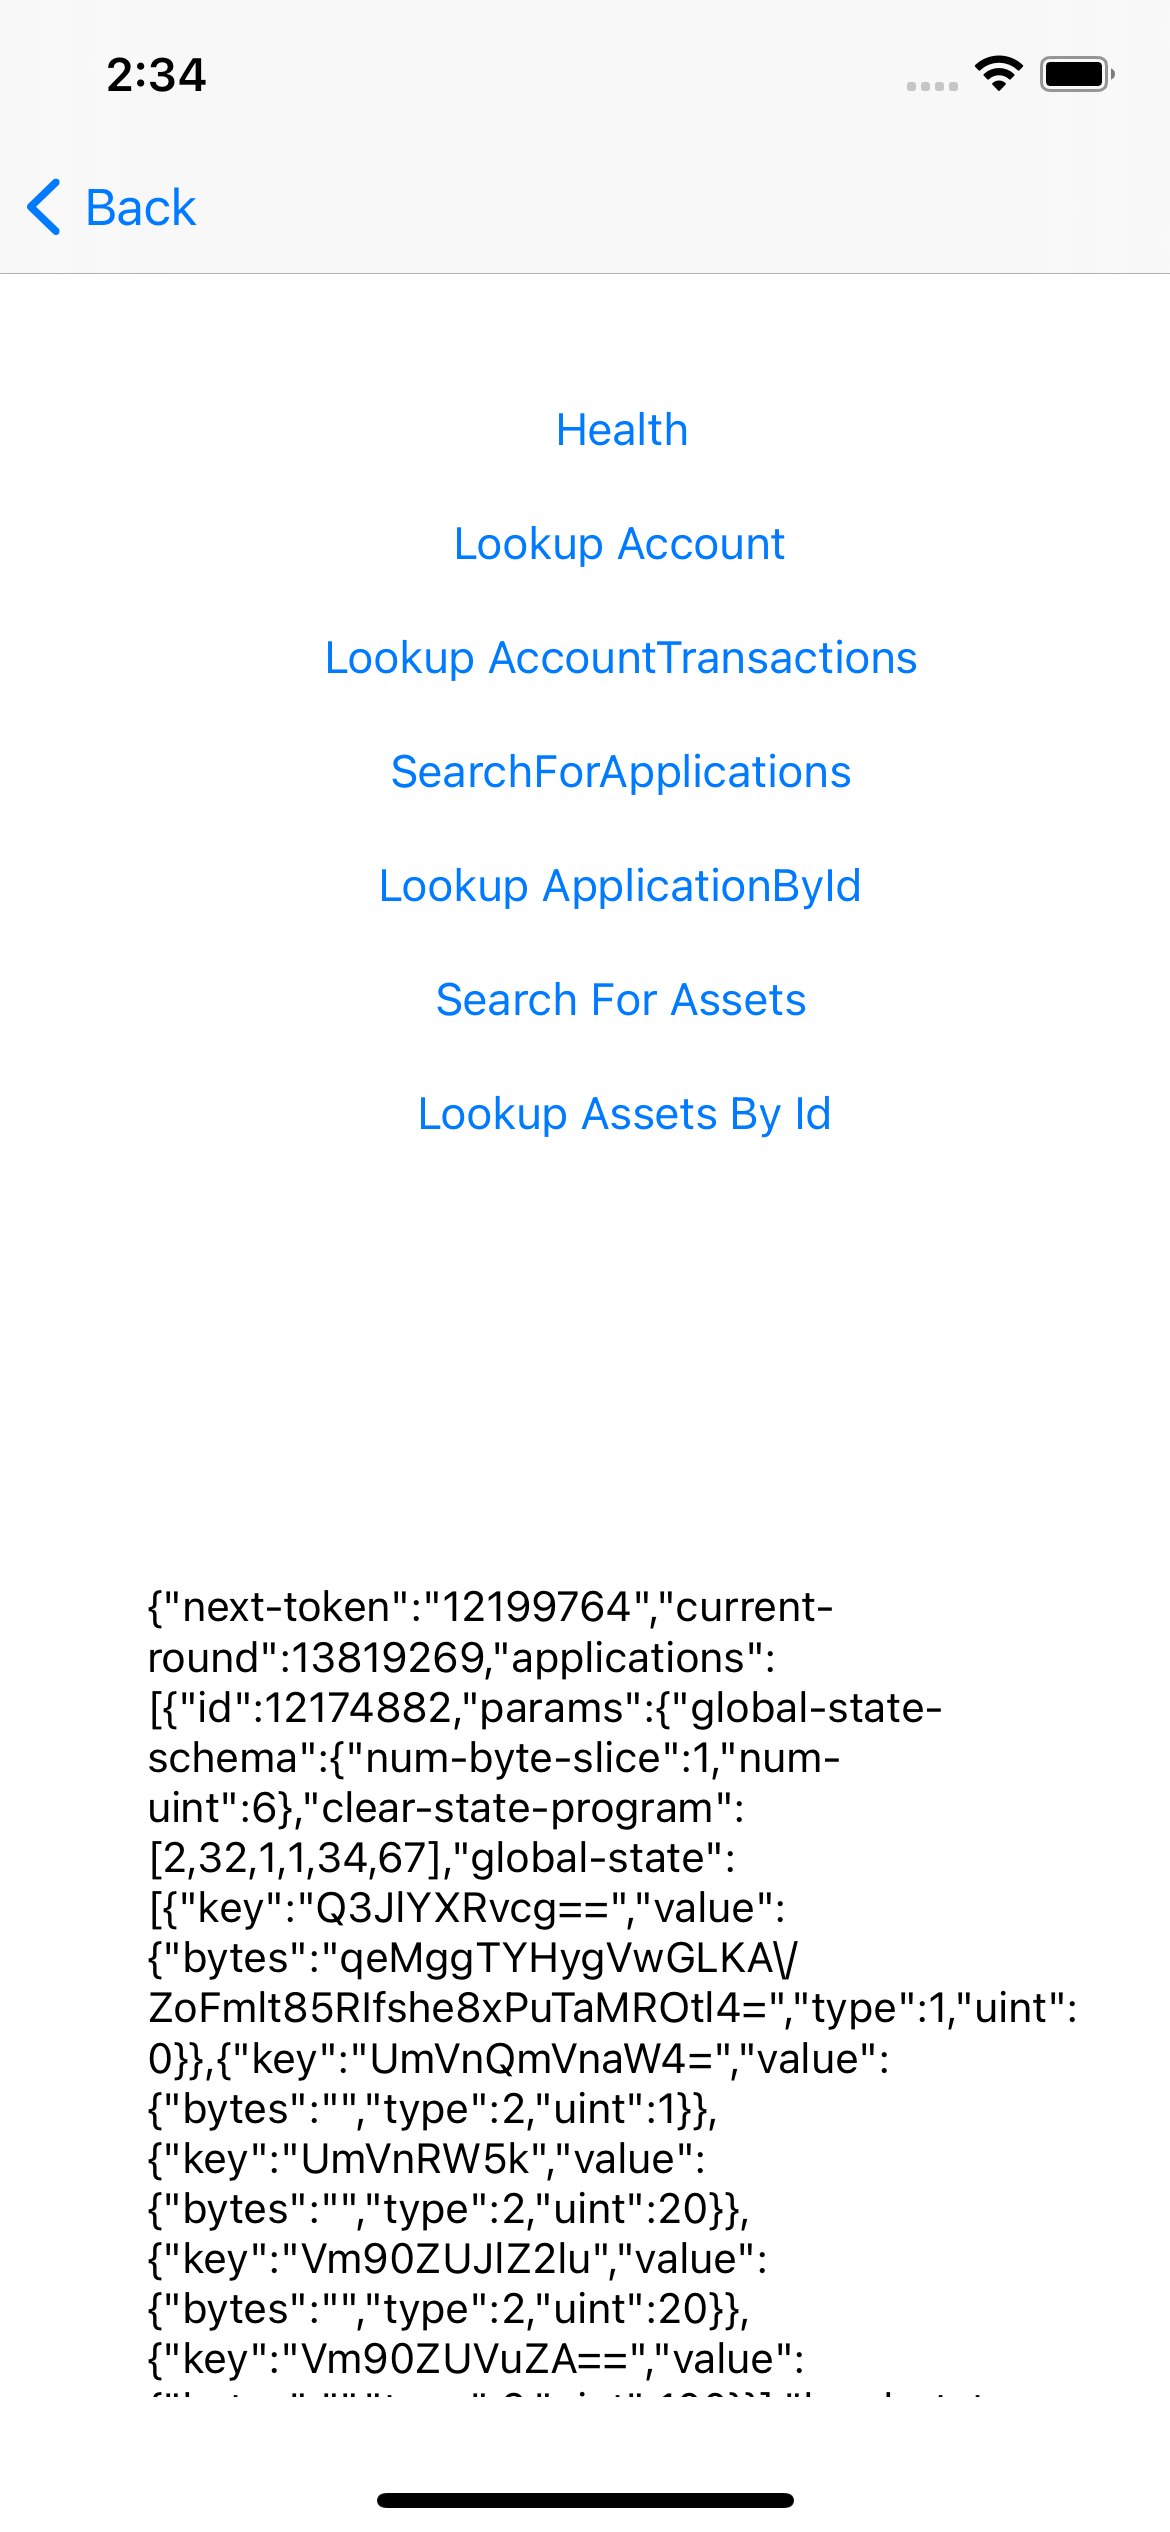
Search For Applications
@IBAction func searchForApplications(_ sender: Any) {
        indexerClient!.searchForApplications().execute(){ response in
                if response.isSuccessful{
                    print(response.data!.toJson()!)
                    self.infoText.text = response.data!.toJson()!
                }else{
                    print(response.errorDescription)
                }
            }
    }
Outputs should look similar to
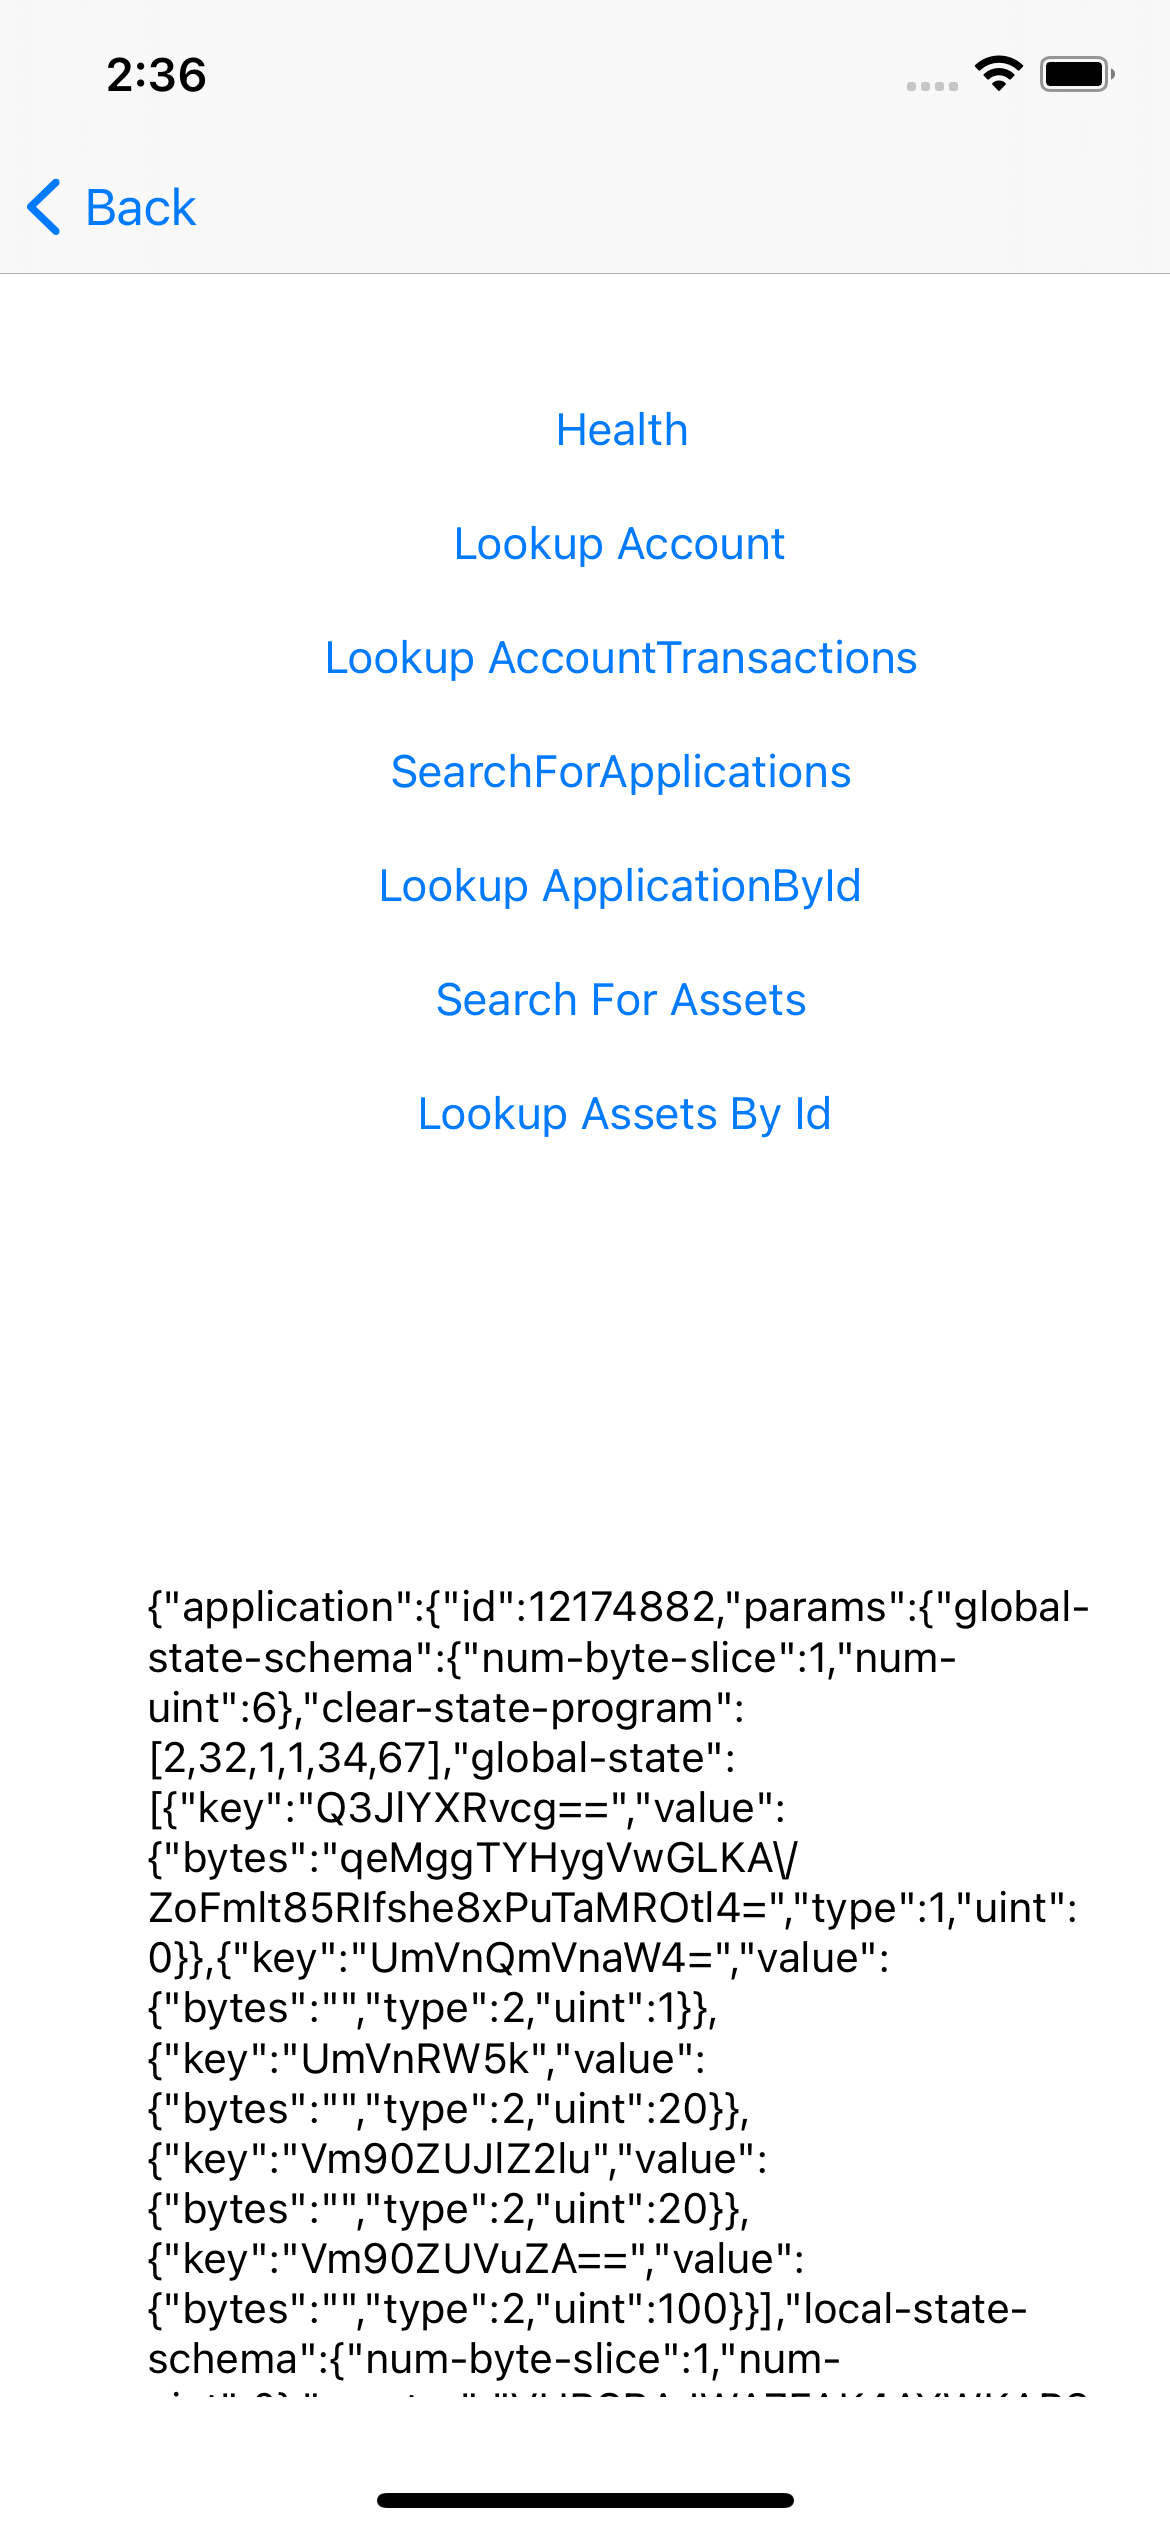
Lookup Application by ID
   @IBAction func lookupApplicationById(_ sender: Any) {
        indexerClient!.lookUpApplicationsById(id:12174882).execute(){ response in
               if response.isSuccessful{
                   print(response.data!.toJson()!)
                self.infoText.text = response.data!.toJson()!
               }else{
                   print(response.errorDescription)
               }
           }
    }
Outputs should look similar to
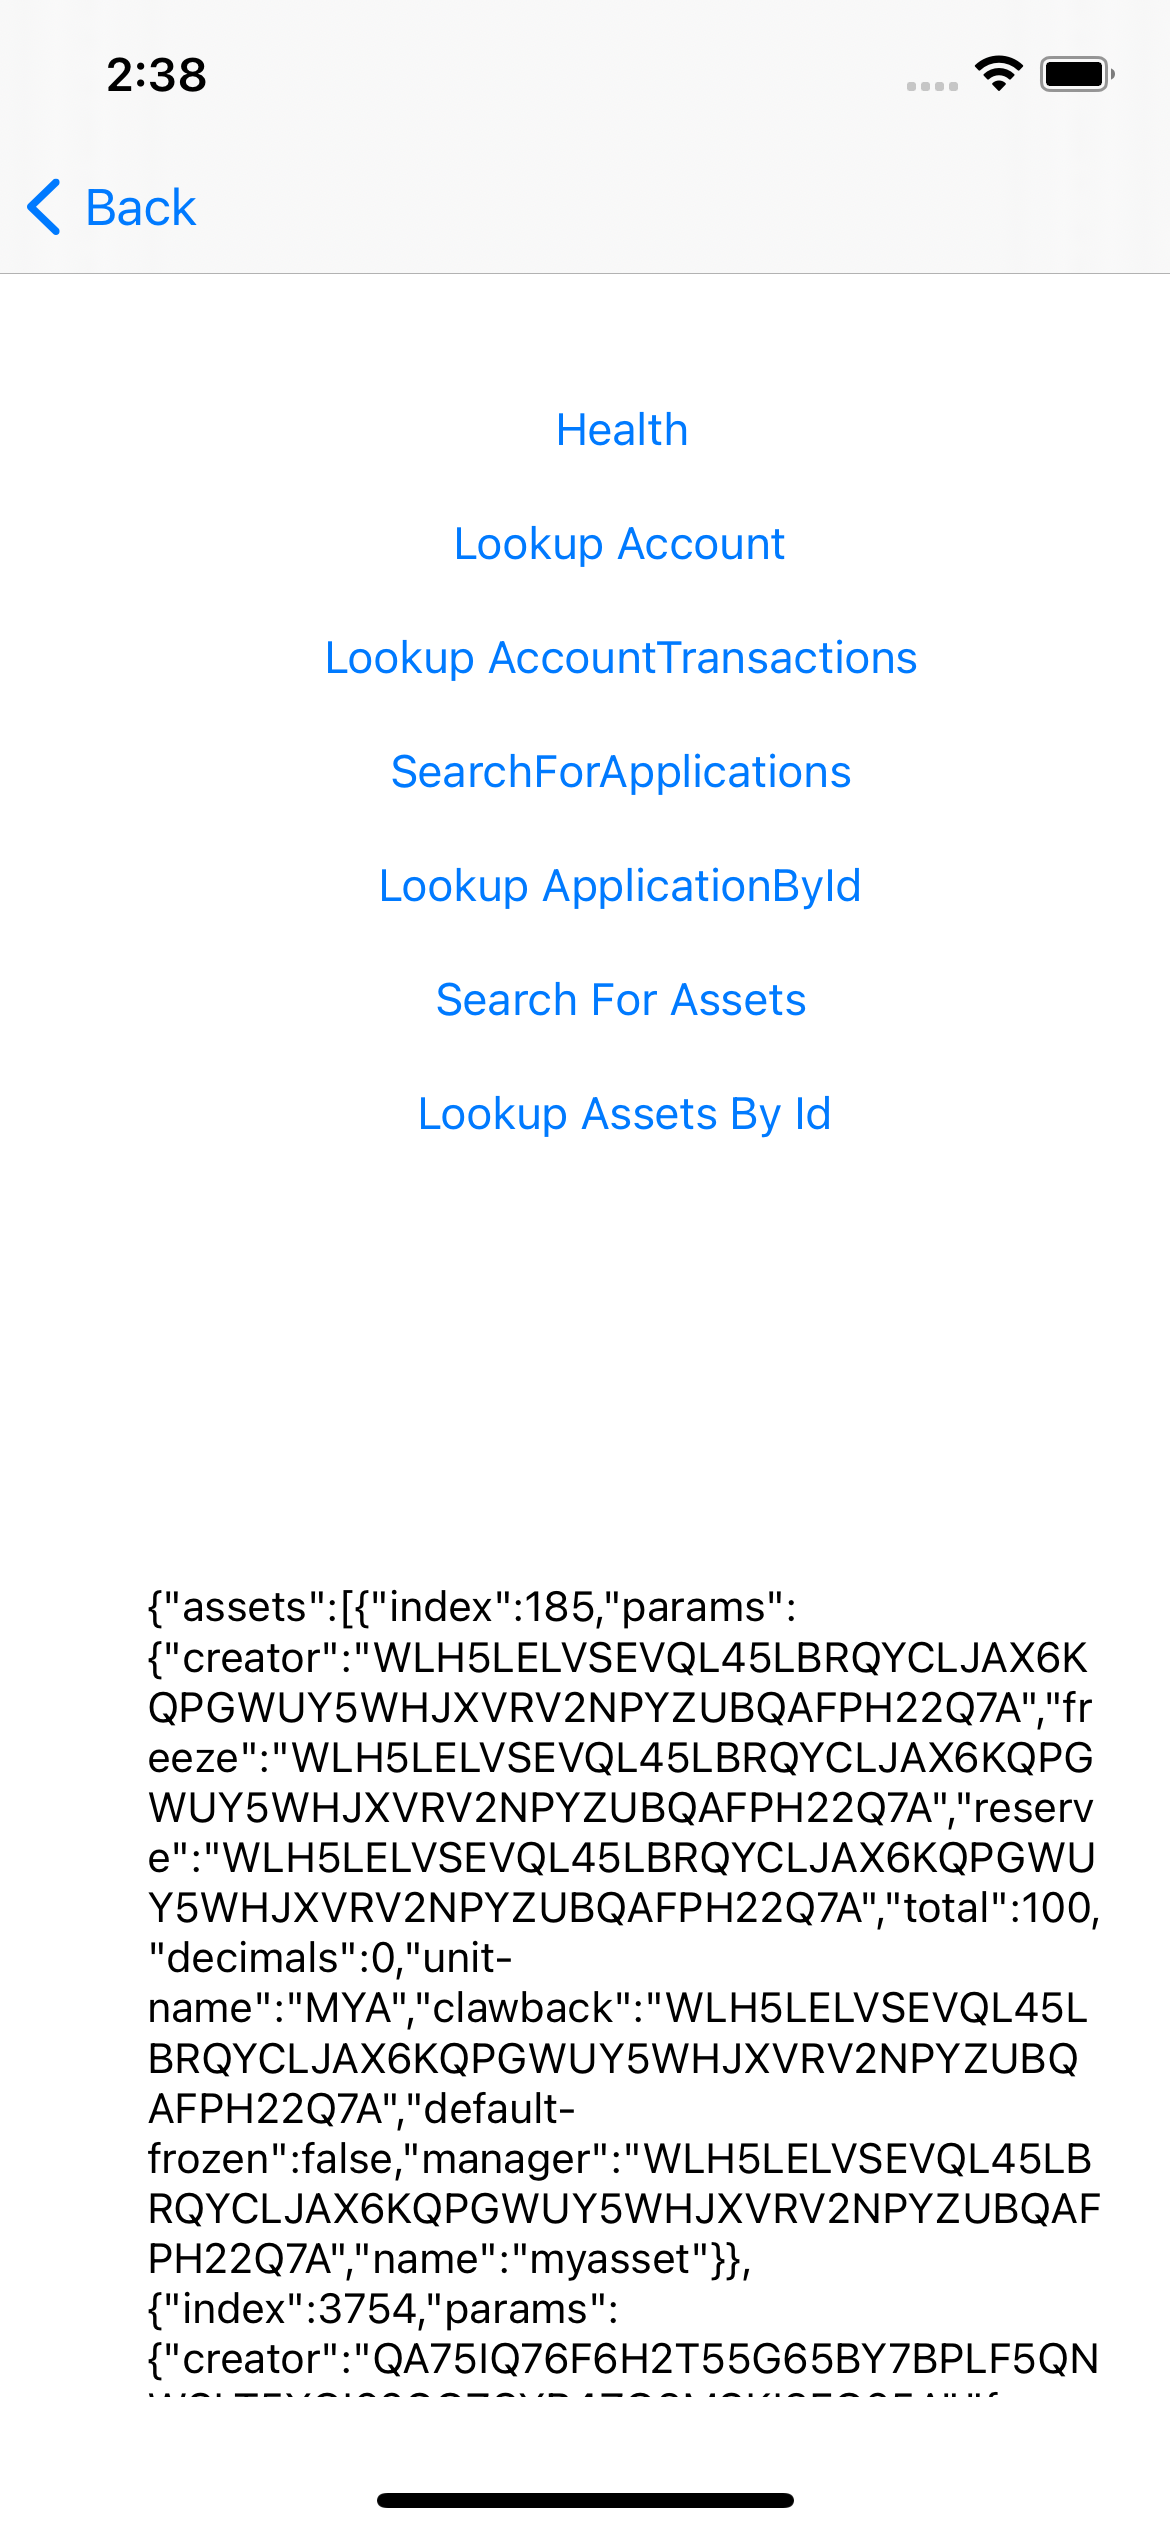
Search For Assets
 @IBAction func searchForAssets(_ sender: Any) {
        indexerClient!.searchForAssets().assetId(assetId:14077815).execute(){ response in
                if response.isSuccessful{
                    print(response.data!.toJson()!)
                    self.infoText.text = response.data!.toJson()!
                }else{
                    print(response.errorDescription)
                    print("Error");
                }
            }
    }
Outputs should look similar to
Lookup Asset by ID
   @IBAction func lookupAssetsById(_ sender: Any) {
        indexerClient!.lookUpAssetById(id:14077815).execute(){response in

                if response.isSuccessful{
                        print("success")
                    print(response.data!.toJson()!)
                    self.infoText.text = response.data!.toJson()!
                }else{
                    print(response.errorDescription)
                    print("Error");

                }
            }
    }
Outputs should look similar to

Things To Note
Secret keys were not stored in this app for the purpose of simplicity, while building your app, you should check out Keychain which is the recommended way to store secret keys in an ios app, you can also check out this article on storing secret keys in an ios project
Conclusion
This solution contains a lot of information you will need while trying to use the swift SDK, although this has been done specifically in the IOS environment, the code should work fine in any other swift environment. We reviewed the basics of getting a block and creating an account. Also, we covered Transactions and MultiSig transactions. Then we looked at another set of transactions for Algorand Standard Assets including SDK methods that Create, Change, Opt-In, Transfer, Freeze, Clawback, and Destroy Assets. Atomic transfers and Algorand Smart Contracts were also covered. Have fun building your next app, using Algorand!