Song Vote on Algorand - Create and deploy a fully functioning Dapp
This tutorial is made for programmers of all skill levels looking to get into web3 or development on the Algorand chain. All you’ll need is some basic knowledge of javascript, python, and smart contracts. You’ll pick the rest up. By the end, you will have an understanding of what the entire development pipeline looks like on Algorand and your own functioning dapp!
I don’t like getting caught up in formality. I’ll keep the tone of this tutorial relatively casual and focus more on creating a working product than getting bogged down in technicality.
Below are all the resources and repositories for this project. I created the project in Notion and then transferred it to the Algorand developer portal.

 JavaScript
Requirements
All you’ll need is a basic knowledge of javascript, python, github, and smart contracts. You’ll also need a Replit account (free). Head Here to make one.
Background
This is a comprehensive tutorial that will take you through the entire development pipeline on Algorand. By the end you will have a fully functioning Dapp that is deployed on the internet that anyone with an Algorand wallet can interact with.
Skills you will learn✅
- Setting up development environment
- Writing basic smart contracts using Python and compiling them using PyTeal
- Developing with the the Algorand testnet (connecting to nodes, faucets, switching networks)
- Interacting with a deployed smart contract on the frontend using javascript
- Setting up wallet connect and signing transactions with the walletconnect API
- Creating and deploying a basic react app to the internet using Replit
Roadmap🛣
- Steps 1-3: Introduction and setting up development environment
- Step 4: Setting up Purestake account so we can connect to the blockchain with a client
- Steps 5-7: Setting up, funding, and logging into Algorand account
- Step 8: Making your first transaction using the Javascript SDK
- Steps 9-11: Activating your virtual environment and writing your first PyTeal smart contract
- Steps 12-13: Deploying your contract to the Algorand testnet and then testing it using the Javascript SDK
- Step 14: Setting up Replit and deploying a basic website
- Step 15: Adding WalletConnect functionality so users can connect a wallet to your dapp and interact with your smart contract
- Steps 16-17: Adding functionality to the buttons on your UI and displaying the count on the UI by reading from global app state
- Steps 18-19: Upgrading your smart contract and deploying the new one
- Step 20: Updating Client app to match functionality from your new smart contract
- Steps 21-22: Wrapping up.
Steps
- 1. 🤙 Introductions
- 2. 👷️ What are you building?
- 3. 🧑💻 Setting up your development env
- 4. 🔗 Connecting to the blockchain
- 5. Creating an account
- 6. 💰 Funding your account with test Algo
- 7. 📲 Logging in on phone
- 8. 💸 Making your first Transaction
- 9. 🔨 Creating your first smart contract
- 10. Activating your Virtual Environment
- 11. ✍🏻 Writing the contract
- 12. 🚢 Deploying to the testnet
- 13. 🧪 Testing the contract
- 14. 🌐 React Client App
- 15. 💳 Adding wallet connectivity
- 16. ➕ Implementing Add and Deduct
- 17. 🧮 Adding count to the user interface
- 18. ⬆️ Upgrading our smart contract
- 19. 🚢 Deploying new contract
- 20. 🌐 Updating client app
- 21. 🖌️ CUSTOMIZE IT
- 22. ## Thanks, your’re awesome :)
1. 🤙 Introductions
Thanks for checking out my tutorial. My name is Antony. I’m a student at the University of Illinois studying Industrial Engineering & Computer Science.
This tutorial is made for programmers of all skill levels looking to get into web3 or development on the Algorand chain. All you’ll need is some basic knowledge of javascript, python, and smart contracts. You’ll pick the rest up. By the end, you will have an understanding of what the entire development pipeline looks like on Algorand and your own functioning dapp!
I don’t like getting caught up in formality. I’ll keep the tone of this tutorial relatively casual and focus more on creating a working product than getting bogged down in technicality.
Ok boring stuff out of the way, let’s jump in 🤪
2. 👷️ What are you building?
You will be building a website to vote on songs and music genres with others. Anyone with a link will be able to see your website and drop some their vote 🔥. All voting data will be stored on the Algorand chain within a smart contract. More generally, we are building a voting app that you can customize!
Throughout the tutorial I will encourage you to customize the project and make it your own.
This is my final product

If you want to drop a vote, head over to the website here. You will need an Algorand wallet.
3. 🧑💻 Setting up your development env
We need a place to write our code, deploy our smart contracts, and interact with the Algorand Blockchain.
Let’s start with your coding environment. Navigate to the folder in you would like to place your project in your terminal and clone the following repository.
Don’t worry if you don’t understand everything in the project folder. A lot of it is boilerplate code or package management. We’ll walk through the rest as we go along.
4. 🔗 Connecting to the blockchain
Cool, our coding environment is all set, but we’re still missing a piece. We can write the code for transactions and smart contracts, but how do we actually deploy those to the blockchain? We need a connection to the blockchain.
We are going to use a third party provider, Purestake, to allow us to interact with the Algorand blockchain.
<aside>
💡 There are other ways to do this. We could set up a Docker Sandbox or even run our own node. Those methods are slightly more involved however and only supported on mac and linux. They should be used for more advanced development, but a third party provider will be fine for this app. You can read more about the pros and cons here.
</aside>
Head to https://developer.purestake.io/ and register for an account. Don’t worry it’s free 😮💨.

Next, copy your API key and paste it in the .env project folder in place of YOUR API KEY HERE.
5. Creating an account
Ok great! We are all set to start developing. In order to do anything on Algorand blockchain we need an account. An account holds our address, assets, application data.
Let’s make one. Head to the scripts folder and open 1-create-account.js.
At the top:
import algosdk from "algosdk"
This will include the javascript algorand standard development kit in this file for use.
Then:
const myaccount = algosdk.generateAccount();
console.log("Account created. Save address & Mnemonic!");
console.log("Account Address = " + myaccount.addr);
let account_mnemonic = algosdk.secretKeyToMnemonic(myaccount.sk);
console.log("Account Mnemonic = "+ account_mnemonic);
That’s a lot. Let’s walk through what that means.
- We create an new account and save it in a variable using the algorand-js-sdk
const myaccount = algosdk.generateAccount();
- We print the account address and mnemonic so we can access
console.log("Account created. Save address & mnemonic!");
console.log("Account Address = " + myaccount.addr);
let account_mnemonic = algosdk.secretKeyToMnemonic(myaccount.sk);
console.log("Account Mnemonic = "+ account_mnemonic);
Cool. Let’s make the account. Run the following in terminal (make sure you’re in project folder):
node scripts/1-create-account
It should print an account address & mnemonic. Save these in your notes. Also, paste the mnemonic in the the .env file where it says YOUR MNEMONIC HERE. Never share this or your API key with anyone. Also don’t commit it to GitHub (I do this for you in the .gitignore folder).
You can run this as many times as you want, it will generate a new random account every time.
More info available at the Algorand docs here.
6. 💰 Funding your account with test Algo
Cool so we have an account. Unfortunately we are broke. Let’s fix that.
Head to to the faucet and input the wallet address you just saved and click dispense.
What are we doing? To do anything on the Algorand network we need currency. Because we are developing and not deploying a production level app, we don’t want to pay real money to develop. This is where the test net comes in. The test net mimics the Algorand blockchain, but instead of using real Algo it uses test Algo which we get from a faucets like this one!
7. 📲 Logging in on phone
Interacting with your wallet through strictly code can be tedious. You could check your balance using some javascript, but who wants to do that?
Let’s download a wallet that gives us a user interface
Get out your phone and search up “Pera Wallet” on the app store.

It looks like this. Once it’s downloaded, open it, press the plus, and then press “Recover with Passphrase”. Input the mnemonic that we just saved. That should unlock the wallet you just created using javascript. Pretty cool.
😰 Oops! You still have no money in your wallet. You have to switch the wallet to the testnet so that it recognizes your test Algos. Go to settings, developer settings, node, and switch it to testnet.
🤯 BOOM. You just did a lot. You created a new account using nothing but javascript, funded it with test Algo, and then logged into that account from your phone.
8. 💸 Making your first Transaction
Ok cool. You set up your dev environment and a wallet. What can you do with a wallet and Algo? You can send a transaction.
We could do this through the mobile app, but when testing it is common to write a script that does several transactions, even sending Algos between multiple test accounts.
Open the 2-first-transaction.js file in the scripts folder and add the following code.
At the top:
import dotenv from "dotenv";
import algosdk from "algosdk";
dotenv.config();
let myaccount = algosdk.mnemonicToSecretKey(process.env.ACCOUNT_MNEMONIC);
Some imports we will need. We generate an account variable using the account mnemonic you stored in the .env folder before.
Then:
const baseServer = 'https://testnet-algorand.api.purestake.io/ps2'
const port = '';
const token = {
    'X-API-Key': process.env.API_KEY
}

const algodClient = new algosdk.Algodv2(token, baseServer, port);
// This variable is our client. It is the link between our code and the blockchain

(async () => {
    try {
        let params = await algodClient.getTransactionParams().do();

        // reciever will be some random address.
        const receiver = "HZ57J3K46JIJXILONBBZOHX6BKPXEM2VVXNRFSUED6DKFD5ZD24PMJ3MVA";
        const enc = new TextEncoder();
        const note = enc.encode("My first transaction on Algo!");
        let amount = 100000; // equals .1 ALGO
        let sender = myaccount.addr;

        let txn = algosdk.makePaymentTxnWithSuggestedParamsFromObject({
            from: sender,
            to: receiver,
            amount: amount,
            node: note,
            suggestedParams: params
        });

        console.log("HERE3");

        let accountInfo = await algodClient.accountInformation(myaccount.addr).do();
        console.log("Account balance: %d microAlgos", accountInfo.amount);

        // sign transaction

        let signedTxn = txn.signTxn(myaccount.sk);
        let txId = txn.txID().toString();
        console.log("Signed transaction with txID: %s", txId);

        await algodClient.sendRawTransaction(signedTxn).do();

        // Wait for confirmation
        let confirmedTxn = await algosdk.waitForConfirmation(algodClient, txId, 4);
        accountInfo = await algodClient.accountInformation(myaccount.addr).do();
        console.log("Transaction Amount: %d microAlgos", confirmedTxn.txn.txn.amt);
        console.log("Transaction Fee: %d microAlgos", confirmedTxn.txn.txn.fee);
        console.log("Account balance: %d microAlgos", accountInfo.amount);

    } catch (err) {
      console.error("Failed to get apps from the sdk", err);
      process.exit(1);
    }
  })()
great, but how does it work?
Let’s break it down.
- This section defines some variables and uses it to construct a client that allows us to interact with the blockchain. The token is your API key, and the server signifies that we would like to connect to the testnet.
const baseServer = 'https://testnet-algorand.api.purestake.io/ps2'
const port = '';
const token = {
    'X-API-Key': process.env.API_KEY
}

const algodClient = new algosdk.Algodv2(token, baseServer, port);
// This variable is our client. It is the link between our code and the blockchain
- This code is constructing parameters for the transaction. The first line is strange. To construct a transaction we need to retrieve the parameters about the Algorand network, such as the genesis hash. Next, set the receiving address, use an encoder to format the note as byte code, and set the sender as your address.
let params = await algodClient.getTransactionParams().do();

// reciever will be some random address.
const receiver = "HZ57J3K46JIJXILONBBZOHX6BKPXEM2VVXNRFSUED6DKFD5ZD24PMJ3MVA";
const enc = new TextEncoder();
const note = enc.encode("My first transaction on Algo!");
let amount = 100000; // equals .1 ALGO
let sender = myaccount.addr
- Now we create the transaction.
        let txn = algosdk.makePaymentTxnWithSuggestedParamsFromObject({
            from: sender,
            to: receiver,
            amount: amount,
            node: note,
            suggestedParams: params
        });
- Before you can send the transaction it has to be signed by your private key.
let signedTxn = txn.signTxn(myaccount.sk);
        let txId = txn.txID().toString();
        console.log("Signed transaction with txID: %s", txId);
- Send transaction, wait for confirmation, print the amount, fee, and new account balance.
await algodClient.sendRawTransaction(signedTxn).do();

// Wait for confirmation
let confirmedTxn = await algosdk.waitForConfirmation(algodClient, txId, 4);
accountInfo = await algodClient.accountInformation(myaccount.addr).do();
console.log("Transaction Amount: %d microAlgos", confirmedTxn.txn.txn.amt);
console.log("Transaction Fee: %d microAlgos", confirmedTxn.txn.txn.fee);
console.log("Account balance: %d microAlgos", accountInfo.amount);
Nice! just writing it isn’t enough though, we have to run our script! In the terminal:
node scripts/2-first-transcation.js
Your terminal should look something like this afterwards. You can also check to see how your balance changed on the mobile app!

You sent your first transaction using nothing but javascript 🔥 🤯
Take a moment and pat yourself on the back. Perhaps even take a break - that was a lot. Take a break before you move onto the next section.
You can find more info on sending transactions in the docs here.
9. 🔨 Creating your first smart contract
Sending transactions is cool. But it gets better. We can do more than just send transactions across the blockchain. We can send also send contracts written in code, AKA smart contracts, that any account on the blockchain can interact with.
Let’s take a step back for a moment and look at what will going to be doing. We will:
- Create a basic smart contract to keep a count using a language similar to Python named PyTeal
- Compile our PyTeal to TEAL (Transaction Execution Approval Language)
- Use the compiled TEAL in a javascript script to deploy our contract to the blockchain
<aside>
💡 You may be thinking to yourself: Why not just write in TEAL?
TEAL is a low level language that somewhat resembles assembly. Most (sane) people don’t like to code complicated logic in a low level language. So, we can write our logic in Pyteal, a language which closely resembles Python, then compile to TEAL. You can read more about it here.
</aside>
I know that sounds complicated, but it’s actually not bad.
<aside>
💡 The words smart contract and application(dapp) are used synonymously in web3. I will use them interchangeably throughout the rest of this tutorial.
</aside>
10. Activating your Virtual Environment
We’re going to be writing in PyTeal, which is a Python library. When working with Python, it is common to use virtual environments to manage Python packages and make sure that version updates don’t break your code. Let’s boot up our virtual environment (venv).
In terminal (in project folder) run:
. venv/bin/activate
You will know you are in your venv if you see the venv in your terminal on the left side.

From now on, if we are working with PyTeal make sure that you are in your venv.
11. ✍🏻 Writing the contract
FINALLY - we’re ready to start writing a contract. This section will be lengthy and there will be parts that are unfamiliar. I will explain the important parts, but I can’t cover everything. See here for a more detailed breakdown if you’re interested, it’s where I learned.
Head to the contracts folder and open up counter.py. This is where we will write our logic.
Let’s create the skeleton for our application:
from pyteal import *
import os

"""Basic Counter Application"""

def approval_program():
    program = Return(Int(1))
    return compileTeal(program, Mode.Application, version=5)

def clear_state_program():
    program = Return(Int(1))
    return compileTeal(program, Mode.Application, version=5)

print(approval_program());
Every smart contract on Alogrand needs an approval and clear program.
The approval program is most important. It holds all the logic for a contract and handles almost all calls to our contract. The clear program is used when an account wants to remove a smart contract from its balance record.
This is the most basic smart contract we can create. It will do nothing other than compile.
You can run it in terminal:
python3 contracts/counter.py
It should print compiled TEAL

Let’s build on it. In order to vote on songs, which is our end goal, we need to keep track of a count. Let’s build a basic counter app. Reassign your program variable with the following:
def approval_program():
    program = Cond(
        [Txn.application_id() == Int(0), handle_creation],
        [Txn.on_completion() == OnComplete.OptIn, handle_optin],
        [Txn.on_completion() == OnComplete.CloseOut, handle_closeout],
        [Txn.on_completion() == OnComplete.UpdateApplication, handle_updateapp],
        [Txn.on_completion() == OnComplete.DeleteApplication, handle_deleteapp],
        [Txn.on_completion() == OnComplete.NoOp, handle_noop]
        )
    return compileTeal(program, Mode.Application, version=5)
What we have created here is a conditional statement to handle each type of transaction that can be called on our contract. There several types of transactions that a contract can handle. I will explain each as we go.
As for the logic flow of the code: if the application_id equals 0, then the handle_creation function is called. Only one function will be called per transaction and if none of these statements return true, the contract will return err and fail.
So we have the conditional statement: now we have to write functions to handle each case.
Add the following inside your approval program and before the conditional statement:
def approval_program():
    handle_creation = Seq(
        App.globalPut(Bytes("Count"), Int(0)),
        Return(Int(1))
    )
    program = Cond(
Here we define the handle_creation function, which is called if our smart contract does not exist yet (if application_id == 0).
“Seq” tells the computer that that what it conains will be a sequence of expressions.
We define a global variable “Count” and assign it to zero. You can read about global vs. local variables here. To keep track of a counter, this is all we need!
Now let’s handle more branches of our conditional. Under the handle_creation function add:
# handle creation function above
handle_optin = Return(Int(0))

handle_closeout = Return(Int(0))

handle_updateapp = Return(Int(0))

handle_deleteapp = Return(Int(0))
# conditional statement below
For the sake of our application, we don’t need to be able to handle any of these types of transactions. I’ll explain each transaction type below:
- optin: Used to handle when an account opts into an app. We don’t need accounts to be able to “opt in” to our app because we store all our variables globally.
- closeout: Used to close an account out of an application, which removes all local state from the application on an account. We don’t use any local state, so we don’t need it.
- updateapp: Used to update an apps approval program and make edits. Our app is so simple that we’ll just create a whole new app if we want to make a change.
- deleteapp: Used to delete an app from the creator’s account, removing all global state. Once again, we could implement this, but for the sake of this app it’s overcomplicated.
Returning 0 in PyTeal causes a transaction to fail. Returning 1 signifies success. In this case, we want all these transaction types to fail.
We’re almost done. We only have one type of transaction type left to handle, the NoOp.
Insert the following function below “handle_deleteapp”:
# delete app above
handle_noop = Seq(
        # First, fails immediately if this transaction is grouped with others
        Assert(Global.group_size() == Int(1)),
        Cond(
            [Txn.application_args[0] == Bytes("Add"), add],
            [Txn.application_args[0] == Bytes("Deduct"), deduct]
        )
    )
# conditional below
The NoOp transaction type is what makes all the generic calls to an application, in this case that will be to add/deduct from our counter variable.
Let’s walk through the code. First, we assert this NoOp transaction is the only one in the transaction group. If it’s not, we reject the transaction.
Then we enter a conditional to which checks the application argument that the transaction contains. Application arguments are arguments an account can pass in a NoOp transaction. If the argument is “Add” then we run the add function, and Deduct runs deduct.
We have to define the add and deduct functions.
Add the following between the delete_app and the handle_noop functions:
// handle delete app above

scratchCount = ScratchVar(TealType.uint64)
add = Seq([
    scratchCount.store(App.globalGet(Bytes("Count"))),
    App.globalPut(Bytes("Count"), scratchCount.load() + Int(1)),
    Return(Int(1))
])

deduct = Seq([
    scratchCount.store(App.globalGet(Bytes("Count"))),
     If(scratchCount.load() > Int(0),
         App.globalPut(Bytes("Count"), scratchCount.load() - Int(1)),
     ),
     Return(Int(1))
])

// handle noOp below
ScratchCount is a temporary variable that we declare in our computer’s scratch space. We use it to temporarily store our global count, modify it, and update the global count.
Ok, that’s all our logic done. Now we actually have to do something with our compiled code. Right now all we do is print it. Let’s write the compiled code to a file instead for later use.
Replace “print(approval_program())” with the following:
if __name__ == "__main__":

    path = "./contracts/artifacts"

    with open(os.path.join(path, "counter_approval.teal"), 'w') as f:
        f.write(approval_program())

    with open(os.path.join(path, "counter_clear.teal"), 'w') as f:
        f.write(clear_state_program())
Not gonna dive too deep into this. We are essentially writing a script so that the compiled approval and clear programs are written into files in the artifacts folder.
Let’s run it! In terminal:
python3 contracts/counter.py
Two files should appear in the artifacts folder. That where you compiled TEAL goes, go take a look. It’s not pretty. That’s why we write in PyTeal and then compile to TEAL.
As per usual there if you want more detail check out the docs here.
Awesome 😮💨. We are almost done. We have finished writing our smart contract. Now we actually have to test and deploy it.
12. 🚢 Deploying to the testnet
For other people to use our contract we have to deploy it, in this case we’ll deploy to the testnet.
To test and deploy we will be using javascript again. There is a lot of boilerplate code here and I won’t be able to cover all of it in detail.
Head to the the 3-deploy-counter.js file in the scripts folder. I have included the imports, as well as boilerplate code for connecting to a client and creating account variables.
In order to deploy our contract we are going to need a helper function. Add the following below what is there already:
async function compileProgram(client, TealSource) {
    let encoder = new TextEncoder();
    let programBytes = encoder.encode(TealSource);
    let compileResponse = await client.compile(programBytes).do();
    let compiledBytes = new Uint8Array(Buffer.from(compileResponse.result, "base64"));
    return compiledBytes;
}
Wait!? Didn’t we just compile our code? In order to deploy our smart contract our approval and clear programs have to be in binary. So, this helper function takes the TEAL code that we just compiled and compiles it to binary. PyTeal → TEAL → Binary → Deploy
Next we’re going to add an async function. Place it below everything we’ve done so far.
(async () => {
    try {
        const localInts = 0
        const localBytes = 0
        const globalInts = 1
        const globalBytes = 0

        let approvalProgramfile = await open('./contracts/artifacts/counter_approval.teal');
        let clearProgramfile = await open('./contracts/artifacts/counter_clear.teal');

        const approvalProgram = await approvalProgramfile.readFile();
        const clearProgram = await clearProgramfile.readFile();

        const approvalProgramBinary = await compileProgram(algodClient, approvalProgram);
        const clearProgramBinary = await compileProgram(algodClient, clearProgram);

        let params = await algodClient.getTransactionParams().do();
        const onComplete = algosdk.OnApplicationComplete.NoOpOC;

        console.log("Deploying Application. . . . ");

        let txn = algosdk.makeApplicationCreateTxn(sender, params, onComplete,
            approvalProgramBinary, clearProgramBinary,
            localInts, localBytes, globalInts, globalBytes,);
        let txId = txn.txID().toString();

        // Sign the transaction
        let signedTxn = txn.signTxn(myaccount.sk);
        console.log("Signed transaction with txID: %s", txId);

        // Submit the transaction
        await algodClient.sendRawTransaction(signedTxn).do();

        // Wait for confirmation
        await algosdk.waitForConfirmation(algodClient, txId, 2);

        // print the app-id
        let transactionResponse = await algodClient.pendingTransactionInformation(txId).do();
        let appId = transactionResponse['application-index'];
        console.log("Created new with app-id: ",appId);
} catch (err) {
    console.error("Failed to deploy!", err);
    process.exit(1);
  }
})()
This is the meat of the function that deploys our app! I know it’s a lot. Let’s go piece by piece.
- First we define the memory that our smart contract will need. In our case we are storing one global int. This can’t be changed once deployed!
const localInts = 0
const localBytes = 0
const globalInts = 1
const globalBytes = 0
- Here we open our TEAL files, read their contents into variables, and then finally use the helper function that we created earlier to compile TEAL into binary. The binary code is what we need to deploy our smart contract.
let approvalProgramfile = await open('./contracts/artifacts/counter_approval.teal');
let clearProgramfile = await open('./contracts/artifacts/counter_clear.teal');

const approvalProgram = await approvalProgramfile.readFile();
const clearProgram = await clearProgramfile.readFile();

const approvalProgramBinary = await compileProgram(algodClient, approvalProgram);
const clearProgramBinary = await compileProgram(algodClient, clearProgram);
- Now we fetch suggested parameters from the client and define what to do when we finish creating our app.
let params = await algodClient.getTransactionParams().do();
const onComplete = algosdk.OnApplicationComplete.NoOpOC;
- Next we create a makeApplicationCreate transaction(txn) with all the parameters we have been defining and store the transaction ID.
let txn = algosdk.makeApplicationCreateTxn(sender, params, onComplete,
            approvalProgramBinary, clearProgramBinary,
            localInts, localBytes, globalInts, globalBytes,);
let txId = txn.txID().toString();
- Finally, we sign, submit, wait for confirmation, and then print our app-id.
// Sign the transaction
let signedTxn = txn.signTxn(myaccount.sk);
console.log("Signed transaction with txID: %s", txId);

// Submit the transaction
await algodClient.sendRawTransaction(signedTxn).do();

// Wait for confirmation
await algosdk.waitForConfirmation(algodClient, txId, 2);

// print the app-id
let transactionResponse = await algodClient.pendingTransactionInformation(txId).do();
let appId = transactionResponse['application-index'];
console.log("Created new with app-id: ",appId);
Make sure to deactivate your venv since we are done with PyTeal. You can do this by typing “deactivate” in your terminal. The “(venv)” on the left should disappear.
Let’s run our script! In terminal:
node scripts/3-deploy-counter.js
If all goes to plan you should get the following output. It might take some time.

Save the app-id in your notes somewhere . . . you will need it in a second!
More info about deploying is available at the docs here.
🚀🚀🚀🚀🚀🚀 CONGRATULATIONS! YOUR CONTRACT JUST GOT DEPLOYED 🚀🚀🚀🚀🚀🚀
So far we have:
- [x] Written our contract
- [x] Deployed our contract
What’s next? Testing! We have to make sure our app functions as intended.
13. 🧪 Testing the contract
We’re going to use another javascript script to test our contract.
Head to 4-testing-counter.js. I’ve included import statements, a helper function to read from global state, and code to connect to a client.
Add the following code below what is there already:
let index = YOURAPPIDHERE;

let appArgs1 = [];
let add = "Add";
let deduct = "Deduct";
let appArgs2 = [];

appArgs1.push(new Uint8Array(Buffer.from(add)));
appArgs2.push(new Uint8Array(Buffer.from(deduct)));

(async () => {
    try {
                console.log("Intial Global State")
        await readGlobalState(algodClient, index);

                let params = await algodClient.getTransactionParams().do();
        // create a transaction to add
        console.log("Adding!")
        let txn = algosdk.makeApplicationNoOpTxn(sender, params, index, appArgs1)
        let txId = txn.txID().toString();

        // sign, send, await
        let signedTxn = txn.signTxn(myaccount.sk);
        console.log("Signed transaction with txID: %s", txId);
        await algodClient.sendRawTransaction(signedTxn).do();
        await algosdk.waitForConfirmation(algodClient, txId, 2);

        // display results
        let transactionResponse = await algodClient.pendingTransactionInformation(txId).do();
        console.log("Called app-id:",transactionResponse['txn']['txn']['apid'])
        if (transactionResponse['global-state-delta'] !== undefined ) {
        console.log("Global State updated:",transactionResponse['global-state-delta']);
        }

        // create a transaction to deduct
        console.log("Deducting!")
        let txn2 = algosdk.makeApplicationNoOpTxn(sender, params, index, appArgs2)
        let txId2 = txn2.txID().toString();
        // sign, send, await
        let signedTxn2 = txn2.signTxn(myaccount.sk);
        console.log("Signed transaction with txID: %s", txId2);
        await algodClient.sendRawTransaction(signedTxn2).do();
        await algosdk.waitForConfirmation(algodClient, txId2, 2);
        // display results
        let transactionResponse2 = await algodClient.pendingTransactionInformation(txId2).do();
        console.log("Called app-id:",transactionResponse2['txn']['txn']['apid'])
        if (transactionResponse2['global-state-delta'] !== undefined ) {
        console.log("Global State updated:",transactionResponse2['global-state-delta']);
        }

    } catch (err) {
      console.error("Tests failed!", err);
      process.exit(1);
    }
  })()
It looks like a lot, but a lot is repetitive. I’ll break down the new parts, but you’re probably getting the hang of this!
- First we save our app-id to index for later use. Then we format two different application argument arrays, one for our add function, and one for our deduct.
let index = YOURAPPIDHERE;

let appArgs1 = [];
let add = "Add";
let deduct = "Deduct";
let appArgs2 = [];

appArgs1.push(new Uint8Array(Buffer.from(add)));
appArgs2.push(new Uint8Array(Buffer.from(deduct)));
- Here we read the global state so we can see it before we call our functions
await readGlobalState(algodClient, index);
- Here we are creating a generic transaction with the appArgs1 array, which is the one that specifies add. We sign, send, and await the transaction, then print out the new global state.
let txn = algosdk.makeApplicationNoOpTxn(sender, params, index, appArgs1)
let txId = txn.txID().toString();

// sign, send, await
let signedTxn = txn.signTxn(myaccount.sk);
console.log("Signed transaction with txID: %s", txId);
await algodClient.sendRawTransaction(signedTxn).do();
await algosdk.waitForConfirmation(algodClient, txId, 2);

// display results
let transactionResponse = await algodClient.pendingTransactionInformation(txId).do();
console.log("Called app-id:",transactionResponse['txn']['txn']['apid'])
if (transactionResponse['global-state-delta'] !== undefined ) {
console.log("Global State updated:",transactionResponse['global-state-delta']);
}
- Repeat step 3 except with deduct using AppArgs2.
Once you’re done run in terminal:
node scripts/4-test-counter.js
Here is my output :)

The value next to unit is the value of our counter. As you can see, it starts at some number (yours will be zero) adds one, then deducts one. Our dapp works!
If you go take a look at your wallet on your phone you will see that each time you run these functions your wallet has a small amount of test Algo subtracted from it.
Why? - Because updating the state of the blockchain costs a gas fee.
Check out the docs for more detail here.
You just wrote, deployed, and tested a smart contract 😩.
Take a break. Eat some food. Go outside. Trust me, it’s good for you.
14. 🌐 React Client App
We have our contract, which will function as our backend. Now we need a website that users can interact with our contract on. This is often called a client app.
We’re going to create a basic React app for our client app.
We’re going to be building and deploying our website with a tool called Replit. Replit is a browser based IDE that lets us build and deploy apps using nothing but a browser.
Make an account on Replit before continuing!
I created a basic React project template that you can fork on Replit. Head here and look for the “Fork” button in the top right. Ensure that you’re logged in, then click this. This will clone my repository and IDE in your browser so that you can start work right away. It will load for a few minutes - once it’s done hit the “Run” button at the top.

You officially have a public website 😎! How easy was that. It is hosted at the URL you see in the top right corner.
You’ll see that once you hit run a mini version of a website will pop up on the right side. That is your website. It will update live as you change your code. If you want to see the website in a standard sized window there is a button in the top right that opens up your website in a new tab.
15. 💳 Adding wallet connectivity
Cool, we have a website. We want our users to be able to call the add and deduct functions from our website. But, for a website to communicate with the blockchain and call smart contracts we have to implement a way for users (ourselves included) to connect their wallets.
To do this we are going to be using the WalletConnect protocol.
Head to App.jsx in your src folder. This is where the bulk of coding will take place.
The pace of things is going to pick up. I am assuming that you know some basic javascript and React. If you are confused, use the internet 😃!
In order to track whether there is a wallet connected to our app we need to keep track of some state variables. We will also need our contract address from earlier Add the following in App:
const App = () => {
  const [currentAccount, setCurrentAccount] = useState();
  const [globalCount, setGlobalCount] = useState(0);
  const [walletbalance, setwalletbalance] = useState();
  const [connector, setConnector] = useState();
  const [connected, setConnected] = useState(false);

  const app_address = YOUR_APPADDRESS_HERE;
Great. currentAccount, connector, and connected will help us keep track if we have a wallet connected. We will use globalCount and walletBalance later.
Now we need a function to check if a wallet is connected. Add the following function:
const checkIfWalletIsConnected = async () => {
      try {
        if (!connector.connected) {
          console.log("No connection");
          return;
        } else {
          console.log("We have connection", connector);
        }
        const { accounts }  = connector;

        if (accounts.length !== 0) {
          const account = accounts[0];
          console.log("Found an authorized account:", account);
          setCurrentAccount(account);
        } else {
          setCurrentAccount();
          console.log("No authorized account found")
        }
      } catch (error) {
        console.log(error);
      }
    }
This will check if we have a wallet connect session and then if there any accounts connected to our app. If not, we console.log what the issue is.
We can now check if a wallet is connected, but we still don’t have a way to actually connect a wallet. Let’s fix that. Add the connectWallet function:
const connectWallet = async () => {
      try {
        const bridge = "https://bridge.walletconnect.org";
        const connector = new WalletConnect({ bridge, qrcodeModal: QRCodeModal });
        setConnector(connector);

        if (!connector.connected) {
          await connector.createSession();
          console.log("Creating new connector session");
        }

        connector.on("connect", (error, payload) => {
          if (error) {
            throw error;
          }
          // Get provided accounts
          const { accounts } = payload.params[0];
          console.log("connector.on connect: Connected an account with address:", accounts[0]);
          setConnector(connector);
          setConnected(true);
          setCurrentAccount(accounts[0]);
        });

        connector.on("session_update", (error, payload) => {
          if (error) {
            throw error;
          }
          // Get updated accounts
          const { accounts } = payload.params[0];
          setCurrentAccount(accounts[0]);
        });

        connector.on("disconnect", (error, payload) => {
          if (error) {
            throw error;
          }
          setCurrentAccount();
          setConnected(false);
          setConnector();
        });

        if (connector.connected) {
          const {accounts} = connector;
          const account = accounts[0];
          setCurrentAccount(account);
          setConnected(true);
        }
      } catch(error) {
        console.log("someething didn't work in creating connector", error);
      }
    }
I am not going to explain everything here. To summarize, this function will help handle and log connecting a wallet, session updates, and disconnections.
We also need a function to handle when a user wants to disconnect their wallet from the app. Insert the disconnectWallet function:
const disconnectWallet = async () => {
      connector.killSession();
      console.log("Killing session for wallet with address: ", currentAccount);
      setCurrentAccount();
      setConnector();
      setConnected(false);
    }
Almost done. Now we want to add some React hooks. They’re really useful tools. Look into them if you don’t understand what they are doing. Add the following hooks right above where we start returning elements.
    useEffect(() => {
    checkIfWalletIsConnected();
        console.log('currentAccount:', currentAccount);
  }, [currentAccount])

  return (
    <div className = "mainContainer">
We are using these hooks to help us document our current account whenever it changes as well as to make sure a wallet is still connected when the account state state changes.
Great. That is all the functions we need for our wallet, but we still need to add buttons so that users connect and disconnect. Edit the section where we return elements to match this:
return (
    <div className = "mainContainer">
      <div className = "dataContainer">
        <div className="header">
        🤪 Yooooo!
        </div>
        <div className="bio">
        Antony here.  I'm happy you made it this far! You're well on your way to creating your first dapp on Algorand!
        </div>
        {!currentAccount && (
          <button className="mathButton" onClick={connectWallet}>
            Connect Wallet
          </button>
        )}
        {currentAccount && (
        <>
                <div className = "count">
          Count #
        </div>
        <button className="mathButton" onClick={add}>
          Add
        </button>
        <button className="mathButton" onClick={deduct}>
          Deduct
        </button>
        <button className="mathButton" onClick={disconnectWallet}>
          Disconnect Wallet
        </button>
        </>
        )}
      </div>
    </div>
  );
We added a connect wallet button and some conditional statements that will control the flow our application. The logic here is:
- If there is no wallet connected, display the connect wallet button
- If there is a wallet connected, display the count, add, deduct, and disconnect buttons
This is what my App.js looks like after everything.
import React, { useEffect, useState } from 'react';
import './App.css';
import WalletConnect from "@walletconnect/client";
import QRCodeModal from "algorand-walletconnect-qrcode-modal";
import algosdk from "algosdk";
import { formatJsonRpcRequest } from "@json-rpc-tools/utils";

const App = () => {
  const [currentAccount, setCurrentAccount] = useState();
  const [globalCount, setGlobalCount] = useState(0);
  const [walletbalance, setwalletbalance] = useState();
  const [connector, setConnector] = useState();
  const [connected, setConnected] = useState(false);
  const app_address = YOUR APP ID;

    const checkIfWalletIsConnected = async () => {
      try {
        if (!connector.connected) {
          console.log("No connection");
          return;
        } else {
          console.log("We have connection", connector);
        }
        const { accounts }  = connector;
        if (accounts.length !== 0) {
          const account = accounts[0];
          console.log("Found an authorized account:", account);
          setCurrentAccount(account);
          // await getAllRecs(); IMPORTANT FOR FUNCTIONALITY LATER
        } else {
          setCurrentAccount();
          console.log("No authorized account found")
        }
      } catch (error) {
        console.log(error);
      }
    }

    const disconnectWallet = async () => {
      connector.killSession();
      console.log("Killing session for wallet with address: ", currentAccount);
      setCurrentAccount();
      setConnector();
      setConnected(false);
    }

    const connectWallet = async () => {
      try {
        const bridge = "https://bridge.walletconnect.org";
        const connector = new WalletConnect({ bridge, qrcodeModal: QRCodeModal });
        setConnector(connector);

        if (!connector.connected) {
          await connector.createSession();
          console.log("Creating new connector session");
        }
        connector.on("connect", (error, payload) => {
          if (error) {
            throw error;
          }
          // Get provided accounts
          const { accounts } = payload.params[0];
          console.log("connector.on connect: Connected an account with address:", accounts[0]);
          setCurrentAccount(accounts[0]);
               setConnector(connector);
          setConnected(true);
          setCurrentAccount(accounts[0]);
        });
        connector.on("session_update", (error, payload) => {
          if (error) {
            throw error;
          }
          // Get updated accounts
          const { accounts } = payload.params[0];
          setCurrentAccount(accounts[0])
        });
        connector.on("disconnect", (error, payload) => {
          if (error) {
            throw error;
          }
          setCurrentAccount();
          setConnected(false);
          setConnector();
        });
        if (connector.connected) {
          const {accounts} = connector;
          const account = accounts[0];
          setCurrentAccount(account);
          setConnected(true);
        }
      } catch(error) {
        console.log("someething didn't work in creating connector", error);
      }
    }

  const add = () => {

  }
    const deduct = () => {

  }

  useEffect(() => {
    checkIfWalletIsConnected();
        console.log('currentAccount:', currentAccount);
  }, [currentAccount])
  return (
    <div className = "mainContainer">
      <div className = "dataContainer">
        <div className="header">
        🤪 Yooooo!
        </div>
        <div className="bio">
        Antony here.  I'm happy you made it this far! You're well on your way to creating your first dapp on Algorand!
        </div>
        {!currentAccount && (
          <button className="mathButton" onClick={connectWallet}>
            Connect Wallet
          </button>
        )}
        {currentAccount && (
        <>
                <div className = "count" >
          Count #
        </div>
        <button className="mathButton" onClick={add}>
          Add
        </button>
        <button className="mathButton" onClick={deduct}>
          Deduct
        </button>
        <button className="mathButton" onClick={disconnectWallet}>
          Disconnect Wallet
        </button>
        </>
        )}
      </div>
    </div>
  );
}

export default App;
Cool. Let’s test the functionality. Open your website in a new tab from your Replit window (button in the top right).
Right click on the screen and click inspect so that you can see the log messages. Press the Connect Wallet button. A QR code should pop up.
Get out your phone 📲, head to the Pera Wallet app, and press the scan button in the top right corner. Scan the code on screen and connect an account.
This is what I see in my console after connecting my wallet.

Play around with it. Disconnect your wallet, reload the page etc.
This is a relatively basic implementation of WalletConnect. It does consider chains and does not handle some edge cases. Check out the docs here for a quick start guide and this project for a complete implementation.
Awesome. We have implemented a wallet. Now we can interact with smart smart contracts on the blockchain using the connected wallet 🤯 💣
16. ➕ Implementing Add and Deduct
So now we can connect our wallet to our app. We can’t do anything with it though. Let’s make the add and deduct buttons call the “Add” and “Deduct” functions that we created when we made our smart contract. This will ultimately be how users vote on songs.
In order to be able to send transactions to the blockchain we are going to need an Algo client. We have done this before. Let’s add it at the top of our App function, right after our app_id:
const app_address = YOUR_APP_ID;

  const baseServer = 'https://testnet-algorand.api.purestake.io/ps2'
    const port = '';
    const token = {
        'X-API-Key': "YOUR-APIKEY-HERE"
    }
    const algodClient = new algosdk.Algodv2(token, baseServer, port);
You should NEVER expose your API key like this in production. Replit’s .env system is buggy which is the only reason we are doing it this way. Make sure that it is in quotes so that it is a string.
Great. Now let’s define our add function:
const add = async () => {
        // construct transaction
      let sender = currentAccount;
    let appArgs = [];
    appArgs.push(new Uint8Array(Buffer.from("Add")));
    let params = await algodClient.getTransactionParams().do();
    const txn = algosdk.makeApplicationNoOpTxn(sender, params, app_address, appArgs);
    let txId = txn.txID().toString();

    // time to sign . . . which we have to do with walletconnect api
    const txns = [txn]
    const txnsToSign = txns.map(txn => {
      const encodedTxn = Buffer.from(algosdk.encodeUnsignedTransaction(txn)).toString("base64");
      return {
        txn: encodedTxn,
    };
  });
  const requestParams = [ txnsToSign ];
  const request = formatJsonRpcRequest("algo_signTxn", requestParams);
  const result = await connector.sendCustomRequest(request);
    // have to go on phone and accept the transaction
  const decodedResult = result.map(element => {
    return element ? new Uint8Array(Buffer.from(element, "base64")) : null;
  });
    // send and await
    await algodClient.sendRawTransaction(decodedResult).do();
    await algosdk.waitForConfirmation(algodClient, txId, 2);
    let transactionResponse = await algodClient.pendingTransactionInformation(txId).do();
    console.log("Called app-id:",transactionResponse['txn']['txn']['apid']);
    if (transactionResponse['global-state-delta'] !== undefined ) {
      console.log("Global State updated:",transactionResponse['global-state-delta']);
      }
  }
There is a lot going on here. Again, we have already done a lot of this. The only difference is that now instead of signing the transaction manually with our secret key we use the Wallet Connect API to sign the transaction with whatever account is connected to the app at the moment.
Define the deduct function in the same way except change the “Add” in appArgs to “Deduct”
Now test it out. Run your website, open the console by pressing inspect, and the press on either the add or deduct key.
You will have to go on your mobile wallet and accept a transaction.

Wait a moment, and you should see in your console that your global state has been updated.
This is what my output looks like:

Nice!
17. 🧮 Adding count to the user interface
Finally, let’s display the count somewhere on the UI. It’ll look a whole lot better that way and we won’t have to constantly check our console.
In order to fetch our global count, let’s define a function. We’ll call it getCount. Place it anywhere with your other async functions.
const getCount = async () => {
      let applicationInfoResponse = await algodClient.getApplicationByID(app_address).do();
      let globalState = []
      globalState = applicationInfoResponse['params']['global-state']
      console.log("count is: ", globalState[0]['value']['uint']);
      setGlobalCount(globalState[0]['value']['uint']);
    }
Now we have a function that will update the global state when called. Let’s make sure that it is called in the right places.
First let’s add to our react hook from before.
useEffect(() => {
    checkIfWalletIsConnected();
    getCount();
    console.log('currentAccount:', currentAccount);
  }, [currentAccount])
This will make sure that if currentAccount state changes, we update our counts.
Next let’s call getCount() whenever we add or deduct. Place it in the if statement at the end:
if (transactionResponse['global-state-delta'] !== undefined ) {
      console.log("Global State updated:",transactionResponse['global-state-delta']);
      await getCount();
      }
The idea here is that if the global state of the app is updated, we call getCount. Make sure to add it in add and deduct!
Ok great, getCount will keep our globalCount up to date. Now we actually need to display the global count. In the space “count” div replace “count #” with the following:
<div className = "count">
          {globalCount}
        </div>
****If you refresh your app, the app should now be displaying your global count in the UI.
You’ve created your first fully functioning Dapp. Anyone with an Algorand Wallet and some test Algo can use this app to modify the global count. That’s really cool 🔥.
I know it doesn’t look great. We’ll get that that later.
18. ⬆️ Upgrading our smart contract
Ok, what we just implemented our core functionality. Keeping track of a global count is how we will keep track of the “vote” for a given song/genre. Let’s upgrade our smart contract so that we can keep track of 2 counts. This is how we will have users vote for one song vs. another.
Let’s get started. Open the project folder in which you created your counter smart contract. Head to the contracts folder and open songvote.py.
Instead of starting from scratch again, let’s build off of counter.py. Copy and paste everything from counter.py into songshare.py. We will have to change some things, but the bones are there.
In the case of voting between 2 songs we need to keep track of 2 global counters. Our code currently has one. Let’s rename that one and add another. In handle creation:
handle_creation = Seq(
        App.globalPut(Bytes("Count1"), Int(0)),
        App.globalPut(Bytes("Count2"), Int(1)),
        Return(Int(1))
)
In the case of voting between two songs we only need to support upvotes. Let’s delete our deduct function.
Now we need to create a new add function that can modify “Count2”. We also need to modify our original add function so that it reflects our name change from the last step.
First, let’s modify our original add so that it looks like this:
addC1 = Seq(
        scratchCount.store(App.globalGet(Bytes("Count1"))),
        App.globalPut(Bytes("Count1"), scratchCount.load() + Int(1)),
        Return(Int(1))
    )
Now let’s create a similar add function that increments “Count2”. Insert it below “addC1”:
addC2 = Seq(
        scratchCount.store(App.globalGet(Bytes("Count2"))),
        App.globalPut(Bytes("Count2"), scratchCount.load() + Int(1)),
        Return(Int(1))
)
We also have to change our NoOp a little to reflect our changes:
handle_noop = Seq(
        # First, fails immediately if this transaction is grouped with others
        Assert(Global.group_size() == Int(1)),
        Cond(
            [Txn.application_args[0] == Bytes("AddC1"), addC1],
            [Txn.application_args[0] == Bytes("AddC2"), addC2]
        )
    )
Note that we will now have to pass “AddC1” or “AddC2” when creating a transaction from the frontend to call the appropriate function.
Finally, we have to change the path that we write our compiled program to:
if __name__ == "__main__":

    path = "./contracts/artifacts"

    with open(os.path.join(path, "songvote_approval.teal"), 'w') as f:
        f.write(approval_program())

    with open(os.path.join(path, "songvote_clear.teal"), 'w') as f:
        f.write(clear_state_program())
Let’s run it. In your terminal (make sure that your venv is activated):
python3 contracts/songvote.py
If you head to the artifacts folder, you will see our newly compiled approval and clear programs!
19. 🚢 Deploying new contract
Now we have to deploy our new contract. Head to 5-deploy-songvote.js. Once again we will be building off code we’ve already written. Copy and paste everything from 3-deploy-counter.js.
We just have to make a few minor changes.
The first is to the amount of global ints in storage. Update “globalInts” from 1 to 2:
const localInts = 0
const localBytes = 0
const globalInts = 2
const globalBytes = 0
Finally we need to change what file we are pulling our approval and clear programs from. Update your code to match below:
const approvalProgramfile = await open('./contracts/artifacts/songvote_approval.teal');
const clearProgramfile = await open('./contracts/artifacts/songvote_clear.teal');
All done! Run your new deploy script in terminal:
node scripts/5-deploy-songvote.js
Save your new app address somewhere. We are going to need it to update our app_address for in our frontend.
<aside>
💡 If you get an error that says you can not deploy your app because you already have created 10 apps you will have to create, fund, and login into a new test account. Since we did not include functionality to delete our apps, this is the easiest way. Remember to update your .env variables to match your new address and secret key.
</aside>
If your app deploys successfully, congratulations, you just wrote your second smart contract. You’re getting good at this.
20. 🌐 Updating client app
Now we have to update our front end to reflect new functionality.
First update our app_address and implement state variables to keep track of 2 counts.
const [currentAccount, setCurrentAccount] = useState();
const [Count1, setCount1] = useState(0);
const [Count2, setCount2] = useState(0);
const [walletbalance, setwalletbalance] = useState();
const [connector, setConnector] = useState();
const [connected, setConnected] = useState(false);

const app_address = NEW_APP_ADDRESS_HERE;
Next, change the add and deduct functions so that they add to Count1 & Count2 respectively. I will show what to do with one, I’ll let you figure the other one out. There is very little to change.
- Change the function name:
const addC1 = async () => {
// . . . rest of of function
- Change the app arg that is passed:
appArgs.push(new Uint8Array(Buffer.from("AddC1")));
Next we have to update our getCount() function:
const getCount = async () => {
      let applicationInfoResponse = await algodClient.getApplicationByID(app_address).do();
      let globalState = []
      globalState = applicationInfoResponse['params']['global-state']
      console.log("Count1: ", globalState[0]['value']['uint']);
      setCount1(globalState[0]['value']['uint']);
      console.log("Count2: ", globalState[1]['value']['uint']);
      setCount2(globalState[1]['value']['uint']);
    }
Each time getCount() is called, we update both our count variable states.
Now let’s update the components of our app to reflect our new functionality:
return (
    <div className = "mainContainer">
      <div className = "dataContainer">
        <div className="header">
        🤪 Yooooo!
        </div>
        <div className="bio">
        Antony here. Trying to settle a debate.  Vote on the better song.
        </div>
        {!currentAccount && (
          <button className="mathButton" onClick={connectWallet}>
            Connect Wallet
          </button>
        )}
        {currentAccount && (
        <>
          <div className = "count">
           Mr. Brightside: {Count1}
        </div>
        <div className = "count">
          Pursuit of Happiness: {Count2}
        </div>
        <button className="mathButton" onClick={addC1}>
          Vote for Mr. Brightside
        </button>
        <button className="mathButton" onClick={addC2}>
          Vote for Pursuit of Happiness
        </button>
        <button className="mathButton" onClick={disconnectWallet}>
          Disconnect Wallet
        </button>
        </>
        )}
      </div>
    </div>
  );
}
I didn’t do anything fancy here. I just changed the functions that are called when each button is clicked. I added another div to display count 2. Finally, I added some songs to vote on.
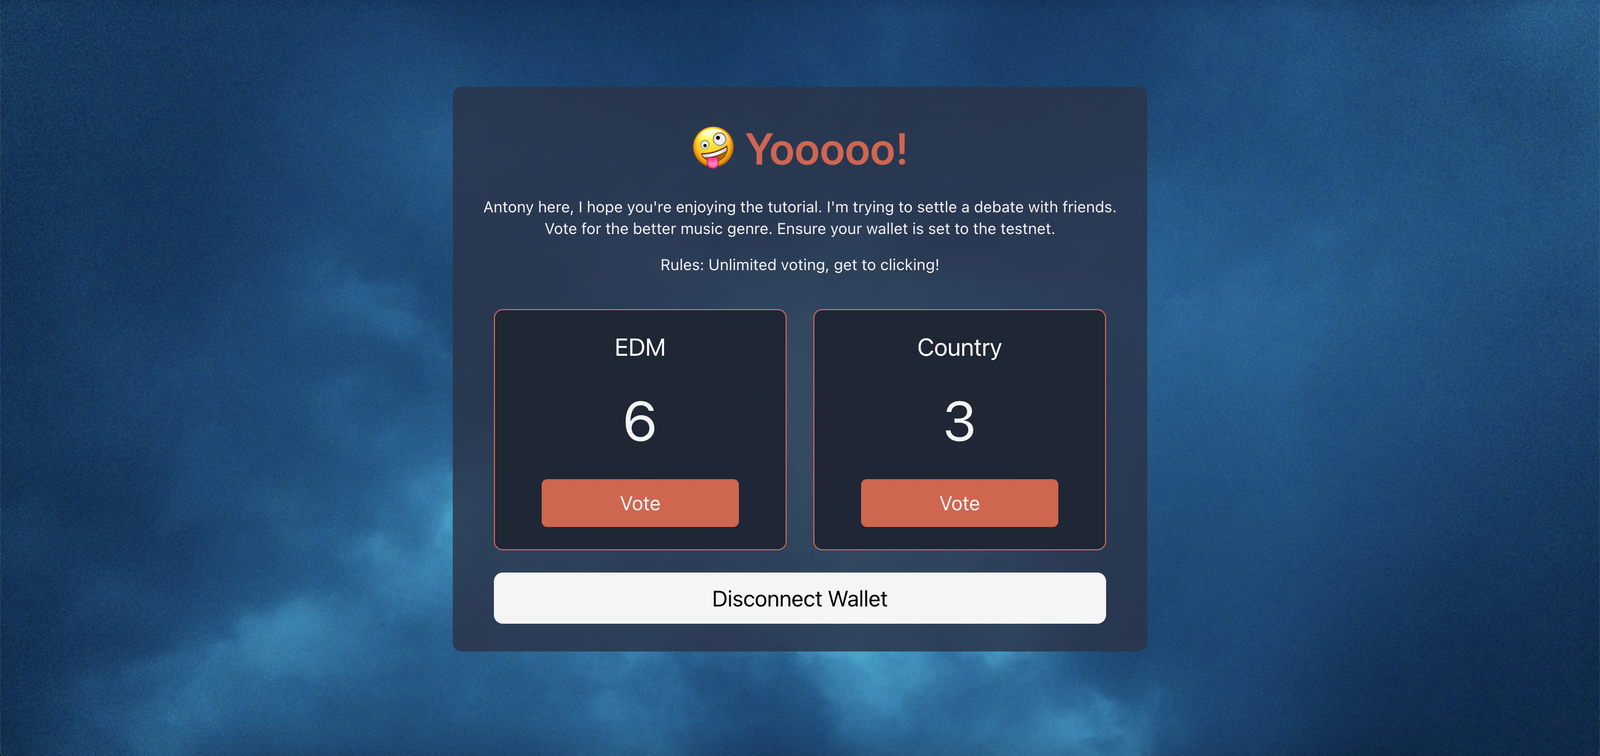
This is what my UI looks like:

Awesome. We have the skeleton for a really cool application laid out.
21. 🖌️ CUSTOMIZE IT
🖌️ CUSTOMIZE IT
I walked you through creating a very basic application. Let’s be honest though, it doesn’t look great 🤣.
Customize it. Make it look good. Add new functionality. Some ideas:
- Make the website pretty, add a background, a nice user interface . . . etc
- Add loading text while transactions are processing
- Create a 3 way vote. You’ll have to create a new smart contract for this.
- Create a screen that shows when a user doesn’t have test Algos and gives link to faucet
- Make it so that each account can only vote once
- Fund your smart contract and reward users for voting
- Set a time limit on voting
- Instead of voting by singular, let users stake their Algos in a song. The song with the most staked Algos wins.
Here is my final product. Don’t copy it lol. If you want to vote go to the website here.

:)
22. ## Thanks, your’re awesome :)
This has been a long tutorial so I’ll keep it brief.
Thank you for following my tutorial. You’re awesome.
You just did more than 99% of people will ever do with blockchain. You can walk the talk.