
Access BetaNet Network using your own node and goal
This tutorial describes how to setup and update a BetaNet network using your own node and goal. It also covers how to switch between networks and create BetaNet accounts. Also covered is how to dispense funds using the BetaNet dispenser and view the results with a BetaNet explorer.
By default, an Algorand installation is configured to run on MainNet. For most users, this is the desired outcome. Developers, however, need access to TestNet or BetaNet networks.
Learn More
Accessing BetaNet with Purestake tutorial or Sandbox tutorial.
Workspace setup for run your own node.
documentation.

 goal
goal
Requirements
- Install a node as described here.
Background
BetaNet is where new protocol-level features are released for initial testing. Therefore, quality and features may not be final, and protocol upgrades and network restarts are common.
The TestNet protocol mirrors MainNet at all times, although without Algos or other assets carrying real value. As such, developers can confidently view TestNet as a stable and public testing ground for their applications before deploying them to MainNet.
BetaNet, TestNet and MainNet facilitate the use of private networks . Private Networks allow for greater control and isolation of your development environment.
Using your own node will inititally require no waiting for node sync in order to run transactions. Sync time will be 0 consistently, when synced, using the goal status command as discussed below.
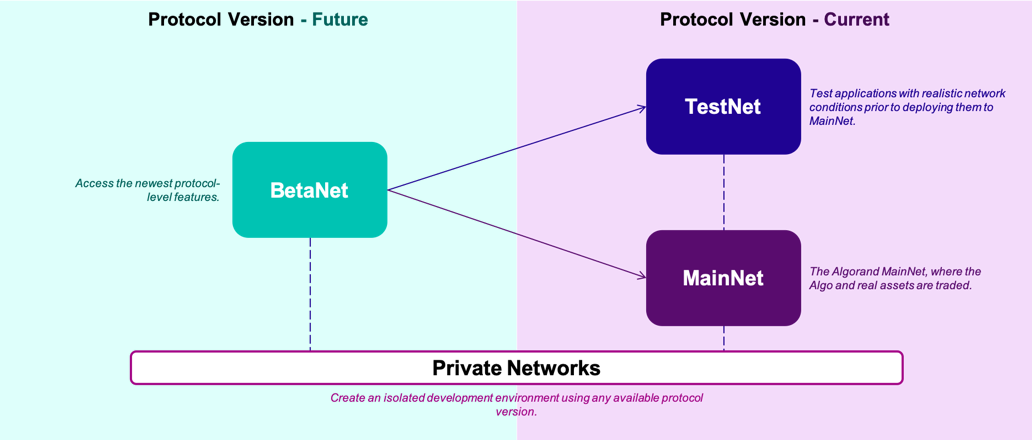
Figure 0-0 BetaNet, TestNet and MainNet
Learn More
- Algorand GOAL CLI
Steps
1. Running BetaNet for the First Time
Build your own node - If you are running BetaNet for the first time use this update command. From your node directory run these commands.
$ ./update.sh -i -c beta -p . -d betanetdata -n -g betanet
Output should look similar to this…
Current Version = 8589934597
Latest Version = 8589934605
New version found
Checking for files matching: 'channel/beta/node_beta_darwin-amd64_' in bucket algorand-releases
Update Downloaded to /var/folders/g9/ryz1stf51tz936yblvt8dv8h0000gn/T/tmp.MHZAweZi/8589934605.tar.gz
Expanding update..
Validating update...
Starting the new update script to complete the installation...
... Resuming installation from the latest update script
Current Version = 85899345
Stopping node...
... node not running
Backing up current binary files...
Backing up current data files from /Users/algorand/node/betanetdata...
Installing new binary files...
Installing new data files into /Users/algorand/node/betanetdata...
Copying genesis files locally
Checking for new ledger in /Users/algorand/node/betanetdata
Cannot read genesis file /Users/algorand/node/betanetdata/genesis.json: open /Users/algorand/node/betanetdata/genesis.json: no such file or directory
Installing genesis files for network betanet
New genesis ID, resetting wallets
New Ledger - restoring genesis accounts in /Users/algorand/node/betanetdata
New Ledger - importing rootkeys for genesis accounts
Imported 0 keys
Applying migration fixups...
Deleting existing log files in /Users/algorand/node/betanetdata
Install complete - restart node manually
Start your BetaNet network
$ goal node start -d betanetdata
Then check the status:
$ goal node status -d betanetdata
Your output should look similar to this showing the genesis id for BetaNet.
Last committed block: 15954
Time since last block: 0.1s
Sync Time: 329.6s
Last consensus protocol: https://github.com/algorand/spec/tree/a26ed78ed8f834e2b9ccb6eb7d3ee9f629a6e622
Next consensus protocol: https://github.com/algorand/spec/tree/22726c9dcd12d9cddce4a8bd7e8ccaa707f74101
Round for next consensus protocol: 20001
Next consensus protocol supported: true
Genesis ID: betanet-v1.0
Genesis hash: mFgazF+2uRS1tMiL9dsj01hJGySEmPN28B/TjjvpVW0=
2. Updating BetaNet
To update your existing BetaNet, from your node directory run these commands.
$ goal node stop -d betanetdata
Run update:
$ ./update.sh -d betanetdata
Start your BetaNet network
$ goal node start -d betanetdata
Then check the status:
$ goal node status -d betanetdata
Your output should show the genesis ID and hash for BetaNet.
3. Find Your REST Endpoint’s IP Address
To see which networks that are currently running use this command.
$ ps aux | grep algod
Your output should look something like this
Russ              6321   0.0  0.0  4287756    752 s001  S+    5:52PM   0:00.00 grep algod
Russ              4861   0.0  0.1  4441404  21700 s001  S     5:24PM   0:00.75 /Users/algorand/node/algod -d betanetdata
Use these endpoints in your application to access your BetaNet node. These are the values you would use in SDK and REST API calls.
Your REST Endpoint IP address is here:
$ cat ~/node/betanetdata/algod.net
Sample Output
127.0.0.1:8080
Your algod token (required by your application to authenticate against algod) is here:
cat ~/node/betanetdata/algod.token
Sample Output
9ce1c64801d2c9e97162b567a72fe258c64cee2f6db7cf9f3235176642449ffa
4. Switch Networks
Your betanetdata folder should be automatically pointing to the BetaNet Network from the update script you executed in Step 1.
If you wish to switch networks using the same data folder, you need to replace the genesis files in that data folder. On a new node, the default is to MainNet.
Verify which network your Data folder is pointing to by running these commands. If you just created a node it will display MainNet.
$ goal node start -d data
$ goal node status -d data
Output
Last committed block: 2031
Time since last block: 0.5s
Sync Time: 14.6s
Last consensus protocol: https://github.com/algorandfoundation/specs/tree/5615adc36bad610c7f165fa2967f4ecfa75125f0
Next consensus protocol: https://github.com/algorandfoundation/specs/tree/5615adc36bad610c7f165fa2967f4ecfa75125f0
Round for next consensus protocol: 2032
Next consensus protocol supported: true
Genesis ID: mainnet-v1.0
Genesis hash: wGHE2Pwdvd7S12BL5FaOP20EGYesN73ktiC1qzkkit8=
Russ-MacBook-Pro-2:node Russ$
To switch from MainNet to TestNet use these commands to have the data folder point to TestNet.
$ goal node stop -d data
Copy genesis.json from the genesisfiles/testnet directory to the data directory.
$ cp genesisfiles/testnet/genesis.json data/
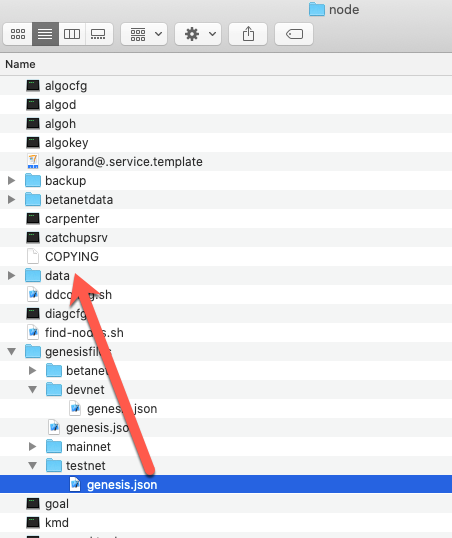
Figure 4-0 Copy genesis.json from testnet directory to the data directory
$ goal node start -d data
$ goal node status -d data
Output should look similar to this showing TestNet.
Next consensus protocol supported: true
Genesis ID: testnet-v1.0
Genesis hash: SGO1GKSzyE7IEPItTxCByw9x8FmnrCDexi9/cOUJOiI=
Note
See this link for Debian or RPM installs.
Note
To run multiple networks at the same time multiple data directories are required.
5. Configure Node
If you wish to make custom config settings in your BetaNet configuration, such as isIndexerActive or Archival run these commands below.
For the BetaNet network, when installing a new node or relay, make the following modification to the config.json file located in the node’s data directory. First, if there is not a config.json, make a copy of the config.json.example file.
$ goal node stop -d betanetdata
$ cd betanetdata
$ cp config.json.example config.json
Then edit the config.json file and replace algorand on the line
"DNSBootstrapID": "<network>.algorand.network",
with algodev
"DNSBootstrapID": "<network>.algodev.network",
This modification to the DNSBootstrapID is only required for the BetaNet network.
Also, you may need to replaced the port number on the EndpointAddress to match what you have in your algod.net file.
"EndpointAddress": "127.0.0.1:54746"
Restart the node
$ goal node start -d betanetdata
$ goal node status -d betanetdata
And you will see the Genesis ID equal to betanet
Note
This will take a while to sync so when the sync-time is consistently 0 then you are synced and will be able to transactions. You can create wallet accounts and standalone accounts immediately however. And you can dispense algos to those accounts using the new BetaNet dispenser, but they may not show up until the node is synced.
6. Create BetaNet Accounts
Use these commands to create accounts using goal. Accounts created in goal require a wallet. See this link for creating standalone accounts.
$ goal wallet new MyWallet -d betanetdata
Output
Please choose a password for wallet 'MyWallet':
Please confirm the password:
Creating wallet...
Created wallet 'MyWallet'
Your new wallet has a backup phrase that can be used for recovery.
Keeping this backup phrase safe is extremely important.
Would you like to see it now? (Y/n): y
Your backup phrase is printed below.
Keep this information safe -- never share it with anyone!

knock gaze toy kidney economy curious slide identify charge slim cargo transfer novel couple wine learn ceiling club volcano glass update industry nice absent drive
Set default wallet:
$ goal wallet -f MyWallet -d betanetdata
Output
Set wallet 'MyWallet' to be the default wallet
Create a new account
$ goal account new -d betanetdata
Output
Please enter the password for wallet 'MyWallet':
Created new account with address FMRGZC6WZY3I6R7QDAUEOHTAWOTAN3K65GOHIY53HMQ3DDJWWYPLO3GCPY
List accounts:
$ goal account list -d betanetdata
Output
Please enter the password for wallet 'MyWallet':
[offline]   Unnamed-0   FMRGZC6WZY3I6R7QDAUEOHTAWOTAN3K65GOHIY53HMQ3DDJWWYPLO3GCPY  0 microAlgos    *Default
7. Create Accounts Using SDKs
To create accounts using the SDKs see these links using node values from Step 3.
Create accounts in JavaScript
Create accounts in Java
Create accounts in Go
Create accounts in Python
8. Dispense Funds
To dispense funds to BetaNet accounts you can use the BetaNet dispenser.
9. Explore BetaNet
To explore BetaNet you can use the BetaNet AlgoExplorer.