
Access BetaNet Network using Sandbox
This tutorial describes how to access the BetaNet network using Sandbox. It also covers how to switch between networks and create BetaNet accounts, Also covered is how to dispense funds using the BetaNet dispenser and view the results with a BetaNet explorer.
By default, an Algorand Sandbox installation is configured to run on TestNet. For most users, this is the desired outcome. Developers, however, need access to BetaNet networks sometimes when testing new features which may not be on TestNet yet.
Learn More
Accessing BetaNet with Purestake tutorial or using your own node.
Workspace setup for sandbox documentation.

 goal
goal
Requirements
- The Algorand Sandbox supports BetaNet, and is the preferred approach for BetaNet and TestNet development.
Background
BetaNet is where new protocol-level features are released for initial testing. Therefore, quality and features may not be final, and protocol upgrades and network restarts are common.
The TestNet protocol mirrors MainNet at all times, although without Algos or other assets carrying real value. As such, developers can confidently view TestNet as a stable and public testing ground for their applications before deploying them to MainNet.
BetaNet, TestNet and MainNet facilitate the use of private networks . Private Networks allow for greater control and isolation of your development environment.
Using the Sandbox facilitates an immediate synchronized node, so there is no waiting for node sync. The sandbox can only be used for BetaNet and TestNet and is a development only tool. The Sandbox can be run on Windows, Mac and Linux machines. All the tools are available for goal CLI and SDK usage.
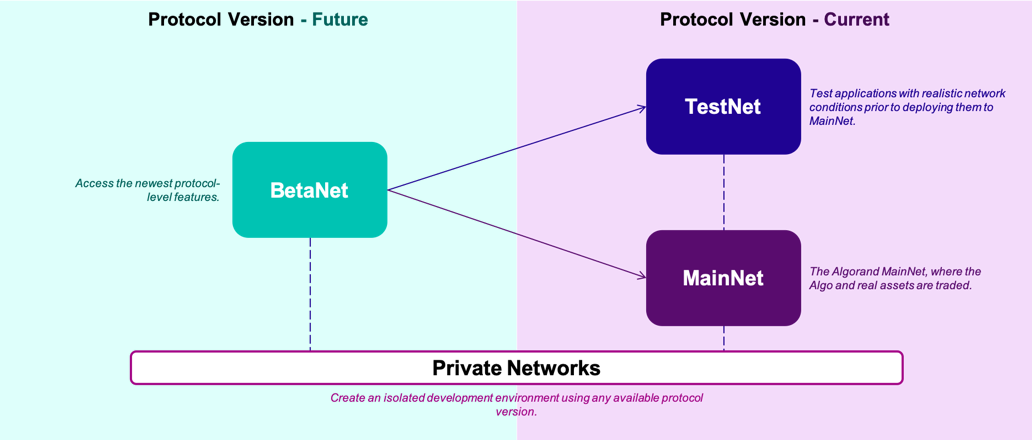
Figure 0-0 BetaNet, TestNet and MainNet
Learn More
- Algorand GOAL CLI
Steps
1. Running BetaNet for the First Time
The quickest method to access BetaNet is to use the Algorand Sandbox. Use this command from the Sandbox
$ ./sandbox up betanet
Enter this command to get a node status
$ ./sandbox goal node status
The genesis ID and hash as BetaNet. Output should look similar to this…
Last committed block: 2906669
Time since last block: 0.0s
Sync Time: 0.0s
Last consensus protocol: https://github.com/algorandfoundation/specs/tree/e5f565421d720c6f75cdd186f7098495caf9101f
Next consensus protocol: https://github.com/algorandfoundation/specs/tree/e5f565421d720c6f75cdd186f7098495caf9101f
Round for next consensus protocol: 2906670
Next consensus protocol supported: true
Genesis ID: betanet-v1.0
Genesis hash: mFgazF+2uRS1tMiL9dsj01hJGySEmPN28B/TjjvpVW0=
2. Updating BetaNet
To update your existing BetaNet, from your sandbox directory run these commands. The BetaNet data directory will be reset.
$ ./sandbox clean
$ ./sandbox up betanet
$ ./sandbox goal node status
Your output should show the genesis ID and hash for BetaNet.
3. Find Your REST Endpoint’s IP Address
Here are the REST endpoints for Sandbox.
algod:
address: http://localhost:4001
token: aaaaaaaaaaaaaaaaaaaaaaaaaaaaaaaaaaaaaaaaaaaaaaaaaaaaaaaaaaaaaaaa

kmd:
address: http://localhost:4002
token: aaaaaaaaaaaaaaaaaaaaaaaaaaaaaaaaaaaaaaaaaaaaaaaaaaaaaaaaaaaaaaaa
4. Switch Networks
Your data folder should be automatically pointing to the BetaNet Network from Step 1 running this command:
./sandbox up betanet
Warning
The data directory is always wiped out using Sandbox when the container is reloaded. To switch to TestNet from BetaNet, you will loose your TestNet data folder. Similarly, to switch to BetaNet from TestNet, you will loose your BetaNet data folder.
When switching you will see a y/n prompt when switching from BetaNet to TestNet when using ./sandbox up testnet when in BetaNet mode and vice versa. If you wish to switch from BetaNet to TestNet, reset your Sandbox environment using these commands:
$ ./sandbox clean
$ ./sandbox up testnet
Note
To run multiple networks at the same time, multiple data directories are required.
5. Configure Node
If you wish to make custom config settings in your BetaNet configuration, such as isIndexerActive or Archival edit the config.json file in the data folder.
For the BetaNet network, sandbox automatically creates a config.json file located in the node’s data directory.
To view the contents of config.json, from the Sandbox folder type in:
$ cat data/config.json
You should see the Endpoint address and DNSBootstapID values. “DNSBootstrapID”: “<network>.algodev.network” is used for BetaNet.
{
  "EndpointAddress": ":4001",
  "DNSBootstrapID": "<network>.algodev.network"
}
6. Create BetaNet Accounts
Use these commands to create accounts using goal. Accounts created in goal require a wallet. See this link for creating standalone accounts.
$ ./sandbox goal wallet new MyWallet
$ ./sandbox goal wallet -f MyWallet
$ ./sandbox goal account new
$ ./sandbox goal account list
So for example:
Input
$ ./sandbox goal wallet new MyWalletPlease
Output
Please choose a password for wallet 'MyWallet':
Please confirm the password:
Creating wallet...
Created wallet 'MyWallet'
Your new wallet has a backup phrase that can be used for recovery.
Keeping this backup phrase safe is extremely important.
Would you like to see it now? (Y/n): y
Your backup phrase is printed below.
Keep this information safe -- never share it with anyone!

mix shoe obvious hazard giant unit possible confirm wall hat lumber lizard issue enjoy kangaroo fever couch sketch feed number caught assume catch absorb hospital
Input
$ ./sandbox goal wallet -f MyWallet
Output
Set wallet 'MyWallet' to be the default wallet
Input
$ ./sandbox goal account new
Output
Please enter the password for wallet 'MyWallet':
Created new account with address Q45NLHEP4XSEZB6BF72QMVYR6NPSST5JEY7XMMDYOQBXVO4VIKVJ3GFUCE
Input
$ ./sandbox goal account list
Output
[offline] Unnamed-0 Q45NLHEP4XSEZB6BF72QMVYR6NPSST5JEY7XMMDYOQBXVO4VIKVJ3GFUCE 0 microAlgos *Default
7. Create Accounts Using SDKs
To create accounts using the SDKs see these links using values from Step 3.
Create accounts in JavaScript
Create accounts in Java
Create accounts in Go
Create accounts in Python
8. Dispense Funds
To dispense funds to BetaNet accounts you can use the BetaNet dispenser.
9. Explore BetaNet
To explore BetaNet you can use the BetaNet AlgoExplorer.