Rekeying
Overview
Rekeying is a powerful protocol feature which enables an Algorand account holder to maintain a static public address while dynamically rotating the authoritative private spending key(s). This is accomplished by issuing a "rekey-to transaction" which sets the authorized address field within the account object. Future transaction authorization using the account's public address must be provided by the spending key(s) associated with the authorized address which may be a single key address, MultiSig address or LogicSig program address. Key management is an important concept to understand and Algorand provides tools to accomplish relevant tasks securely.
Quick start videos
If you prefer videos, take a look at this 4 minute guide to Learn About Algorand Account Rekeying.
Info
The term "spending key(s)" is used throughout this document to signify that generally either a single key or a set of keys from a MultiSig account may authorize from a given public address. The address itself cannot distinguish how many spending keys are specifically required.
Warning
Using the --close-to parameter on any transaction from a rekeyed account will remove the auth-addr field, thus reverting signing authority to the original address. The --close-to parameter should be used with caution by keyholder(s) of auth-addr as the effects remove their authority to access this account thereafter.
Warning
Rekeying an account affects the authorizing address for that account only. Note that an Account is distinct from an address so there are several important points that may not be obvious:
1) If an account is closed (balance to 0) the rekey setting is lost (see previous warning).
2) Rekeys are not recursively resolved, that is, if A is rekeyed to B and B rekeyed to C, A will have it's transactions authorized by B not C.
3) Rekeying members of a Multisig has no effect on the Multisig authorization since it's composed of Addresses not accounts. If necessary the Multisig account would need to be rekeyed itself.
Account Review
The account overview page introduces keys, addresses and accounts. During initial account generation, a public key and corresponding private spending key are created and used to derive the Algorand address. This public address is commonly displayed within wallet software and remains static for each account. When you receive Algos or other assets, they will be sent to your public Algorand address. When you send from your account, the transaction must be authorized using the appropriate private spending key(s).
Authorized Addresses
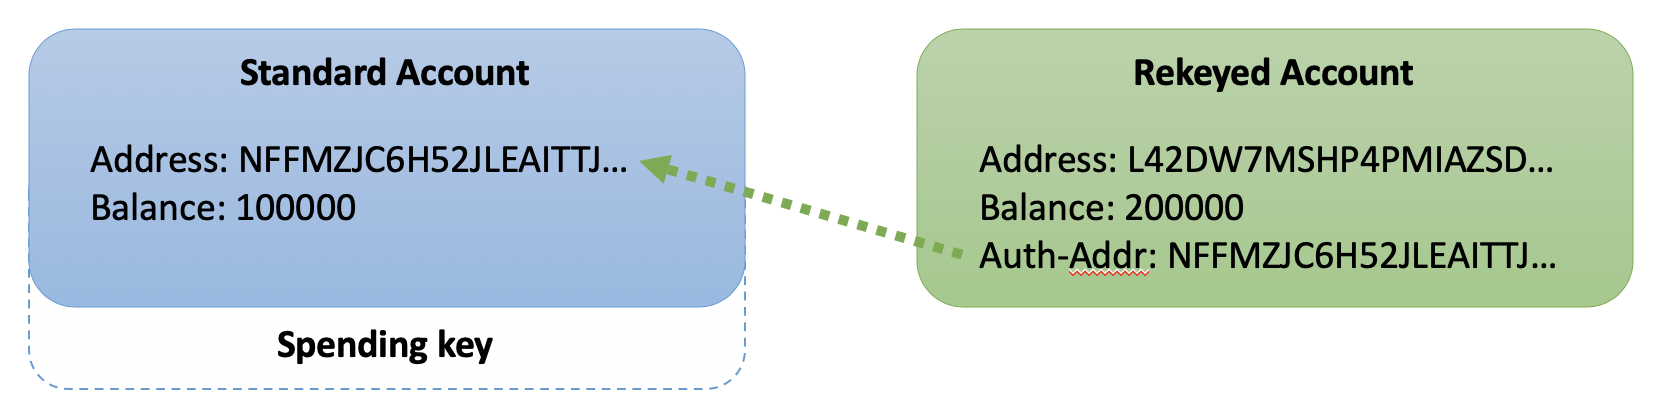
The balance record of every account includes the "auth-addr" field which, when populated, defines the required authorized address to be evaluated during transaction validation. Initially, the "auth-addr" field is implicitly set to the account's "address" field and the only valid private spending key is the one created during account generation. To conserve resources, the "auth-addr" field is only stored and displayed after an authorized rekey-to transaction is confirmed by the network.
Conceptually illustrated in the image below, a "standard" account uses its private spending key to authorize from its public address. A "rekeyed" account defines the authorized address which references a distinct "foreign" address and thus requires the private spending key(s) thereof to authorize future transactions.
Standard Account
Use the following code sample to view a standard account on BetaNet:
goal account dump --address NFFMZJC6H52JLEAITTJ7OIML3XCJFKIRXYRJLO4WLWIJZB7N6CTWESRAZU
Response:
{
  "addr": "NFFMZJC6H52JLEAITTJ7OIML3XCJFKIRXYRJLO4WLWIJZB7N6CTWESRAZU",
  "algo": 100000,
  [...]
}
Rekeyed Account
Next, modify your command slightly to display results for this rekeyed account: L42DW7MSHP4PMIAZSDAXYTZVHTE756KGXCJYGFKCET5XHIAWLBYYNSMZQU.
Response:
{
  "addr": "L42DW7MSHP4PMIAZSDAXYTZVHTE756KGXCJYGFKCET5XHIAWLBYYNSMZQU",
  "algo": 100000,
  "spend": "NFFMZJC6H52JLEAITTJ7OIML3XCJFKIRXYRJLO4WLWIJZB7N6CTWESRAZU",
  [...]
}
This response includes the addition of the "spend" field. This is the "auth-addr" within the account object and signifies any transactions from L42DW7MSHP4PMIAZSDAXYTZVHTE756KGXCJYGFKCET5XHIAWLBYYNSMZQU must now be authorized by NFFMZJC6H52JLEAITTJ7OIML3XCJFKIRXYRJLO4WLWIJZB7N6CTWESRAZU to be confirmed by the network.
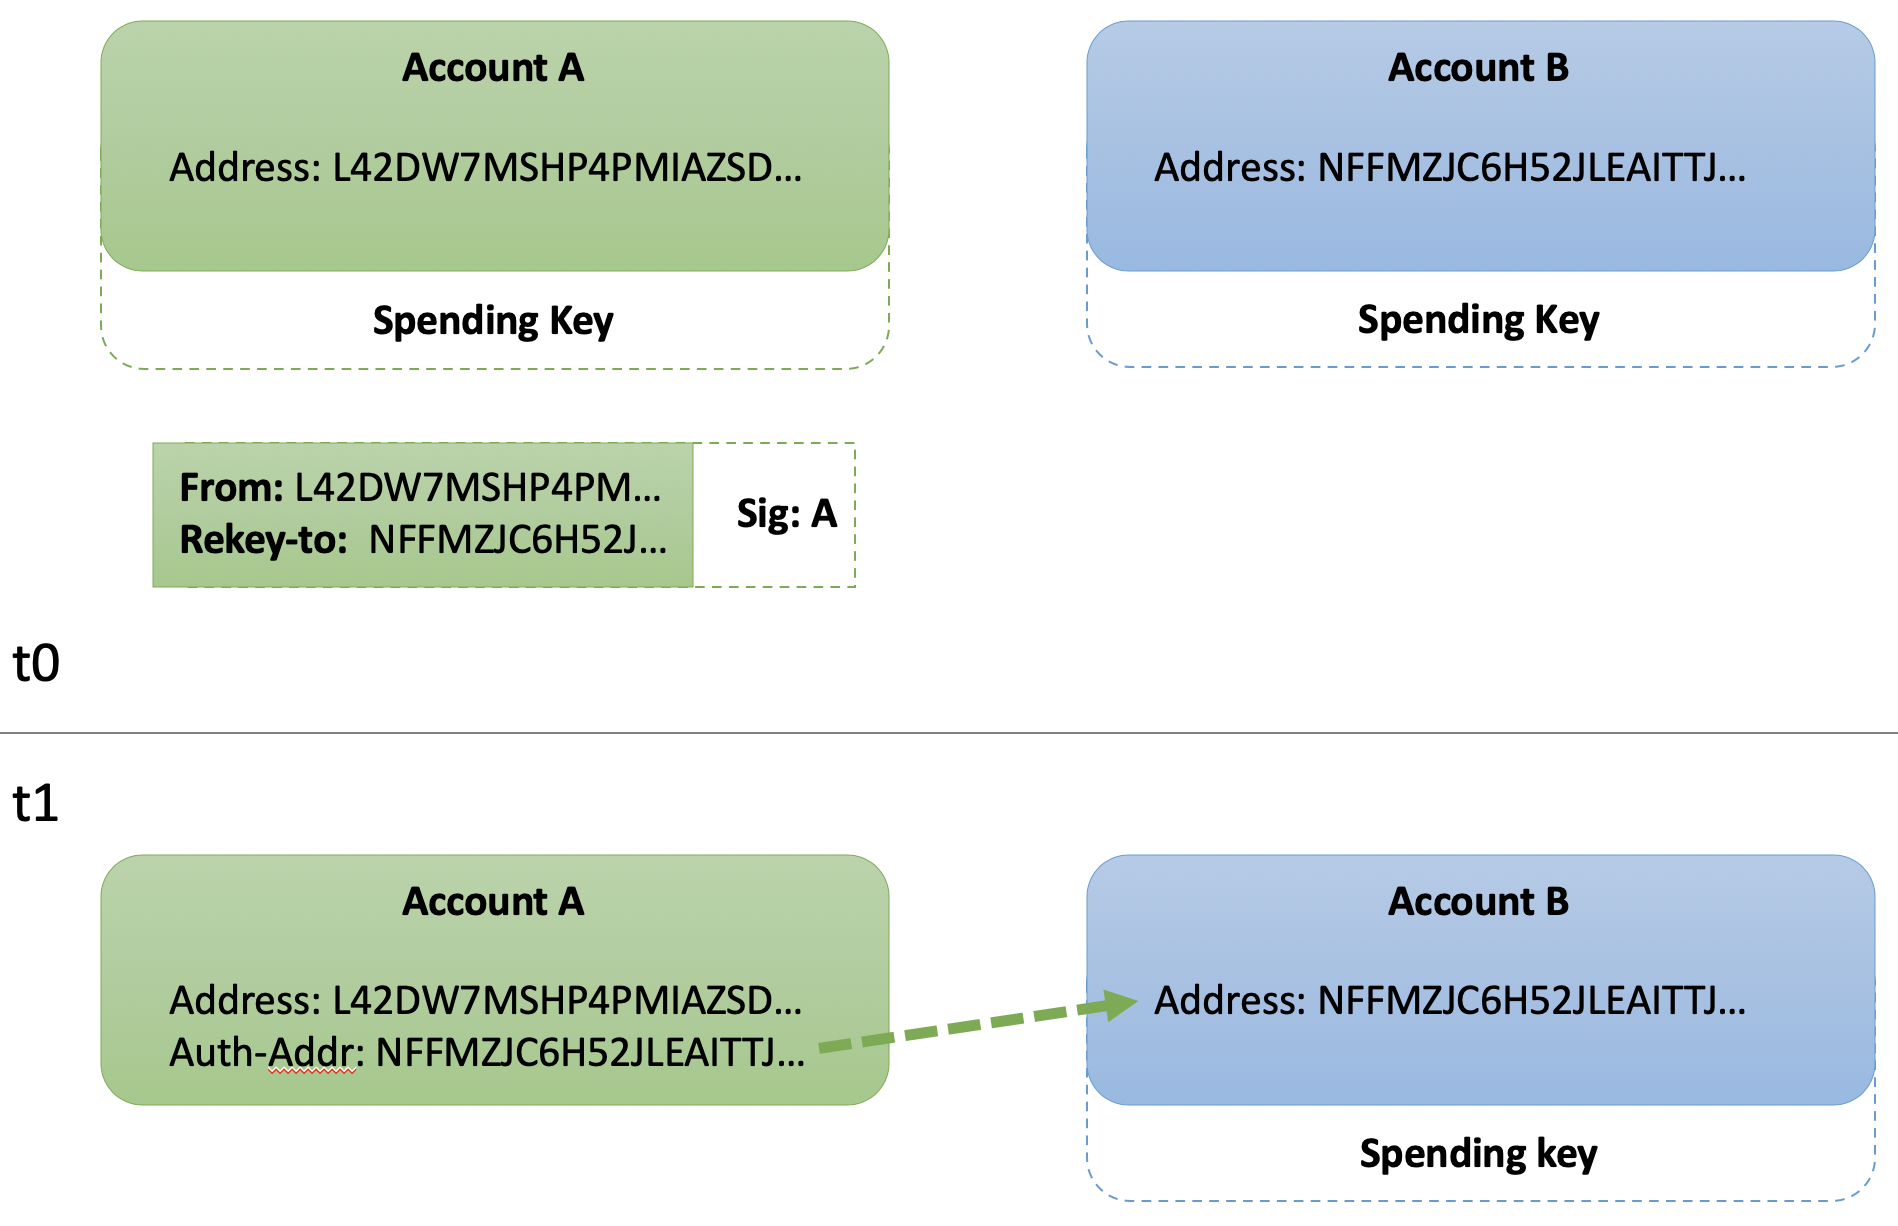
Rekey-to Transaction
A rekey-to transaction is a transaction which includes the rekey-to parameter set to a well-formed Algorand address. Authorization for this transaction must be provided by the existing authorized address. As shown in the first example account above, the authorized address is implicitly the "addr" field of this account even though the "auth-addr" field is not explicitly defined. Only the private spending key of this "addr" address may be used to authorize a rekey-to transaction.
The rekey-to transaction workflow is as follows:
- Construct a transaction which specifies an address for the
rekey-toparameter - Add required signature(s) from the current authorized address
- Send and confirm the transaction on the network
Construct Transaction
The following commands will construct an unsigned transaction file rekey.txn and inspect the contents:
goal clerk send --from L42DW7MSHP4PMIAZSDAXYTZVHTE756KGXCJYGFKCET5XHIAWLBYYNSMZQU \
                  --to L42DW7MSHP4PMIAZSDAXYTZVHTE756KGXCJYGFKCET5XHIAWLBYYNSMZQU \
                  --amount 0 \
                  --rekey-to NFFMZJC6H52JLEAITTJ7OIML3XCJFKIRXYRJLO4WLWIJZB7N6CTWESRAZU \
                  --out rekey.txn
goal clerk inspect rekey.txn
Response:
rekey.txn[0]
{
  "txn": {
    "fee": 1000,
    "fv": 4921687,
    "gen": "betanet-v1.0",
    "gh": "mFgazF+2uRS1tMiL9dsj01hJGySEmPN28B/TjjvpVW0=",
    "lv": 4922687,
    "note": "bbD6hjNZNdg=",
    "rcv": "L42DW7MSHP4PMIAZSDAXYTZVHTE756KGXCJYGFKCET5XHIAWLBYYNSMZQU",
    "rekey": "NFFMZJC6H52JLEAITTJ7OIML3XCJFKIRXYRJLO4WLWIJZB7N6CTWESRAZU",
    "snd": "L42DW7MSHP4PMIAZSDAXYTZVHTE756KGXCJYGFKCET5XHIAWLBYYNSMZQU",
    "type": "pay"
  }
}
Construction of the rekey-to transaction includes the rekey-to parameter and the value "NFFMZJC6H52JLEAITTJ7OIML3XCJFKIRXYRJLO4WLWIJZB7N6CTWESRAZU". Notice the resulting unsigned transaction output includes the "rekey" field and this value.
Add Authorized Signature(s)
Adding the current authorized signature(s) to a rekey-to transaction is required prior to sending to the network for confirmation. The "snd" field provides the address to the account object where the "auth-addr" field is defined.
Info
Examples provided below demonstrate the commands in detail and allow you to rekey accounts in various scenarios.
Send and Confirm
Once all of the required signatures are gathered into a single signed transaction, it may be sent to the network for confirmation. The result for the sample account is:
{
  "addr": "L42DW7MSHP4PMIAZSDAXYTZVHTE756KGXCJYGFKCET5XHIAWLBYYNSMZQU",
  "algo": 100000,
  "spend": "NFFMZJC6H52JLEAITTJ7OIML3XCJFKIRXYRJLO4WLWIJZB7N6CTWESRAZU",
  [...]
}
Conclusion
The result of a confirmed rekey-to transaction will be the "auth-addr" field of the account object is defined, modified or removed. Defining or modifying means only the private spending key(s) of the corresponding authorized address may authorize future transactions for this public address. Removing the "auth-addr" field is really an explicit assignment of the authorized address back to the "addr" field of the account object (observed implicitly because the field is not displayed).
The "auth-addr" may be specified within a rekey-to transaction as a distinct foreign address representing a single key address, MultiSig address or LogicSig program address to provide maximum flexibility in key management options.
Warning
The protocol does not validate control of the required spending key(s) associated with the authorized address defined by --rekey-to parameter when the rekey-to transaction is sent. This is by design and affords additional privacy features to the new authorized address. It is incumbent upon the user to ensure proper key management practices and --rekey-to assignments.
Use Case Scenarios
Info
Below are a series of potential use cases for rekeying various accounts.
1 - Rekey to Single Address
The first scenario rekeys a single key account with address "A" to a distinct single key account with address "B". This requires two single key accounts at time t0. The result from time t1 is transactions for address "A" must be authorized by address "B".
Generate and Fund Accounts
Refer to the Getting Started guide to learn how to generate two accounts and fund their respective address from the Faucet. This example uses the following public addresses:
  ADDR_A="UGAGADYHIUGFGRBEPHXRFI6Z73HUFZ25QP32P5FV4H6B3H3DS2JII5ZF3Q"
  ADDR_B="LOWE5DE25WOXZB643JSNWPE6MGIJNBLRPU2RBAVUNI4ZU22E3N7PHYYHSY"
View the initial authorized address for Account A using goal:
goal account dump --address $ADDR_A
Response:
{
  "addr": "UGAGADYHIUGFGRBEPHXRFI6Z73HUFZ25QP32P5FV4H6B3H3DS2JII5ZF3Q",
  "algo": 100000,
  [...]
}
Implicitly, the authorized address is the defined as the "addr" field displayed here.
Rekey to Single Address
Account A intends to rekey its authorized address to $ADDR_B which is the public address of Account "B". This can be accomplished in a single goal command:
goal clerk send --from $ADDR_A --to $ADDR_A --amount 0 --rekey-to $ADDR_B
Results of goal account dump --address $ADDR_A will now display:
{
  "addr": "UGAGADYHIUGFGRBEPHXRFI6Z73HUFZ25QP32P5FV4H6B3H3DS2JII5ZF3Q",
  "algo": 199000,
  [...]
  "spend": "LOWE5DE25WOXZB643JSNWPE6MGIJNBLRPU2RBAVUNI4ZU22E3N7PHYYHSY"
}
The populated "spend" field instructs the validation protocol to only approve transactions for this account object when authorized by the spending key(s) of that address. Validators will ignore all other attempted authorizations, including those from the public address defined in the "addr" field.
TEST: Send with Auth A
The following transaction will fail because, by default, goal attempts to add the authorization using the --from parameter. However, the protocol will reject this because it is expecting the authorization from $ADDR_B due to the confirmed rekeying transaction above.
goal clerk send --from $ADDR_A --to $ADDR_B --amount 100000
Send from Authorized Address
Sending from the authorized address of Account "A" requires:
- Construct an unsigned transaction from
$ADDR_A - Sign using authorized address
$ADDR_B - Send authorized transaction
Construct Unsigned Transaction
First, construct an unsigned transaction using goal with the --outfile flag to write the unsigned transction to a file:
goal clerk send --from $ADDR_A --to $ADDR_B --amount 100000 --out send-single.txn
Sign Using Authorized Address
Next, locate the wallet containing the private spending key for Account "B". The goal clerk sign command provides the flag --signer which allows specifying the proper required authorized address $ADDR_B. Notice the infile flag reads in the unsigned transaction file from above and the --outfile flag writes the signed transaction to a separate file.
goal clerk sign --signer $ADDR_B --infile send-single.txn --outfile send-single.stxn
TEST: Send with Auth B
Finally, send the the signed transaction file using goal:
goal clerk rawsend --filename send-single.stxn
This will succeed, sending the 100000 microAlgos from $ADDR_A to $ADDR_B using the private spending key of Account "B".
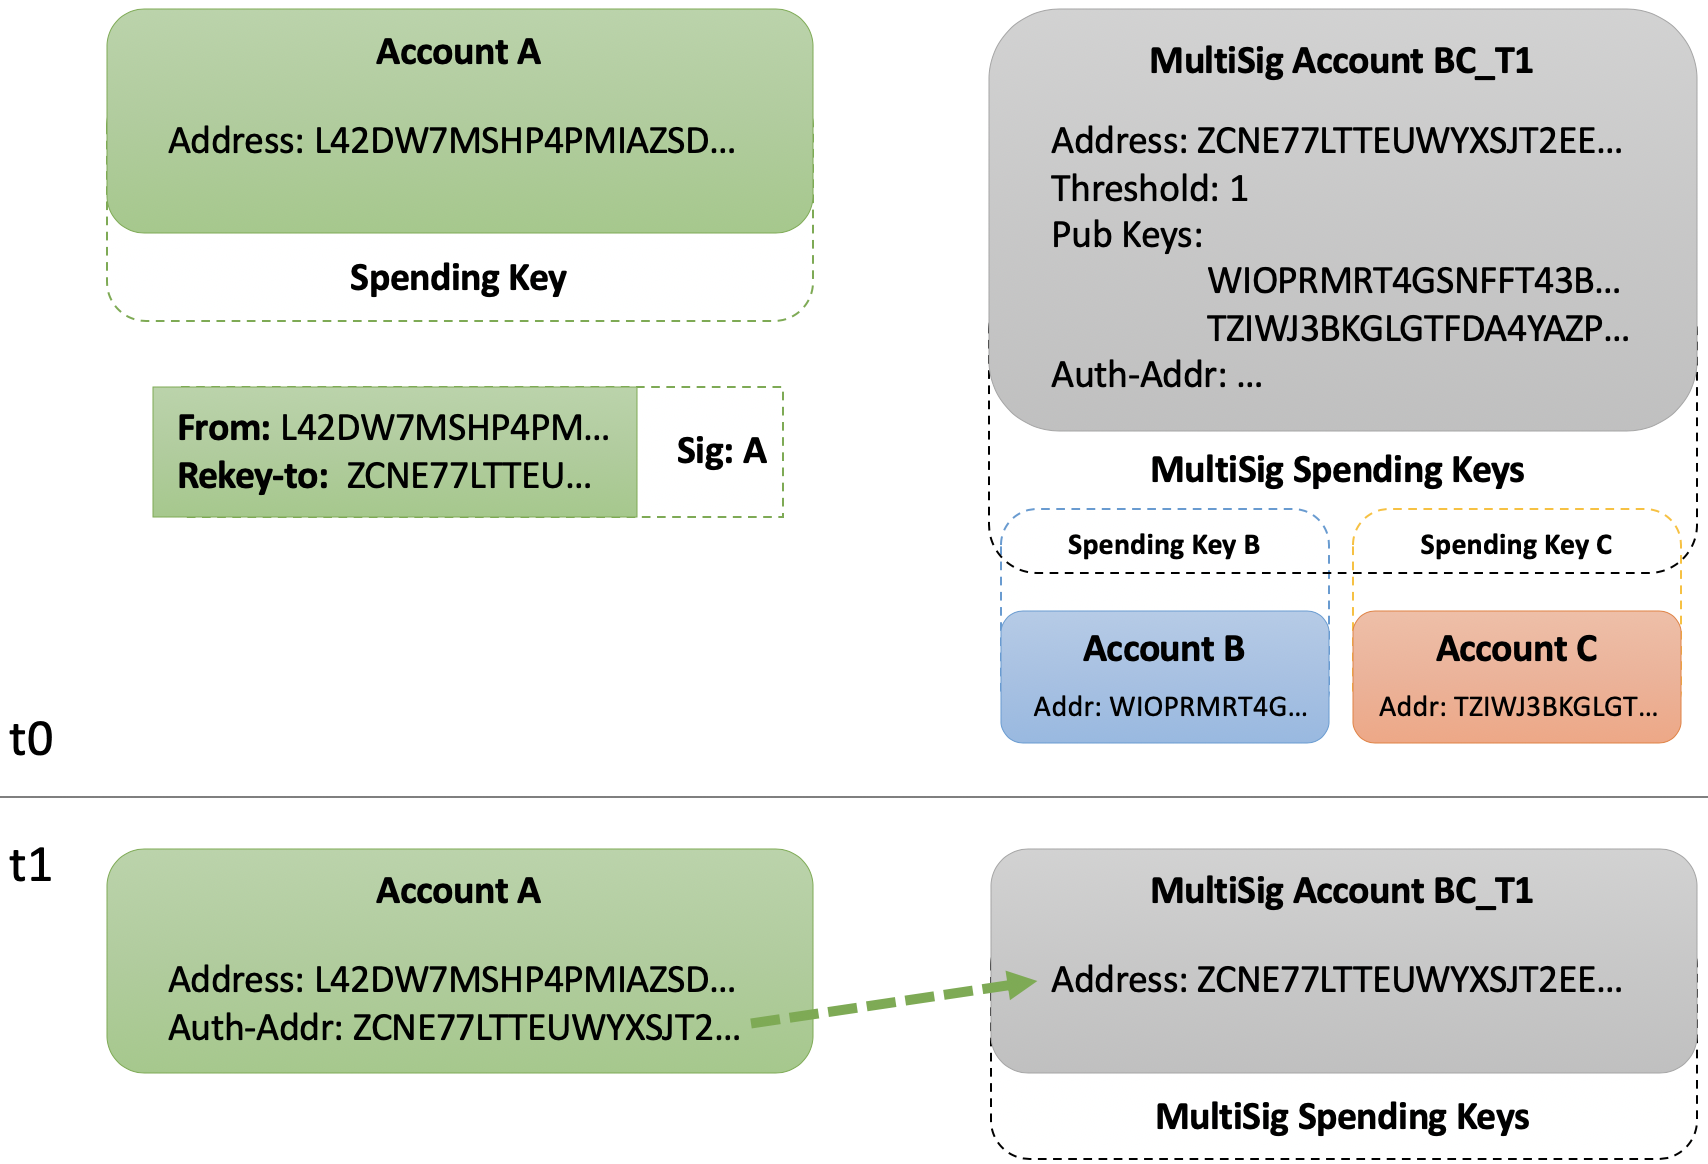
2 - Rekey to MultiSig Address
The second scenario rekeys a single key account with public address "A" to a MultiSig address "BC_T1". This scenario reuses both Accounts "A" and "B", adds a third Account "C" and creates a MultiSig Account "BC_T1" comprised of addresses "B" and "C" with a threshold of 1. The result will be the private spending key for $ADDR_B or $ADDR_C may authorize transaction from $ADDR_A.
Generate Additional Account
Follow the same procedure as above to generate a third account for use as "C".
Generate New MultiSig Account
Reference the documentation to generate MultiSig account. Ensure it uses both $ADDR_B and the new $ADDR_C with a threshold of 1 (so either "B" or "C" may authorize). Set the resulting account address to the $ADDR_BC_T1 environment variable for use below.
Rekey to MultiSig Address
Recall from scenario 1 that Account "A" has already rekeyed to $ADDR_B.
Construct Unsigned Transaction
The rekey transaction constructed for this scenario requires authorize from $ADDR_B.
goal clerk send --from $ADDR_A --to $ADDR_A --amount 0 --rekey-to $ADDR_BC_T1 --out rekey-multisig.txn
Sign Rekey Transaction
goal clerk sign --signer $ADDR_B --infile rekey-multisig.txn --outfile rekey-multisig.stxn
Send and Confirm Rekey to MultiSig
goal clerk rawsend --filename rekey-multisig.stxn
goal account dump --address $ADDR_A
The rekey transaction will confirm, resulting in the "spend" field update within the account object:
{
  "addr": "UGAGADYHIUGFGRBEPHXRFI6Z73HUFZ25QP32P5FV4H6B3H3DS2JII5ZF3Q",
  "algo": 199000,
  [...]
  "spend": "NEWMULTISIGADDRESSBCT1..."
}
TEST: Send with Auth BC_T1
Use the established pattern:
- Construct unsigned transaction
- Sign transaction
- Confirm transaction
goal clerk send --from $ADDR_A --to $ADDR_B --amount 100000 --msig-params="1 $ADDR_B $ADDR_C" --out send-multisig-bct1.txn
goal clerk multisig sign --tx send-multisig-bct1.txn --address $ADDR_C
goal clerk rawsend --filename send-multisig-bct1.txn
This transaction will succeed as private spending key for $ADDR_C provided the authorization and meets the threshold requirement for the MultiSig account.
SDK Example:
In the following example Account 1 is rekeyed to Account 2. The code then illustrates that signing a transaction from Account 1 will fail if signed with Account 1's private key and succeed if signed with Account 2's private key.
# Any kind of transaction can contain a rekey
rekey_txn = transaction.PaymentTxn(
    account_1.address, sp, account_1.address, 0, rekey_to=account_2.address
)
signed_rekey = rekey_txn.sign(account_1.private_key)
txid = algod_client.send_transaction(signed_rekey)
result = transaction.wait_for_confirmation(algod_client, txid, 4)
print(f"rekey transaction confirmed in round {result['confirmed-round']}")

# Now we should get an error if we try to submit a transaction
# signed with account_1s private key
expect_err_txn = transaction.PaymentTxn(
    account_1.address, sp, account_1.address, 0
)
signed_expect_err_txn = expect_err_txn.sign(account_1.private_key)
try:
    txid = algod_client.send_transaction(signed_expect_err_txn)
except Exception as e:
    print("Expected error: ", e)

# But its fine if we sign it with the account we rekeyed to
signed_expect_err_txn = expect_err_txn.sign(account_2.private_key)
txid = algod_client.send_transaction(signed_expect_err_txn)
result = transaction.wait_for_confirmation(algod_client, txid, 4)
print(f"transaction confirmed in round {result['confirmed-round']}")

# rekey account1 back to itself so we can actually use it later
rekey_txn = transaction.PaymentTxn(
    account_1.address, sp, account_1.address, 0, rekey_to=account_1.address
)
signed_rekey = rekey_txn.sign(account_2.private_key)
txid = algod_client.send_transaction(signed_rekey)
result = transaction.wait_for_confirmation(algod_client, txid, 4)
print(f"rekey transaction confirmed in round {result['confirmed-round']}")
// rekey the original account to the new signer via a payment transaction
// Note any transaction type can be used to rekey an account
const rekeyTxn = algosdk.makePaymentTxnWithSuggestedParamsFromObject({
  from: acct1.addr,
  to: acct1.addr,
  amount: 0,
  suggestedParams,
  rekeyTo: acct2.addr, // set the rekeyTo field to the new signer
});

await client.sendRawTransaction(rekeyTxn.signTxn(acct1.privateKey)).do();
await algosdk.waitForConfirmation(client, rekeyTxn.txID().toString(), 3);

const acctInfo = await client.accountInformation(acct1.addr).do();

console.log(`Account Info: ${acctInfo} Auth Addr: ${acctInfo['auth-addr']}`);
// Any kind of transaction can contain a rekey, here we use a Payment
// transaction
Transaction rekeyTxn = Transaction.PaymentTransactionBuilder().sender(acct1.getAddress())
                .receiver(acct1.getAddress()).suggestedParams(sp).rekey(acct2.getAddress()).build();
SignedTransaction signedRekeyTxn = acct1.signTransaction(rekeyTxn);
Response<PostTransactionsResponse> resp = algodClient.RawTransaction()
                .rawtxn(Encoder.encodeToMsgPack(signedRekeyTxn)).execute();
ExampleUtils.printTxnResults(algodClient, resp.body(), "rekey");

// Create a transaction to rekey it back
Transaction rekeyBack = Transaction.PaymentTransactionBuilder().sender(acct1.getAddress())
                .receiver(acct1.getAddress()).suggestedParams(sp).rekey(acct1.getAddress()).build();

// note we sign with acct2's key
SignedTransaction signedRekeyBack = acct2.signTransaction(rekeyBack);
Response<PostTransactionsResponse> rekeyBackResponse = algodClient.RawTransaction()
                .rawtxn(Encoder.encodeToMsgPack(signedRekeyBack)).execute();
ExampleUtils.printTxnResults(algodClient, rekeyBackResponse.body(), "rekey back");
sp, err := algodClient.SuggestedParams().Do(context.Background())
if err != nil {
    log.Fatalf("failed to get suggested params: %s", err)
}

addr := acct.Address.String()
// here we create a payment transaction but rekey is valid
// on any transaction type
rktxn, err := transaction.MakePaymentTxn(addr, addr, 0, nil, "", sp)
if err != nil {
    log.Fatalf("failed to creating transaction: %s\n", err)
}
// Set the rekey parameter
rktxn.RekeyTo = rekeyTarget.Address

_, stxn, err := crypto.SignTransaction(acct.PrivateKey, rktxn)
if err != nil {
    fmt.Printf("Failed to sign transaction: %s\n", err)
}

txID, err := algodClient.SendRawTransaction(stxn).Do(context.Background())
if err != nil {
    fmt.Printf("failed to send transaction: %s\n", err)
    return
}

result, err := transaction.WaitForConfirmation(algodClient, txID, 4, context.Background())
if err != nil {
    fmt.Printf("Error waiting for confirmation on txID: %s\n", txID)
    return
}

fmt.Printf("Confirmed Transaction: %s in Round %d\n", txID, result.ConfirmedRound)